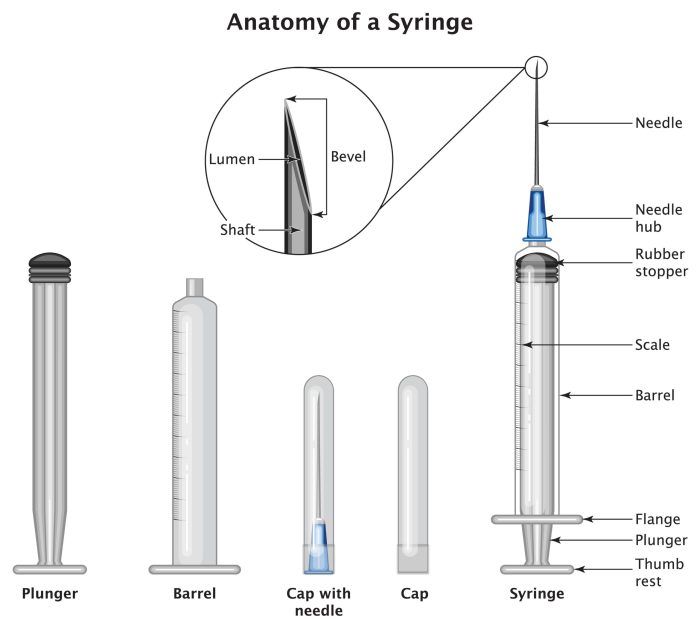
Blog

  • What to Wear to Physical Therapy Your Guide

    What to Wear to Physical Therapy Your Guide

    What to wear to physical therapy is more important than you might think. Choosing the right clothes can significantly impact your comfort, performance, and even your mindset during your sessions. This guide will equip you with the knowledge to select clothing that optimizes your therapy experience, from comfortable fabrics to temperature regulation and specific exercise considerations.

    From choosing breathable fabrics for optimal comfort to considering the type of exercises you’ll be doing, this guide covers everything you need to know. We’ll also explore the importance of inclusive styles and how to find budget-friendly options without sacrificing quality.

    Clothing Comfort and Mobility

    Choosing the right clothing for physical therapy is crucial for maximizing your session’s effectiveness and minimizing discomfort. Appropriate attire supports proper movement, range of motion, and overall well-being during exercises and stretches. The correct fabrics and styles can significantly impact your experience, allowing you to focus on the therapeutic process rather than feeling restricted or uncomfortable.Comfort and mobility are key factors when selecting clothing for physical therapy.

    Fabric choices that prioritize breathability, flexibility, and moisture-wicking properties will contribute to a more comfortable and productive session. Proper clothing can also reduce distractions, allowing you to concentrate on your therapy goals.

    Fabric Selection for Physical Therapy

    Selecting the right fabrics for physical therapy sessions is important for comfort and optimal performance. Breathable fabrics allow air circulation, preventing overheating and maintaining a comfortable temperature. Flexibility in the fabric ensures ease of movement and range of motion during exercises. Moisture-wicking properties draw sweat away from the skin, keeping you dry and comfortable, which is crucial to avoid chafing or skin irritation.

    Types of Clothing for Enhanced Mobility

    Several types of clothing promote ease of movement and range of motion during physical therapy exercises. Loose-fitting garments, such as athletic shorts or leggings, allow for unrestricted movement, enabling a full range of motion during stretches and exercises. Moisture-wicking fabrics like polyester or nylon are excellent choices for their ability to keep you dry and comfortable during intense workouts.

    Consider athletic tops or shirts that are made of similar materials, providing a similar benefit.

    Fabric Comparison for Physical Therapy Attire

    Fabric Type Comfort Mobility Price
    Polyester Good; wicks moisture effectively Excellent; stretchy and flexible Moderate
    Nylon Good; wicks moisture effectively Excellent; durable and supportive Moderate
    Cotton Good; soft and comfortable Fair; can become restrictive when wet Low
    Spandex Excellent; very flexible and stretchy Excellent; allows for great range of motion Moderate to High
    Bamboo Excellent; naturally breathable and soft Good; offers a balance between comfort and mobility Moderate to High

    This table provides a general comparison of common fabric types used in physical therapy attire. Prices can vary depending on the brand and specific design. Factors like comfort, mobility, and the desired level of support should guide your decision-making process.

    Avoiding Restrictive Clothing

    Restrictive clothing can hinder movement and cause discomfort during physical therapy sessions. Tight-fitting clothing, such as jeans or non-stretchy fabrics, can restrict range of motion and impede proper exercise execution. Avoid garments with zippers or tight closures that might rub against the skin or cause discomfort. Opt for clothing that allows for a full range of motion without constricting or binding.

    This will ensure a more productive and comfortable therapy session.

    Temperature Regulation

    What to wear to physical therapy

    Staying comfortable during physical therapy sessions is crucial for optimal performance and recovery. This involves more than just choosing clothes that fit well; temperature regulation plays a vital role. Understanding how clothing affects body temperature, especially during varying exercise intensities and room temperatures, can significantly enhance your therapy experience.Maintaining the right temperature balance during physical therapy helps prevent overheating or chilling, which can impact your body’s ability to heal and perform exercises effectively.

    Proper clothing choices allow you to adapt to the specific needs of each session, ensuring comfort and safety throughout the process.

    Managing Body Temperature in Different Conditions

    The ideal temperature for physical therapy varies depending on the exercise intensity and the surrounding environment. Clothing choices should be tailored to help maintain a comfortable internal body temperature. For example, if the room is cool, layering clothes allows you to adjust to the temperature changes during different parts of the session. Conversely, if the room is warm, lightweight, moisture-wicking fabrics are key to preventing overheating.

    Clothing Options for Different Temperatures

    Different climates and exercise intensities require different clothing approaches. Layers are essential for cold weather. Starting with a moisture-wicking base layer next to the skin, followed by a mid-layer for insulation, and a lightweight, breathable outer layer for protection from wind and rain, allows you to adjust to varying temperatures and exercise intensities. In warmer weather, loose-fitting, breathable fabrics like cotton or linen, in light colors, are excellent choices.

    These fabrics allow air to circulate and help keep you cool.

    Choosing Appropriate Clothing Layers

    The best approach to temperature regulation is layering. This allows you to adjust to changes in temperature and activity level throughout your session.

    Weather Condition Base Layer Mid Layer Outer Layer
    Cool/Chilly Moisture-wicking thermal top and bottom Fleece jacket or sweater Light waterproof or windbreaker jacket
    Warm/Mild Moisture-wicking t-shirt or tank top Lightweight long-sleeved shirt or jacket Light, breathable jacket or light vest
    Hot/Humid Moisture-wicking athletic shirt or tank top Lightweight athletic shirt or singlet Loose-fitting, breathable shorts or pants

    Practical Considerations for Specific Exercises

    Choosing the right clothing for your physical therapy sessions is crucial for optimal performance and safety. Beyond comfort and temperature regulation, the type of exercise you’re performing dictates specific clothing needs. Consideration of these factors can enhance your therapy experience and ensure a safe and effective treatment plan.Understanding the specific requirements for different exercises, from gentle stretching to intense strength training, is essential for maximizing the benefits of your physical therapy.

    This allows for greater ease of movement, reduces the risk of injury, and ensures proper hygiene during each session.

    Clothing for Stretching

    Stretching exercises require clothing that allows for a full range of motion without restriction. Loose-fitting fabrics like breathable cotton or athletic wear with good flexibility are ideal. Avoid restrictive clothing that might impede your movement or cause discomfort during stretches. This can lead to muscle strain or tears if the clothing limits movement. Proper stretching attire enables a full range of motion, reducing the risk of injury.

    Clothing for Strength Training

    Strength training exercises demand clothing that offers support and stability while allowing for free movement. Moisture-wicking fabrics, like polyester or nylon, are recommended to keep you dry and comfortable during intense workouts. Consider athletic shorts or leggings that provide adequate support for your muscles without restricting movement. Choosing the right clothing can prevent injuries and improve performance during strength training sessions.

    Clothing for Aquatic Therapy

    Aquatic therapy, often performed in pools or water tanks, necessitates specialized clothing. Swimsuits or athletic clothing designed for water activities are crucial for safety and comfort. These suits usually provide excellent buoyancy and prevent the risk of slipping or getting caught on equipment. The fabric should be water-resistant to maintain dryness and prevent discomfort.

    Clothing for Safety and Hygiene

    Safety and hygiene are paramount during physical therapy sessions. Clothing should not contain loose threads or materials that could get caught on equipment. For example, avoid clothing with loose zippers or long, dangling straps. Fabric should be free of any sharp or rough edges that might cause irritation to the skin. This is important to prevent skin abrasions or discomfort.

    Select clothing that is easy to wash and disinfect to maintain hygiene standards.

    Clothing Selection Table

    Exercise Type Ideal Clothing Type Key Considerations
    Stretching Loose-fitting, breathable fabrics (e.g., cotton, athletic wear) Full range of motion, comfort
    Strength Training Moisture-wicking fabrics (e.g., polyester, nylon), supportive athletic wear Support, stability, dryness
    Aquatic Therapy Swimsuits or water-resistant athletic clothing Buoyancy, water resistance, comfort in water

    Accessibility and Inclusivity

    Choosing the right clothing for physical therapy isn’t just about comfort; it’s about inclusivity and accessibility for everyone. A wide range of body types and needs require adaptable clothing that supports movement and confidence. This section dives into the crucial role of inclusive apparel in physical therapy, ensuring that patients of all sizes and abilities can participate fully and comfortably.Physical therapy should be a journey of empowerment, and accessible clothing plays a significant role in creating that environment.

    Inclusive designs are crucial for patients to feel confident and supported, which in turn promotes a more positive and effective therapy experience.

    Choosing comfortable clothes for physical therapy is key, especially if you’re dealing with conditions like metastatic castration-resistant prostate cancer symptoms. metastatic castration resistant prostate cancer symptoms can sometimes make movement challenging, so opting for loose-fitting, breathable fabrics like cotton or linen is a great idea. You’ll want something that allows for a full range of motion, so avoid anything too restrictive.

    Think athletic wear or comfortable sweatpants – the goal is to feel free and supported, not constricted, during your therapy sessions.

    Importance of Inclusive Clothing Choices, What to wear to physical therapy

    Inclusive clothing choices are vital for patients of diverse body types and needs. A variety of styles and fits are needed to accommodate varying sizes, shapes, and conditions. This allows patients to move freely and comfortably, reducing any potential barriers to their recovery.

    Clothing Styles for Specific Needs

    Several clothing styles can be adjusted or modified to meet specific conditions or requirements. Stretchy, athletic fabrics, for instance, allow for a wide range of movement and are often preferred. Clothing with adjustable features like zippers, elastic waistbands, or Velcro closures can accommodate varying levels of mobility and support.

    Significance for Patients with Mobility Limitations

    Comfortable and accessible clothing is particularly important for patients with mobility limitations. Clothes that are easy to put on and take off, without requiring significant effort, can greatly improve the patient experience. The ease of dressing can directly impact a patient’s independence and self-esteem during the recovery process. For example, patients with limited upper body strength may find clothing with wide necklines or easy-access zippers beneficial.

    So, what to wear to physical therapy? Comfort is key! Loose-fitting clothes that allow for easy movement are best. Thinking about how a plant-based diet might influence longevity, I recently read an interesting article about whether vegans live longer and age better. Do vegans live longer and age better ? Regardless of dietary choices, comfortable, breathable clothing is crucial for a successful therapy session.

    Opt for moisture-wicking fabrics to stay dry and prevent discomfort during exercises.

    Clothing Options for Various Body Types and Sizes

    Body Type/Size Clothing Features Examples
    Petite Short inseams, shorter torso lengths, easy access closures Fitted athletic tops and bottoms with adjustable drawstrings, leggings with smaller sizes.
    Plus Size Roomy fits, stretchy materials, generous sizing Loose-fitting athletic tops and bottoms, clothing with wide necklines and waistbands.
    Activewear with built-in support Supportive materials, adjustable straps Sports bras, compression shirts, and shorts
    Patients with Limited Mobility Easy-to-wear closures, wide necklines, loose fitting garments Clothes with zippers, elastic waistbands, and wide sleeves

    “Inclusive clothing choices are critical for patients of all body types and abilities to feel confident and comfortable during physical therapy.”

    Appearance and Confidence

    Feeling good about yourself can significantly impact your physical therapy journey. Positive self-perception and a sense of comfort in your attire can boost your motivation and engagement in exercises. This, in turn, can accelerate your recovery and overall well-being. When you feel confident and comfortable, you’re more likely to participate actively and enthusiastically in your sessions.Beyond the practical aspects of comfort and mobility, clothing choices play a crucial role in shaping a patient’s mindset.

    A well-chosen outfit can foster a sense of empowerment and readiness to tackle the therapy ahead. Conversely, ill-fitting or uncomfortable clothing can create anxiety and self-consciousness, potentially hindering progress. The right apparel can make all the difference in fostering a positive and encouraging atmosphere.

    Choosing Clothing for a Positive Experience

    Choosing clothing for physical therapy goes beyond simple practicality. It involves considering how your attire impacts your self-image and your overall therapy experience. Select clothing that makes you feel good about yourself, confident, and ready to engage fully in your exercises. This includes factors like fit, fabric, and color choices. Consider how these factors contribute to your self-perception and the environment in which you engage in therapy.

    So, what to wear to physical therapy? Comfort is key! Think loose-fitting, breathable fabrics, like athletic wear. And, while you’re focusing on your recovery, remember that low vitamin D and K levels can sometimes contribute to seasonal depression, which can impact your overall well-being. For more information on how vitamin D and vitamin K can help with seasonal blues, check out this informative article on vitamin d vitamin k for seasonal depression.

    Ultimately, choosing comfortable clothing that allows for easy movement is the best approach for a productive therapy session.

    Style Suggestions for Physical Therapy Wear

    The following table provides style suggestions for physical therapy wear, emphasizing comfort and confidence. Each style option is designed to support a positive and encouraging atmosphere during sessions.

    Style Description Comfort Considerations Confidence Boosting Factors
    Activewear Comprised of stretchy, moisture-wicking fabrics. Excellent movement range, quick-drying to prevent overheating or chilling. Modern, trendy options, allowing you to express your personal style.
    Athletic Leggings or Shorts Tight-fitting but comfortable bottoms. Excellent range of motion, minimizing distractions. Can feel powerful and streamlined.
    Capris or Yoga Pants Slightly loose, allowing for more freedom of movement. Comfortable and flexible, allowing for a wider range of motion. Versatile and stylish, often in a variety of colors and prints.
    Comfortable T-shirts or Tank Tops Simple and soft fabrics. Easy to move in, breathable. A sense of ease and comfort.
    Light and Breathable Sweatshirts or Jackets Suitable for cooler environments or for layering. Breathable and comfortable. Adds an element of warmth and protection.
    Versatile Dress Pants or Shorts Easy to move in, suitable for a variety of exercises. Durable and versatile, suitable for various activities. Can provide a sense of preparedness and professionalism.

    Specific Equipment Considerations: What To Wear To Physical Therapy

    Choosing the right clothing for physical therapy goes beyond comfort and mobility; it significantly impacts the effectiveness and safety of your sessions. Considering the specific equipment used in your therapy, such as weights, resistance bands, or water, is crucial for optimal performance and injury prevention. Proper attire allows for seamless movement and prevents interference with the equipment, ultimately enhancing your overall therapy experience.Effective physical therapy often involves the use of various equipment to target specific muscle groups and improve physical function.

    Therefore, the clothing you wear must accommodate these tools, enabling a full range of motion and preventing discomfort or safety hazards. The appropriate clothing allows you to focus on the therapeutic exercises rather than being distracted by clothing restrictions.

    Clothing for Weights and Resistance Bands

    Selecting clothing suitable for weight training or resistance band exercises is important for unrestricted movement. Fabric that clings or restricts movement can impede your range of motion and potentially cause discomfort. For these types of exercises, loose-fitting, moisture-wicking fabrics are ideal. Avoid clothing with zippers or drawstrings that might snag or cause irritation. Lightweight athletic shorts or leggings paired with a breathable athletic top are generally recommended.

    Clothing for Water Therapy

    Water therapy presents unique considerations for clothing selection. The primary concern is maintaining comfort and safety while in the water. Fabric that holds water can impede mobility and potentially cause discomfort. Moisture-wicking, quick-drying fabrics are essential to prevent chafing and maintain comfort. Swimsuits or athletic shorts and tops designed for water activities are excellent choices for water therapy.

    Avoid clothing that can easily bunch up or get caught on equipment. Lightweight, fast-drying fabrics are crucial to prevent the risk of hypothermia.

    Comparison of Clothing Options

    Therapy Equipment Clothing Recommendation Compatibility Ease of Use
    Weights/Resistance Bands Loose-fitting athletic shorts/leggings, moisture-wicking athletic top Excellent; allows for a full range of motion without restriction High; easy to move and exercise in
    Water Therapy Swimsuit, or moisture-wicking athletic shorts/top designed for water Excellent; allows for freedom of movement in the water High; quick-drying and prevents discomfort

    Hygiene and Maintenance

    What to wear to physical therapy

    Maintaining the cleanliness and hygiene of your physical therapy attire is crucial for preventing infections and ensuring a comfortable and safe therapy experience. Proper care of your clothing also extends the lifespan of your garments, saving you money in the long run. This section details the importance of hygiene in physical therapy clothing and provides practical washing and care instructions.

    Importance of Clean Physical Therapy Clothing

    Physical therapy often involves close contact with equipment and other individuals. Clean clothing minimizes the risk of spreading bacteria or viruses, thereby reducing the likelihood of infections or discomfort. This is particularly important for individuals with weakened immune systems or those undergoing specific therapies that increase susceptibility to infection. The practice of maintaining clean physical therapy attire contributes to a healthier and safer environment for everyone involved in the process.

    Washing and Drying Methods

    Proper washing and drying techniques are vital for maintaining the quality and effectiveness of physical therapy clothing. The type of fabric, the level of activity involved, and the presence of any specific treatments or lotions can influence how to handle clothing items. Following care instructions ensures that the clothing retains its shape, comfort, and longevity, and protects from fading or damage.

    Washing Instructions for Different Fabrics

    Fabric Type Washing Instructions Drying Instructions
    Cotton Machine wash in cold water with similar colors. Use a mild detergent. Tumble dry on low heat or hang dry.
    Polyester Machine wash in cold water with similar colors. Use a mild detergent. Tumble dry on low heat or hang dry.
    Nylon Hand wash in cold water with a mild detergent, or machine wash on a delicate cycle. Line dry or tumble dry on low heat.
    Mesh Machine wash in cold water on a delicate cycle. Use a mild detergent. Line dry or tumble dry on low heat. Avoid excessive heat to prevent distortion.
    Specialized/Moisture-wicking Fabrics Check manufacturer instructions for specific care guidelines. Follow manufacturer instructions for appropriate drying methods.

    Washing physical therapy clothing regularly prevents the buildup of sweat, dirt, and potentially harmful microorganisms.

    Budget-Friendly Options

    Finding suitable physical therapy attire doesn’t have to break the bank. With a little creativity and smart shopping, you can find comfortable, quality options without sacrificing your budget. This section explores various ways to stretch your clothing budget while maintaining the necessary comfort and functionality for your therapy sessions.

    Stretching Your Clothing Budget

    Finding affordable options for physical therapy clothing requires a shift in perspective. Instead of focusing on designer labels, prioritize quality materials and durable construction. Look for items that can withstand frequent washing and wear, extending their lifespan. Consider buying versatile pieces that can be mixed and matched to create different outfits, minimizing the need for a large wardrobe.

    Thrift stores, online marketplaces, and sales are excellent places to discover hidden treasures. Many brands offer discounts or promotions, and checking for these opportunities is key.

    Affordable Brands and Materials

    Several brands cater to budget-conscious consumers without compromising quality. Look for brands known for durable materials and classic designs. Brands focusing on athletic wear often offer competitive prices. Polyester blends and breathable fabrics are good choices for physical therapy attire. These materials are typically more affordable than specialized performance fabrics while still providing necessary comfort and breathability.

    Affordable Physical Therapy Clothing Options

    Item Brand Recommendation Estimated Cost (USD)
    Workout Shorts Target, Old Navy $15-$25
    Moisture-wicking T-shirt Nike, Adidas $15-$25
    Workout Leggings Lululemon (Outlet or previous season), Athleta $25-$40
    Compression Socks Medline, other medical supply stores $10-$20
    Stretchy sports bra Target, Walmart, Amazon Basics $10-$20
    Lightweight Hoodie Uniqlo, Old Navy $20-$35

    Note: Prices are estimates and may vary depending on size, style, and current promotions. Outlet stores and online marketplaces often offer further discounts.

    Final Wrap-Up

    In conclusion, dressing appropriately for physical therapy goes beyond just looking good; it’s about maximizing your comfort, performance, and overall well-being during your sessions. By considering factors like fabric type, temperature, exercise type, and personal needs, you can choose clothing that enhances your experience and supports your recovery journey. Remember, comfortable, practical, and inclusive clothing choices are key to feeling confident and prepared for each therapy session.

  • How Does a Caffeine Nap Work?

    How Does a Caffeine Nap Work?

    How does a caffeine nap work? This intriguing question delves into the science behind the seemingly paradoxical practice of combining caffeine with a short sleep. We’ll explore the ideal timing, the physiological effects of caffeine, and the factors influencing nap quality. From understanding how caffeine interacts with your body to maximizing the benefits of this sleep strategy, this guide will equip you with the knowledge to make the most of a caffeine nap, or decide if it’s right for you.

    A caffeine nap, while seemingly counterintuitive, can be a powerful tool for boosting alertness and cognitive function. By strategically timing your caffeine intake and nap duration, you can potentially enhance your performance and productivity. However, it’s crucial to understand the underlying science and potential drawbacks to utilize this technique effectively. This exploration will walk you through the science behind it, examining the impact of timing, environment, and individual factors.

    Introduction to Caffeine Naps

    A caffeine nap, a relatively recent addition to the world of power napping, is a short sleep period followed by a caffeine boost. It leverages the stimulating effects of caffeine to counteract the grogginess often associated with waking up after a short nap. Understanding how caffeine affects the body and the timing of caffeine consumption relative to the nap are crucial for maximizing the benefits and minimizing the potential downsides.

    This approach is often employed to improve alertness and cognitive function, especially in situations requiring sustained mental focus.Caffeine, a central nervous system stimulant, works by blocking adenosine, a neurotransmitter that promotes sleepiness. By inhibiting adenosine, caffeine promotes wakefulness and enhances alertness. The body’s response to caffeine isn’t instantaneous, but rather develops over time. The peak effects of caffeine usually manifest between 30-60 minutes after consumption.

    This knowledge is key to optimizing the caffeine nap experience.

    Caffeine Nap Timeframes and Benefits

    A typical caffeine nap lasts between 20 and 30 minutes. This timeframe is chosen to avoid the deeper stages of sleep, which can lead to grogginess upon awakening. A longer nap may lead to delayed reaction times and even the dreaded “sleep inertia.” The critical aspect is to strategically time the caffeine intake relative to the nap.

    Nap Duration Caffeine Consumption Timing Potential Benefits Drawbacks
    20-30 minutes Immediately after waking from the nap Improved alertness, enhanced cognitive function, reduced sleepiness, and increased mental clarity. Potential for jitters, anxiety, or insomnia if caffeine is consumed too late in the day. Overstimulation if the dose is too high.
    20-30 minutes 30-45 minutes after waking from the nap A slight delay in the caffeine effects, allowing a smoother transition into alertness. May result in less immediate improvement in alertness compared to consuming caffeine immediately after waking from the nap.

    The table above summarizes the key factors of caffeine napping. Choosing the right duration and timing of caffeine consumption is crucial for optimizing the benefits and minimizing potential drawbacks. Individual responses to caffeine vary, so it’s essential to monitor your own body’s reaction.

    The Science Behind Caffeine and Sleep

    Caffeine, a ubiquitous stimulant, profoundly impacts our sleep-wake cycle. Understanding its interaction with our bodies’ natural processes is key to harnessing its potential, including for the short-term boost of a caffeine nap. This section delves into the scientific mechanisms behind caffeine’s effects, emphasizing its relationship with sleepiness and the body’s internal clock.Caffeine’s powerful effects stem from its ability to interfere with the body’s natural chemical messengers, particularly those related to sleep.

    This interference alters our physiological state, making it crucial to understand the interplay between caffeine, sleep, and the circadian rhythm for optimal use.

    Physiological Effects of Caffeine on the Central Nervous System

    Caffeine’s primary action is on the central nervous system (CNS). It blocks adenosine receptors, a neurotransmitter that promotes sleepiness. By preventing adenosine from binding, caffeine effectively reduces feelings of drowsiness. This leads to increased alertness and focus. This stimulation is not without its drawbacks, as prolonged or excessive caffeine consumption can disrupt sleep patterns and contribute to anxiety.

    Caffeine’s Impact on Adenosine

    Adenosine is a crucial neurotransmitter that accumulates in the brain as the day progresses. This accumulation promotes feelings of sleepiness. Caffeine, structurally similar to adenosine, can bind to adenosine receptors in the brain. This binding prevents adenosine from binding, thereby reducing the signal for sleepiness. The result is a sustained alertness.

    It’s important to note that caffeine’s effect is not permanent and eventually wears off.

    Caffeine Absorption and its Effect on the Body

    Caffeine absorption is relatively rapid, typically occurring within 30 to 60 minutes after ingestion. The rate of absorption varies depending on factors like food intake, metabolism, and individual sensitivity. Once absorbed, caffeine circulates throughout the body, affecting various organs and systems. The body’s metabolism gradually breaks down caffeine, with elimination taking several hours. This explains the duration of caffeine’s effects.

    The Role of Circadian Rhythm in Caffeine Naps

    The body’s internal clock, the circadian rhythm, plays a critical role in regulating sleep-wake cycles. Caffeine, while offering a temporary boost, can interfere with the circadian rhythm. A caffeine nap taken too close to the natural sleep cycle can disrupt the body’s internal clock, leading to difficulty falling asleep later. Understanding the circadian rhythm is key to timing caffeine naps for optimal effectiveness.

    Comparison of Caffeine’s Effects with Other Stimulants

    Caffeine’s effects are comparable to other stimulants like amphetamines, but differ in their mechanism and intensity. Amphetamines directly increase the release of neurotransmitters like dopamine and norepinephrine, leading to a more intense and potentially longer-lasting stimulation. Caffeine, however, primarily blocks adenosine, resulting in a milder but still noticeable effect.

    Effects of Different Caffeine Doses on Sleep Stages

    Caffeine Dose (mg) Potential Impact on Sleep Stages
    0-100 Minimal to no impact on sleep stages, but may increase alertness.
    100-200 Potentially moderate impact on sleep onset and duration.
    200+ Significant impact on sleep stages, potentially leading to insomnia or disrupted sleep patterns.

    This table demonstrates the correlation between caffeine intake and potential disruption of sleep stages. Higher doses of caffeine are associated with greater disruptions to sleep quality and duration. It’s essential to be mindful of the dose and timing of caffeine consumption.

    The Impact of Caffeine Timing on Nap Effectiveness

    Getting the most out of a caffeine nap isn’t just about having caffeine; it’s about timing it perfectly. The delicate dance between caffeine consumption and nap duration dictates whether you’ll wake up refreshed or groggy. Understanding the optimal timing ensures your nap is a productivity booster, not a sleep-deprived setback.

    Ever wondered how that caffeine nap actually works? It’s basically a short burst of alertness followed by a period of deep sleep. This can be tricky to time, and sometimes a caffeine nap can be more disruptive than helpful, especially when dealing with issues like implantation bleeding vs periods. Implantation bleeding vs periods can be confusing, but understanding the difference can help you decipher your body’s signals.

    Ultimately, the best approach to a successful caffeine nap is finding the sweet spot between the desired alertness and a truly restorative sleep cycle.

    Optimal Caffeine Consumption Time Before a Nap

    The ideal time to consume caffeine before a nap is crucial for maximizing its alertness-boosting effects without disrupting sleep. Research suggests that consuming caffeine 30-60 minutes before a nap often produces the best results. This allows for the caffeine to reach its peak concentration in the bloodstream without inducing anxiety or interfering with sleep onset. If you consume caffeine closer to your nap, you might feel jittery or anxious.

    If you wait too long, the caffeine might not be in your system when you’re ready for a nap.

    Ideal Nap Time After Caffeine Consumption, How does a caffeine nap work

    Timing your nap after caffeine consumption is equally important. A 20-30 minute nap is often cited as the sweet spot for maximizing alertness after a caffeine-induced boost. This short nap period allows for the beneficial effects of caffeine to be realized, yet prevents deep sleep, which might lead to grogginess upon waking. Napping longer than 30 minutes after caffeine intake might negate the positive effects and lead to a delayed awakening.

    Consequences of Consuming Caffeine Too Close to Bedtime

    Consuming caffeine too close to bedtime can significantly impact sleep quality and duration. Caffeine’s half-life, the time it takes for the body to eliminate half of the caffeine, is approximately 5 hours. This means that even if you consumed caffeine hours before bed, some of it may still be in your system, hindering your ability to fall asleep.

    Avoid consuming caffeine within 4-6 hours of bedtime to minimize this interference. Individuals sensitive to caffeine might need to extend this timeframe.

    Caffeine’s Half-Life and Nap Timing

    Caffeine’s half-life plays a significant role in determining the optimal timing of your nap. As caffeine gradually diminishes in the body, the effects on alertness lessen. Considering this half-life, timing your nap appropriately ensures that the caffeine’s stimulating effects are still present but haven’t waned to the point of diminishing returns. The graph below illustrates this dynamic relationship.

    Relationship Between Caffeine Intake Time and Nap Effectiveness

    Caffeine Intake Time (Before Nap) Ideal Nap Time (After Caffeine Intake) Potential Impact
    30-60 minutes 20-30 minutes Improved alertness and wakefulness
    1-2 hours 20-30 minutes Reduced alertness, but still possible benefits
    Less than 30 minutes 20-30 minutes Potential jitters and anxiety
    More than 2 hours 20-30 minutes Reduced caffeine effect; may not improve alertness

    This chart illustrates the relationship between caffeine intake and nap effectiveness. Note that individual responses to caffeine vary, and these are general guidelines. Experimentation might be necessary to find the ideal timing that works best for you.

    Factors Influencing Nap Quality

    Caffeine naps, while offering a quick boost, aren’t a magic bullet. Their effectiveness hinges on various factors, from your pre-nap state to the environment you choose. Understanding these nuances allows you to optimize your caffeine nap for maximum productivity and minimal side effects.

    Sleep Deprivation’s Impact

    Chronic sleep deprivation significantly hinders the effectiveness of a caffeine nap. When you’re already sleep-deprived, your body is desperately seeking restorative sleep. A caffeine nap might offer a temporary reprieve, but it’s unlikely to fully compensate for the sleep debt. The body’s natural sleep-wake cycle (circadian rhythm) is disrupted, leading to reduced alertness and cognitive function in the long term.

    A well-rested individual benefits more from a caffeine nap than someone who is chronically sleep-deprived.

    Stress and Mental State

    Stress and anxiety directly impact the quality of a caffeine nap. A stressed mind often struggles to relax and fall into a restful state, even if the nap itself is short. Stress hormones like cortisol interfere with the body’s ability to recover, preventing deep relaxation and potentially leading to a feeling of restlessness and agitation after waking up.

    The mental state before a nap plays a crucial role in its effectiveness.

    Environmental Influence

    The environment profoundly influences the quality of your nap. A quiet, dark, and cool space promotes relaxation and sleep. Conversely, a noisy, bright, or overly warm environment can disrupt your sleep cycle, rendering the nap less restorative and less effective. The ideal environment is conducive to both sleep and wakefulness.

    Nap Length and Caffeine’s Effect

    The length of the nap significantly impacts the effect of the caffeine. A short nap (around 20-30 minutes) is more likely to produce the desired alertness boost from caffeine without causing grogginess upon waking. Longer naps, while providing a more restful experience, might interfere with the timing of caffeine’s peak alertness effect. The relationship between nap length and caffeine’s effect needs careful consideration.

    Examples of Conducive Environments

    A quiet library corner with ambient lighting, a shaded outdoor spot under a tree, or a designated nap room at work all offer opportunities for a productive caffeine nap. A quiet room with comfortable bedding, a dark room, or a dimly lit space with soft lighting can also work well. These examples provide a variety of environments that support the goal of a good nap.

    Ever wondered how a caffeine nap actually works? It’s a bit like a controlled crash, leveraging caffeine’s stimulating effect to wake you up after a short period of sleep. This phenomenon is intriguing, but recent advancements in cancer treatments, like the enhertu breast cancer treatment trial , offer a similar, albeit far more complex, approach to achieving desired outcomes.

    The way the body responds to both caffeine and targeted therapies for cancer is fascinating, showing how different systems can function in interesting ways.

    Factor Impact on Nap Examples
    Sleep Deprivation Reduces nap effectiveness; doesn’t fully compensate for sleep debt. Pulling an all-nighter before a caffeine nap.
    Stress Levels Interferes with relaxation; leads to restlessness. Dealing with a deadline or a personal crisis.
    Environment Impacts relaxation and sleep quality. A noisy office, a bright sunlit room, a hot room.
    Nap Length Affects caffeine’s effect; short naps are best for alertness. A 20-minute power nap versus a 90-minute nap.

    Potential Benefits and Drawbacks of Caffeine Naps

    Caffeine naps can be a powerful tool for boosting alertness and cognitive function, but they come with potential downsides. Understanding these benefits and drawbacks is crucial for using caffeine naps effectively and safely. This section explores the advantages and disadvantages of incorporating caffeine naps into your daily routine.Caffeine naps, strategically timed with the inclusion of caffeine, can offer a unique opportunity to enhance cognitive function, but they also present potential risks.

    Careful consideration of the interplay between caffeine and sleep patterns is essential for maximizing the benefits and minimizing the drawbacks.

    Ever wondered how a caffeine nap actually works? It’s all about that sweet spot between alertness and relaxation. You’re essentially tricking your brain into a short, restorative sleep cycle, but the caffeine kick afterwards keeps you from feeling groggy. This is similar to the process of getting rid of hiccups, where a sudden change in your body’s state, like swallowing, can disrupt the involuntary spasms.

    For a deeper dive into dealing with those pesky hiccups, check out this helpful guide on how to get rid of hiccups. Ultimately, the goal is to achieve a state of equilibrium where your body can settle into a more balanced rhythm, whether you’re aiming for a productive nap or a hiccup-free existence.

    Potential Benefits for Cognitive Performance

    Caffeine’s stimulating effect, combined with the restorative power of a short nap, can lead to significant improvements in cognitive performance. Studies have shown that caffeine naps can enhance alertness, memory, and reaction time. This is particularly beneficial for individuals experiencing fatigue or needing a quick mental boost, such as students cramming for exams or professionals facing demanding deadlines.

    The combined effect of caffeine and sleep can lead to improved focus and concentration, allowing individuals to perform tasks more efficiently.

    Potential Drawbacks: Anxiety and Jitters

    A common drawback associated with caffeine naps is the potential for anxiety or jitters. The stimulating nature of caffeine, when combined with the temporary sleep deprivation that often precedes the nap, can trigger a heightened physiological response. This can manifest as feelings of restlessness, nervousness, or even mild anxiety. Individuals sensitive to caffeine may experience these effects more acutely.

    Careful monitoring of your individual response to caffeine is crucial.

    Potential Risks of Overuse and Dependence

    Overuse of caffeine naps can lead to a reliance on them to function. This dependence can lead to a disrupted sleep cycle, making it harder to fall asleep naturally at night. Individuals who rely heavily on caffeine naps may find it increasingly difficult to function without them, leading to a dependence on the substance for daily alertness. Consistency in sleep patterns is vital for optimal health.

    Consequences of Disrupting Sleep Schedules

    Disrupting your sleep schedule with caffeine naps, especially if they’re not timed correctly, can have negative impacts on your overall sleep quality. The body needs consistent sleep patterns for optimal physical and mental restoration. Chronic sleep deprivation can negatively affect mood, concentration, and overall well-being. It is crucial to ensure your sleep schedule is maintained.

    Comparison with Other Alertness-Improving Methods

    Caffeine naps offer a unique approach to improving alertness compared to other methods. While techniques like exercise or hydration can contribute to improved alertness, caffeine naps offer a targeted approach for cognitive enhancement. However, each method has its limitations and optimal use cases. For instance, while exercise promotes long-term alertness, caffeine naps offer immediate, short-term benefits. Consider the context and desired outcome when choosing a method.

    Potential Benefits and Drawbacks Table

    Potential Benefit Potential Drawback
    Improved cognitive function (e.g., alertness, memory, reaction time) Anxiety or jitters
    Increased focus and concentration Disrupted sleep schedule
    Enhanced performance in tasks requiring sustained attention Potential for dependence on caffeine naps
    Quick mental boost Adverse effects for caffeine-sensitive individuals
    Potentially beneficial for specific scenarios (e.g., students studying, professionals under pressure) Interference with natural sleep patterns if not used strategically

    Alternative Strategies for Improving Alertness: How Does A Caffeine Nap Work

    How does a caffeine nap work

    Caffeine naps, while offering a temporary boost, aren’t always the best solution. Long-term sleep deprivation can lead to serious health consequences, so exploring sustainable methods for improving alertness is crucial. These strategies focus on addressing the root causes of fatigue, promoting healthy sleep habits, and optimizing cognitive function without resorting to caffeine.

    Prioritizing Sleep

    Adequate sleep is fundamental to maintaining alertness and cognitive function. Insufficient sleep directly impacts mood, concentration, and reaction time. Establishing a consistent sleep schedule, creating a relaxing bedtime routine, and optimizing the sleep environment can significantly improve sleep quality.

    • Consistent Sleep Schedule: Going to bed and waking up at the same time each day, even on weekends, regulates your body’s natural sleep-wake cycle (circadian rhythm). This consistency improves sleep quality and makes it easier to fall asleep and wake up feeling refreshed. For example, a consistent schedule allows your body to anticipate sleep, promoting a more restful night.

    • Relaxing Bedtime Routine: Engage in calming activities before bed, such as reading, taking a warm bath, or listening to soothing music. Avoid screen time for at least an hour before sleep, as the blue light emitted from electronic devices can interfere with melatonin production, the hormone crucial for regulating sleep.
    • Optimize Sleep Environment: Ensure your bedroom is dark, quiet, and cool. Invest in blackout curtains, earplugs, or a white noise machine to minimize distractions. A comfortable mattress and pillows are also essential for a good night’s sleep. A dark, quiet, and cool bedroom environment can significantly improve sleep quality.

    Improving Diet and Exercise

    Nourishing your body with a balanced diet and incorporating regular exercise can significantly impact your energy levels and alertness.

    • Balanced Diet: Consume a diet rich in fruits, vegetables, and whole grains. Limit processed foods, sugary drinks, and excessive caffeine and alcohol intake. A balanced diet provides the necessary nutrients for optimal brain function and energy levels. For instance, a diet rich in complex carbohydrates can provide sustained energy throughout the day, whereas sugary snacks lead to energy crashes.

    • Regular Exercise: Physical activity increases blood flow to the brain, promoting alertness and cognitive function. Aim for at least 30 minutes of moderate-intensity exercise most days of the week. Exercise not only improves physical health but also boosts mood and reduces stress, both of which contribute to alertness.

    Mindfulness and Stress Management

    Chronic stress can negatively impact sleep quality and alertness. Practicing mindfulness and stress-reduction techniques can help manage stress effectively.

    • Mindfulness Techniques: Mindfulness exercises, such as meditation and deep breathing, can help reduce stress and promote relaxation. Regular practice can improve focus and concentration, crucial for maintaining alertness throughout the day. Mindfulness techniques, such as meditation, can help manage stress, leading to improved alertness and focus.
    • Stress-Reducing Activities: Engage in activities that you find relaxing and enjoyable, such as spending time in nature, listening to music, or pursuing hobbies. These activities can help reduce stress levels and improve overall well-being, leading to enhanced alertness.

    Cognitive Enhancement Strategies

    Certain cognitive techniques can help optimize brain function and improve alertness.

    • Regular Mental Stimulation: Engage in activities that challenge your mind, such as learning a new language, playing a musical instrument, or solving puzzles. This mental stimulation helps maintain cognitive sharpness and improve alertness.
    • Cognitive Behavioral Therapy (CBT): CBT can help identify and modify negative thought patterns that contribute to stress and anxiety, both of which can affect alertness. This therapy can improve sleep quality and reduce stress levels, leading to improved alertness.

    Case Studies and Examples

    Caffeine naps, when strategically implemented, can significantly enhance alertness and cognitive function. However, like any sleep intervention, their effectiveness hinges on individual factors and the specific context. Understanding how different individuals experience caffeine naps through real-world examples illuminates their potential benefits and drawbacks.The following case studies illustrate how individuals have successfully utilized caffeine naps to improve performance and how misapplication can lead to negative outcomes.

    These examples showcase the critical role of timing, duration, and individual response in optimizing the benefits of this unique sleep strategy.

    Effective Use of Caffeine Naps in Specific Tasks

    Many professionals, particularly those in demanding fields like medicine, law enforcement, and aviation, have reported using caffeine naps to maintain peak performance.

    “A surgeon reported a significant improvement in concentration and reaction time after a 20-minute caffeine nap. This allowed them to maintain focus and accuracy throughout a long surgical procedure.”

    “A long-haul trucker found that a 15-minute caffeine nap, taken with a cup of coffee 10 minutes before, improved alertness and reduced the risk of accidents during their long drives. This allowed for a significant reduction in driving errors and improved overall safety.”

    These examples highlight how short, timed caffeine naps can be effective for improving cognitive function in high-stakes tasks that require sustained alertness. The key is to understand individual responses and adjust the nap duration and timing accordingly.

    The Detrimental Impact of Caffeine Naps

    While caffeine naps can be highly beneficial, they can also be detrimental if not used correctly.

    “A student attempting to cram for an exam found that a caffeine nap, taken too close to bedtime, disrupted their normal sleep schedule and resulted in poor exam performance due to sleep deprivation the following night.”

    “An individual who regularly consumed a high dose of caffeine found that caffeine naps were ineffective due to an already elevated caffeine level in their system.”

    These cases underscore the importance of understanding individual tolerances and avoiding excessive caffeine consumption before a nap, and the need for appropriate timing relative to the individual’s sleep schedule. A well-timed and carefully dosed caffeine nap can be beneficial, but an ill-timed or poorly managed one can be counterproductive.

    Factors Contributing to the Success or Failure of Caffeine Naps

    The success or failure of a caffeine nap is dependent on various factors. Understanding these factors can lead to more effective strategies.

    • Individual sensitivity to caffeine: Some individuals are more sensitive to caffeine than others. This sensitivity can affect the effectiveness of a caffeine nap.
    • Timing of the nap relative to the individual’s circadian rhythm: Napping at the wrong time can disrupt one’s natural sleep-wake cycle, potentially counteracting the desired benefits of the nap.
    • Duration of the nap: The optimal nap duration for maximizing alertness varies between individuals.
    • Caffeine dosage: A proper balance between caffeine consumption and the nap duration is crucial for optimizing the nap’s effectiveness.

    Final Review

    How does a caffeine nap work

    In conclusion, a caffeine nap can be a valuable tool for improving alertness and cognitive performance, but it’s crucial to understand the science behind it. Optimizing the timing of your caffeine intake and nap duration, and considering individual factors like sleep deprivation and stress, are key to maximizing its benefits. Understanding the potential drawbacks, such as anxiety or disrupted sleep schedules, is also essential.

    This exploration of the science behind caffeine naps provides valuable insights, allowing you to make informed decisions about incorporating this strategy into your routine. Hopefully, this discussion has offered clarity on when and how caffeine naps can work for you.

  • What Stage of Dementia is Sundowning?

    What Stage of Dementia is Sundowning?

    What stage of dementia is sundowning? This perplexing phenomenon, characterized by a worsening of behavioral and cognitive issues during the late afternoon and evening hours, affects individuals with dementia in various ways. Understanding the link between sundowning and the progression of dementia is crucial for caregivers and medical professionals alike. This exploration delves into the specifics of sundowning, its connection to different dementia stages, and the contributing factors behind this challenging behavior.

    Sundowning, often marked by increased agitation, confusion, and disorientation, can significantly impact daily life. Recognizing the typical patterns and triggers associated with this behavior can lead to more effective management strategies and a more supportive environment for those experiencing it. We’ll also examine how to differentiate sundowning from other conditions that may share similar symptoms.

    Defining Sundowning

    Sundowning is a common behavioral and psychological symptom experienced by individuals with dementia, particularly those in the later stages. It’s characterized by a noticeable worsening of symptoms during the evening and nighttime hours. This pattern can significantly impact the well-being of both the individual experiencing sundowning and their caregivers. Understanding this phenomenon is crucial for effective management and support.Sundowning is not a disease itself, but rather a constellation of symptoms that typically manifest in the late afternoon or early evening and persist through the night.

    It’s important to remember that every individual experiences sundowning differently, and the specific symptoms can vary. This variability necessitates a personalized approach to care.

    Sundowning Phenomenon Description, What stage of dementia is sundowning

    Sundowning involves a predictable deterioration in cognitive function, mood, and behavior, generally beginning in the late afternoon or early evening and peaking during the nighttime hours. The symptoms can range from mild agitation and confusion to more severe and concerning behaviors like wandering, aggression, and hallucinations. It’s a complex interplay of factors, including changes in light, sleep-wake cycles, and the progression of the underlying dementia.

    Behavioral Characteristics of Sundowning

    Sundowning often presents with a variety of behavioral characteristics, which can significantly impact the individual’s daily life and the lives of their caregivers. These characteristics often include:

    • Increased agitation and restlessness: Individuals might become more fidgety, anxious, and easily irritated. This could manifest as pacing, hand-wringing, or verbal outbursts.
    • Confusion and disorientation: The individual might exhibit increased confusion about time, place, or people, particularly as the day transitions into night.
    • Hallucinations and delusions: Individuals might experience visual or auditory hallucinations or believe things that are not real. This can be distressing for the person experiencing it and those around them.
    • Wandering: Individuals may become restless and wander away from their surroundings, putting themselves at risk of injury or getting lost.
    • Increased verbal outbursts: Individuals might exhibit increased irritability, shouting, or verbal aggression.

    Examples of Sundowning Manifestations

    Sundowning can manifest in various ways across different individuals. One individual might experience mild agitation and confusion, while another might become significantly more aggressive or prone to wandering. Consider the following examples:

    • A person with Alzheimer’s disease might become increasingly confused and agitated as the sun sets, asking repetitive questions about family members or the day’s events.
    • A person with vascular dementia might exhibit increased restlessness and pacing, particularly in the late evening, making it difficult for caregivers to manage their care.
    • An individual with Lewy body dementia might experience vivid hallucinations and delusions as the sun goes down, leading to disorientation and fear.

    Typical Time of Day for Sundowning Symptoms

    Sundowning symptoms typically emerge in the late afternoon or early evening and often peak during the nighttime hours. The exact timing can vary from person to person but frequently coincides with the decrease in ambient light and the transition to darkness.

    Comparing Sundowning Behaviors with Typical Behaviors

    Behavior Description Frequency Severity
    Typical Behavior (Daytime) Calm, focused, and responsive High Low
    Sundowning Behavior (Evening) Agitated, confused, and disoriented Moderate to High Low to High
    Typical Behavior (Nighttime) Sleep or rest High Low
    Sundowning Behavior (Nighttime) Restlessness, wandering, hallucinations Variable Moderate to High

    Understanding Dementia Stages

    What stage of dementia is sundowning

    Dementia isn’t a single disease; it’s an umbrella term for a group of conditions that gradually impair cognitive function. Understanding the progression of dementia is crucial for caregivers and individuals living with the condition. This allows for proactive planning and support tailored to the specific needs of each stage. It also helps to manage expectations and prepare for the challenges ahead.The stages of dementia vary significantly in their severity, impacting daily life in different ways.

    Early diagnosis and intervention can slow down the progression and improve quality of life. Early detection is often key to managing the symptoms and adapting to the changes.

    Sundowning, a common symptom in dementia, often manifests as confusion and agitation during the evening hours. While the exact reasons behind this nighttime increase in symptoms are complex, it’s sometimes linked to disruptions in sleep patterns. This can sometimes be similar to experiences with sleep paralysis, a temporary inability to move or speak when falling asleep or waking up.

    Understanding the causes of sleep paralysis, such as stress, lack of sleep, or certain medications, what causes sleep paralysis , could offer clues to better manage sundowning in individuals with dementia. Ultimately, however, sundowning remains a complex aspect of dementia that requires careful monitoring and personalized strategies for care.

    Different Stages of Dementia

    Dementia progresses through various stages, each characterized by specific cognitive and behavioral changes. This gradual decline in cognitive abilities and behavioral changes is a significant aspect of dementia’s progression. The rate of progression varies greatly among individuals. There’s no single path or timeline for everyone.

    Key Cognitive and Behavioral Features

    This table Artikels the key cognitive and behavioral features associated with different dementia stages. It provides a framework for understanding the typical progression of the condition.

    Stage Cognitive Features Behavioral Features Progression
    Mild Cognitive Impairment (MCI) Mild forgetfulness, difficulty with planning, and trouble with complex tasks. Subtle changes in language or attention are present. Mood swings, frustration, or social withdrawal. Individuals may be more easily agitated. Personality changes may be subtle. MCI often precedes dementia, sometimes lasting for years before progressing to more severe stages.
    Early-Stage Dementia Noticeable memory loss, difficulty with daily tasks like cooking or managing finances, confusion with time and place. Language difficulties might start to emerge. Increased irritability, anxiety, or apathy. Some individuals may experience delusions or hallucinations. Cognitive decline becomes more pronounced. The individual may still function independently in some areas, but increasing assistance is often needed.
    Middle-Stage Dementia Significant memory loss, difficulty with complex tasks, disorientation in familiar environments. Language problems become more prominent, and the ability to communicate effectively may be impacted. Increased agitation, wandering, or aggression. Changes in sleep patterns are common. Daily activities require significant assistance. The individual may need help with dressing, eating, and personal hygiene.
    Late-Stage Dementia Severe memory loss, complete dependence on others for daily care. Communication is severely impaired. The individual may lose awareness of their surroundings and people around them. Loss of appetite, incontinence, and difficulty swallowing. Individuals may exhibit repetitive behaviors. Emotional expression can be limited. This stage requires constant care and support. Individuals in this stage are often bedridden and completely dependent.

    Common Challenges

    Individuals with dementia face various challenges at each stage. These challenges are often related to the cognitive decline and behavioral changes associated with each stage. Understanding these challenges can help to develop strategies for managing them effectively.

    • Early-Stage Challenges: Maintaining independence, managing daily routines, and adapting to changes in cognitive function. Maintaining social connections and activities can become challenging.
    • Middle-Stage Challenges: Providing appropriate care and support for daily needs. Managing challenging behaviors, ensuring safety, and adapting to changes in communication.
    • Late-Stage Challenges: Providing constant care and support for all daily needs, ensuring safety and comfort, and maintaining dignity. Addressing the physical and emotional needs of both the individual and the caregiver is crucial.

    Impact on Daily Life Activities

    Dementia significantly impacts daily life activities at each stage. The impact on daily activities can be profound and often requires adjustments and adaptations in daily routines and social interactions.

    Sundowning, that frustrating nighttime increase in confusion and agitation in dementia patients, typically appears in the later stages of the disease. Managing these challenging behaviors often requires significant resources, and if you’re facing surgery costs without insurance, exploring options like how to pay for surgery costs without insurance can provide valuable guidance. Ultimately, understanding the progression of dementia, like sundowning, is crucial for effective caregiving strategies.

    • Early-Stage: Individuals may experience difficulties with memory, planning, and decision-making. Simple tasks like managing finances or scheduling appointments may become challenging.
    • Middle-Stage: Significant assistance may be needed with most daily activities. Individuals may struggle with communication, mobility, and self-care.
    • Late-Stage: Individuals become completely dependent on others for all aspects of daily life. Caregivers face significant challenges in providing constant support and ensuring safety and well-being.

    Linking Sundowning to Dementia Stages

    Sundowning, the worsening of behavioral and cognitive symptoms in the late afternoon and evening, is a significant challenge for individuals living with dementia and their caregivers. Understanding how sundowning relates to different stages of dementia is crucial for effective management and support. It’s not a separate disease, but a symptom complex that can be exacerbated by factors like fatigue, sensory overload, and environmental changes.

    This understanding helps tailor strategies to address the specific needs of individuals at various stages of the disease.The relationship between sundowning and dementia stages is complex. Sundowning symptoms are not consistently present or predictable across all dementia stages, and their severity can vary significantly from one individual to another. The factors influencing the manifestation and severity of sundowning are numerous and interlinked.

    While the exact causes are still being researched, it’s thought that sundowning may result from a combination of cognitive decline, circadian rhythm disruption, and environmental factors.

    Sundowning in Early-Stage Dementia

    Early-stage dementia is often characterized by subtle cognitive changes. Sundowning symptoms in this phase might be less pronounced and intermittent. Individuals may experience mild confusion, agitation, or disorientation during the late afternoon and evening hours. These symptoms might be mistaken for normal age-related changes or attributed to other factors. However, if these symptoms persist and affect daily life, it’s important to seek medical attention.

    They can range from mild restlessness to occasional disorientation, often not severe enough to disrupt daily routines significantly.

    Sundowning, those late-day mood swings and confusion in dementia patients, often happens in the moderate to late stages. It’s a tough time for caregivers, but did you know that some dietary changes, like focusing on foods on the low fodmap diet , might help manage some of the symptoms? While a low fodmap diet can potentially help with other health issues, more research is needed to confirm its effectiveness in managing sundowning.

    Ultimately, understanding the stage of dementia is key to creating the right support system.

    Sundowning in Middle-Stage Dementia

    Middle-stage dementia presents more noticeable cognitive decline. Sundowning symptoms become more frequent and potentially disruptive. Individuals may exhibit increased agitation, confusion, and wandering behavior during the evening hours. They might experience difficulty with tasks like recognizing familiar faces or remembering recent events. Communication difficulties can also escalate, leading to frustration and distress for both the individual and caregivers.

    Sundowning in Late-Stage Dementia

    In late-stage dementia, sundowning symptoms tend to be more pronounced and pervasive. Individuals may experience significant confusion, agitation, and disorientation throughout the day, but these symptoms are typically most prominent in the late afternoon and evening. Physical restlessness, including pacing or repetitive movements, is common. They may have difficulty with basic self-care tasks and require increased assistance with daily activities.

    Comparison of Sundowning Across Dementia Stages

    Dementia Stage Symptom Example Frequency Severity
    Early Mild confusion, occasional agitation, disorientation Intermittent Low
    Middle Increased agitation, confusion, wandering, difficulty recognizing familiar faces Frequent Moderate
    Late Significant confusion, disorientation, agitation, physical restlessness, difficulty with self-care Pervasive High

    Factors Contributing to Sundowning: What Stage Of Dementia Is Sundowning

    What stage of dementia is sundowning

    Sundowning, the worsening of behavioral and cognitive symptoms in the late afternoon or evening, is a complex phenomenon. Understanding the factors that contribute to it is crucial for developing effective strategies to support individuals with dementia and their caregivers. These factors often interact, making it difficult to isolate a single cause. A multifaceted approach that addresses multiple contributing factors is typically most successful.Sundowning is not a distinct disease or stage of dementia, but rather a symptom that can occur across various dementia types and stages.

    It is important to remember that sundowning is often a result of the interplay of multiple factors, making it a challenging issue to address. Identifying and addressing these contributing factors can lead to significant improvements in the quality of life for both the individual experiencing sundowning and their caregivers.

    Environmental Factors

    Environmental factors play a significant role in triggering sundowning. Dim lighting, unfamiliar surroundings, or changes in routine can all contribute to disorientation and agitation. A lack of natural light and social interaction, particularly in institutional settings, can be particularly impactful. Consistent routines and familiar spaces can mitigate these effects. For example, maintaining a consistent schedule for meals, activities, and sleep can help minimize the occurrence of sundowning.

    Similarly, ensuring the home environment is well-lit and easily navigable can reduce confusion and anxiety.

    Psychological Factors

    Psychological factors can also significantly impact sundowning. Depression, anxiety, and fear of the unknown can exacerbate behavioral symptoms. Furthermore, frustration from declining cognitive abilities or unmet needs can lead to increased agitation. Recognizing and addressing these underlying emotional issues can be critical in managing sundowning. Therapy or counseling can help individuals cope with their emotions and adjust to the changes associated with dementia.

    For instance, reminiscence therapy can provide a sense of comfort and familiarity, reducing anxiety and promoting a sense of well-being.

    Physical Factors

    Physical factors can contribute to sundowning, including pain, discomfort, or unmet physical needs. For example, an individual experiencing discomfort from a urinary tract infection or arthritis can exhibit increased agitation. Ensuring that individuals with dementia receive adequate hydration, nutrition, and pain management can often significantly reduce sundowning episodes. Proper sleep hygiene, including a regular sleep schedule and a comfortable sleep environment, is also vital.

    For instance, a lack of sleep or poor sleep quality can contribute to increased confusion and agitation, exacerbating sundowning.

    Table: Contributing Factors to Sundowning

    Category Factor Description Impact
    Environmental Dim lighting Reduced visibility, increasing disorientation. Increases confusion, agitation, and potential for wandering.
    Environmental Unfamiliar surroundings Changes in environment, leading to anxiety. Triggers anxiety, confusion, and resistance to care.
    Psychological Depression Sadness, hopelessness, and loss of interest. Increased irritability, withdrawal, and potential for sundowning.
    Psychological Anxiety Fear, worry, and apprehension. Increased agitation, restlessness, and sundowning episodes.
    Physical Pain Physical discomfort or injury. Increased agitation, irritability, and difficulty with tasks.
    Physical Urinary tract infection Infection affecting the urinary system. Increases confusion, agitation, and sleep disturbance.

    Management and Interventions

    Sundowning, a common symptom in dementia, significantly impacts the quality of life for both the individual and their caregivers. Effective management strategies are crucial for alleviating distress and maintaining a supportive environment. Understanding the triggers and employing tailored interventions can significantly improve the experience for everyone involved.Addressing sundowning involves a multifaceted approach that goes beyond simply treating the symptoms.

    It necessitates a holistic understanding of the individual’s needs, preferences, and current cognitive abilities. This approach emphasizes creating a calming and predictable environment, managing stress and anxiety, and adapting communication techniques to ensure effective interaction.

    Strategies for Managing Sundowning Behaviors

    Sundowning behaviors are often linked to changes in the individual’s cognitive abilities, increasing confusion, and heightened emotional responses. Addressing these underlying factors is key to managing the behaviors effectively. Creating a predictable routine, ensuring adequate sleep, and managing environmental stressors are crucial components of a successful management strategy.

    • Establish a consistent daily routine: A structured daily schedule helps to reduce uncertainty and anxiety. This includes predictable mealtimes, activity times, and bedtime routines. Consistency provides a sense of security and control in a world that may feel increasingly unpredictable.
    • Optimize the environment: The environment plays a significant role in managing sundowning. A well-lit, clutter-free space, with calming colors and familiar objects, can reduce confusion and anxiety. Avoid overly stimulating environments or sudden changes in surroundings.
    • Ensure adequate sleep hygiene: A regular sleep-wake cycle is vital for cognitive function. Establishing a relaxing bedtime routine, avoiding caffeine and alcohol before bed, and creating a dark and quiet sleep environment are beneficial. Consider a medical evaluation to rule out any underlying sleep disorders that could contribute to sundowning.

    Methods for Creating a Supportive Environment

    Creating a supportive environment for individuals with sundowning is crucial. A safe and familiar space helps alleviate anxiety and confusion, making the experience more manageable.

    • Familiarize the space: Use familiar objects and decorations to create a sense of comfort and security. Photographs, familiar furniture, and personal belongings can create a sense of home and belonging.
    • Maintain a calm atmosphere: Minimize noise and distractions. Use soft lighting and calming music to create a relaxing atmosphere. Avoid overly stimulating activities or interactions.
    • Provide sensory comfort: Incorporate calming sensory elements like soft blankets, aromatherapy, or gentle touch to soothe anxiety and agitation. Consider using gentle music, calming scents, or quiet activities.

    Strategies to Reduce Stress and Anxiety

    Stress and anxiety often exacerbate sundowning behaviors. Identifying and addressing the triggers for stress is essential for managing sundowning effectively.

    • Identify potential stressors: Pay close attention to potential triggers, such as changes in routine, unfamiliar faces, or unmet needs. Keep a journal or log to track potential triggers and patterns.
    • Employ relaxation techniques: Encourage relaxation techniques like deep breathing exercises, meditation, or gentle stretching. These techniques can help calm the individual and reduce anxiety.
    • Address unmet needs: Ensure that basic needs are met, including hydration, nutrition, and comfort. Unmet needs can contribute to stress and agitation, exacerbating sundowning symptoms.

    Effective Communication Techniques

    Clear and concise communication is essential when interacting with individuals experiencing sundowning. Avoid complex language and use simple, direct phrases.

    • Use simple and direct language: Avoid complex sentences or jargon. Use short, clear sentences and focus on one idea at a time.
    • Use visual aids: Visual cues, such as calendars, clocks, and photos, can help individuals understand their environment and routine better.
    • Maintain a calm and reassuring tone: Speak slowly and calmly, using a reassuring tone. Avoid raising your voice or becoming frustrated.

    Management Strategies Table

    Strategy Description Effectiveness Potential Drawbacks
    Consistent Routine Establishing a predictable daily schedule High; provides a sense of security and control Can be challenging to maintain, requires flexibility
    Calming Environment Creating a peaceful and familiar space Moderate to High; reduces anxiety and confusion Requires significant effort to adapt the environment
    Stress Reduction Techniques Employing relaxation techniques Moderate; can help manage anxiety May not be effective for all individuals; requires consistent application
    Clear Communication Using simple, direct language High; facilitates understanding and reduces frustration May require practice and patience

    Distinguishing Sundowning from Other Conditions

    Sundowning, a common symptom in dementia, can sometimes be confused with other conditions, particularly those with similar behavioral and cognitive changes. Accurate diagnosis is crucial for developing effective management strategies. Distinguishing sundowning from these conditions requires careful observation, assessment, and consideration of the broader clinical picture.Sundowning, while often associated with dementia, is not an independent disease. It’s a symptom complex, and its presence suggests underlying issues.

    Critically evaluating the other possible causes is vital to avoid misdiagnosis and ensure the appropriate support is provided to the individual and their caregivers.

    Sundowning vs. Delirium

    Delirium is a distinct state of acute confusion, often characterized by fluctuating levels of consciousness and disorientation. It differs significantly from the gradual cognitive decline associated with sundowning, which typically worsens in the evening. Delirium usually has a rapid onset, often triggered by an identifiable medical cause like infection, medication side effects, or dehydration. Conversely, sundowning is a chronic pattern linked to the progression of dementia.

    Key differentiating factors include the presence of a specific medical cause in delirium and the gradual, rather than acute, nature of the cognitive decline in sundowning.

    Sundowning vs. Other Behavioral and Psychological Symptoms of Dementia

    Other behavioral and psychological symptoms of dementia (BPSD) can overlap with sundowning. For example, agitation, aggression, and hallucinations can occur in both contexts. However, sundowning typically exhibits a specific temporal pattern, worsening in the late afternoon and evening hours. This distinct cyclical pattern, coupled with a lack of other acute triggers, can be helpful in differentiating it from other BPSD.

    Careful monitoring and documentation of the timing and intensity of these behaviors are important for accurate diagnosis.

    Importance of Proper Diagnosis

    A precise diagnosis of sundowning is essential for tailoring effective interventions. Treatment strategies for sundowning often focus on managing the underlying dementia and addressing environmental factors. Misdiagnosing sundowning as a different condition can lead to ineffective or even harmful interventions. For example, treating delirium symptoms when the underlying issue is sundowning will likely not address the core problem and could potentially worsen the individual’s condition.

    “A critical distinction between sundowning and other conditions lies in its specific temporal pattern: worsening in the late afternoon and evening, often without an identifiable acute cause.”

    Examples of Differential Diagnosis

    Condition Key Differences from Sundowning
    Delirium Sudden onset, fluctuating consciousness, identifiable medical cause, not a progressive decline
    Depression Persistent low mood, loss of interest, fatigue, not necessarily tied to a specific time of day
    Anxiety Excessive worry, fear, physical symptoms, not always linked to a specific time of day, but potentially exacerbated in the evening

    These examples illustrate the importance of comprehensive assessment and consideration of the entire clinical picture, including medical history, medications, and environmental factors, when distinguishing sundowning from other conditions.

    Final Summary

    In conclusion, sundowning, while a complex phenomenon, is linked to the progression of dementia. While no single stage definitively dictates sundowning’s onset, understanding the various dementia stages and their associated behavioral and cognitive changes is vital. Recognizing potential triggers, implementing supportive strategies, and distinguishing sundowning from other conditions can greatly improve the quality of life for individuals with dementia and their caregivers.

    By exploring the different facets of sundowning, we gain a deeper understanding of this common challenge, paving the way for more effective care and support.

  • Elderly Dehydration Symptoms and Solutions

    Elderly Dehydration Symptoms and Solutions

    Symptoms of dehydration in elderly individuals often present differently than in younger adults, making recognition crucial. This article delves into the various signs, from common to uncommon, highlighting the impact of underlying health conditions and offering strategies for prevention and management.

    Understanding how dehydration manifests in older adults is vital. Factors like decreased thirst sensation, reduced mobility, and cognitive decline can mask or alter typical symptoms, leading to delayed diagnosis. This comprehensive guide explores these nuances, offering a practical approach to assessing severity and implementing preventive measures.

    Identifying Common Symptoms

    Symptoms of dehydration in elderly

    Dehydration, a serious concern, can manifest differently in older adults compared to younger individuals. Understanding these variations is crucial for prompt diagnosis and treatment. This often involves recognizing subtle symptoms that might be easily missed. Older adults often have underlying health conditions that can complicate the picture, making it even more important to be vigilant.Recognizing the specific symptoms of dehydration in the elderly is vital for timely intervention.

    Elderly folks can experience dehydration symptoms like confusion and dizziness, which, surprisingly, can sometimes mimic the anxiety of glossophobia, the fear of public speaking. Glossophobia can manifest in similar physical responses, like a racing heart or dry mouth. However, proper hydration is crucial for overall well-being, especially for the elderly, and can alleviate these symptoms.

    Age-related changes in body composition and function can affect how the body responds to fluid loss, leading to different presentation of symptoms. This section will delve into common, subtle, and uncommon symptoms, providing a comprehensive overview for healthcare professionals and caregivers.

    Common Signs of Dehydration in the Elderly

    Dehydration in older adults often presents with less dramatic symptoms than in younger people. This is partly due to the reduced awareness of thirst and slower response to fluid loss in the elderly.

    • Dry mouth and throat: This is a common, easily recognizable symptom. Elderly individuals might not report dryness as frequently as younger ones, often due to reduced awareness of thirst or difficulty communicating.
    • Dark yellow or amber urine: Older adults may not be as aware of their urine color as indicators of hydration status. Observing urine color is a quick and useful assessment method.
    • Fatigue and weakness: These are often attributed to other factors in the elderly, potentially masking dehydration. They might feel tired, weak, or simply not as energetic as usual.
    • Confusion or disorientation: This can be a significant indicator of dehydration, particularly in older adults with pre-existing cognitive impairment. Confusion can be a serious sign.
    • Headache: A headache can be a symptom of dehydration in both younger and older adults, but the elderly may attribute it to other conditions.

    Differences in Symptom Presentation, Symptoms of dehydration in elderly

    The way dehydration manifests in older adults differs significantly from younger adults.

    Symptom Elderly Younger Adults
    Thirst Reduced awareness, difficulty communicating Clear and prompt awareness of thirst
    Urine output Less frequent, darker color More frequent, lighter color
    Skin elasticity Reduced elasticity, skin may appear dry Skin springs back quickly
    Mental status Confusion, disorientation, agitation Irritability, lethargy
    Heart rate May be elevated, but not as pronounced Often elevated significantly

    Subtle Symptoms Often Overlooked

    Many subtle symptoms associated with dehydration in the elderly can be easily overlooked, leading to delayed diagnosis and treatment.

    • Changes in bowel habits: Constipation or decreased bowel movements can be a subtle sign of dehydration. This can be especially true if there are no other noticeable symptoms.
    • Reduced alertness or sleepiness: This can be mistaken for other issues in older adults.
    • Decreased appetite: Reduced food intake can be a symptom, often overlooked or attributed to other factors.
    • Urinary incontinence: This can occur if the body is struggling to retain fluids. This is particularly important in the elderly.

    Uncommon, but Potentially Serious, Symptoms

    Some uncommon symptoms associated with dehydration in the elderly can be serious and require immediate medical attention.

    • Severe weakness or dizziness: This can lead to falls and injuries.
    • Low blood pressure (hypotension): This can be particularly dangerous, especially in the elderly.
    • Rapid heart rate (tachycardia): This could indicate a more serious issue and requires urgent medical intervention.
    • Loss of consciousness (syncope): This is a serious sign and warrants immediate medical attention.

    Impact of Underlying Conditions

    Symptoms of dehydration in elderly

    Dehydration, a common concern, especially among the elderly, can be significantly complicated by pre-existing medical conditions. These conditions can mask the typical signs of dehydration or alter their presentation, making diagnosis more challenging. Understanding these interactions is crucial for healthcare providers to ensure timely intervention and prevent potentially serious consequences.Pre-existing health issues can significantly influence how dehydration manifests in elderly individuals.

    Conditions affecting the kidneys, heart, or nervous system, for instance, can affect fluid balance and potentially alter the way dehydration presents itself. These variations can be subtle, making it challenging to recognize the problem early on.

    Impact of Specific Medical Conditions

    Various medical conditions can impact the manifestation of dehydration symptoms. These conditions can either mask the symptoms or alter their typical presentation. For example, individuals with chronic kidney disease may not exhibit the typical thirst sensation. Similarly, those with heart failure may experience edema (swelling), which can mask the signs of dehydration. Cognitive impairment, a common concern in the elderly, can also affect the ability to recognize and communicate the symptoms of dehydration.

    Dehydration in Elderly Individuals with Dementia

    The experience of dehydration in elderly individuals with dementia often differs from those without cognitive impairment. Dementia can impact the ability to communicate thirst or other symptoms. They may also exhibit behavioral changes, such as agitation or confusion, which can be mistaken for other conditions. Changes in appetite, which are often associated with dementia, may also lead to decreased fluid intake, increasing the risk of dehydration.

    Recognition of subtle changes in behavior, such as restlessness or unusual sleep patterns, can be crucial in identifying potential dehydration.

    Factors Contributing to Delayed Recognition

    Several factors can contribute to delayed or absent recognition of dehydration in the elderly. These factors include the subtlety of symptoms, the presence of co-morbidities, and the challenges associated with cognitive decline. Furthermore, the elderly may not seek medical attention as readily as younger individuals, or they may not understand the importance of early intervention. Sometimes, healthcare professionals may overlook dehydration in the elderly, particularly if the individual is already under the care for other chronic conditions.

    Strategies for Identifying Dehydration in Elderly Patients

    Effective strategies for identifying dehydration in elderly patients with various health conditions include a comprehensive assessment of their medical history, a thorough evaluation of their current medications, and a detailed analysis of their fluid intake. Careful monitoring of their behavior, such as changes in appetite, sleep patterns, or level of alertness, can also be helpful. Regular blood tests to assess electrolyte levels and kidney function can be crucial in identifying potential dehydration, especially in patients with underlying kidney conditions.

    Communication with family members and caregivers is also essential to obtain a complete picture of the patient’s daily activities and fluid intake patterns.

    Assessing Severity of Dehydration

    Determining the severity of dehydration in older adults is crucial for timely intervention and preventing potentially serious complications. Factors like underlying health conditions, medications, and cognitive impairment can significantly affect the presentation and progression of dehydration. Accurate assessment allows healthcare professionals to implement appropriate treatment strategies and prevent further deterioration.

    Levels of Dehydration Severity

    Understanding the different stages of dehydration is essential for prompt and effective management. Severity is often categorized based on observable symptoms and physiological changes.

    Severity Level Symptoms Recommended Actions
    Mild Dehydration Slight thirst, dry mouth, decreased urine output, slightly sunken eyes, fatigue, dizziness, slight increase in heart rate. Increased fluid intake (water, clear broths, diluted juices), frequent small sips, monitoring for worsening symptoms, and contacting healthcare provider if symptoms persist or worsen.
    Moderate Dehydration Increased thirst, dry mouth, sunken eyes, decreased urine output, noticeable fatigue, dizziness, lightheadedness, confusion, rapid pulse, low blood pressure, elevated body temperature. Urgent medical attention is required. Intravenous (IV) fluids may be necessary to restore hydration. Close monitoring of vital signs and electrolyte levels is crucial.
    Severe Dehydration Extreme thirst, very dry mouth, sunken eyes, decreased or absent urine output, rapid, weak pulse, low blood pressure, confusion, lethargy, loss of consciousness, shock. Immediate medical intervention is critical. Intravenous (IV) fluids and electrolyte replacement are usually necessary. Close monitoring of vital signs and organ function is essential to prevent life-threatening complications. Possible admission to a hospital or intensive care unit (ICU) may be necessary.

    Methods for Evaluating Dehydration Severity

    Accurate assessment involves a combination of observation, physical examination, and laboratory tests. The key is to evaluate the patient holistically, considering their individual circumstances and medical history.

    • Physical Examination: A thorough physical examination focusing on vital signs, skin turgor, mucous membrane moisture, and mental status provides valuable insights. Skin turgor, a measure of skin elasticity, can indicate the degree of dehydration. A sunken appearance to the eyes is another key indicator.
    • Monitoring Vital Signs: Changes in heart rate, blood pressure, respiratory rate, and temperature can reflect the severity of dehydration. A rapid pulse and low blood pressure, especially in conjunction with other signs, suggest more severe dehydration. Monitoring for elevated temperature can be an indication of a concurrent condition or a worsening condition.
    • Urine Output and Concentration: Assessing urine output and specific gravity (a measure of urine concentration) provides valuable information. Decreased urine output, especially with concentrated urine, suggests dehydration. On the other hand, very dilute urine can indicate overhydration, or other conditions. Changes in urine output and concentration should be carefully tracked in relation to fluid intake.
    • Laboratory Tests: Blood tests, including electrolyte levels (sodium, potassium, and calcium), can reveal underlying imbalances that may contribute to or exacerbate dehydration. Monitoring these levels and their changes over time is crucial to ensure appropriate treatment and to rule out or monitor for underlying conditions.

    Importance of Monitoring Urine Output

    Monitoring urine output in elderly patients is crucial in assessing hydration status. Decreased urine output can be an early indicator of dehydration. The volume and color of urine provide important clues. A lack of urine production in a patient who is not taking diuretics or experiencing other conditions can suggest a need for immediate medical attention. By closely monitoring urine output, healthcare providers can proactively identify and address dehydration.

    Factors Contributing to Dehydration in the Elderly

    Dehydration, a surprisingly common issue among older adults, can have serious consequences for their health and well-being. Understanding the various factors contributing to dehydration is crucial for preventing and managing this condition. It’s not always a simple matter of not drinking enough; multiple intertwined elements can play a role. From lifestyle choices to underlying medical conditions, a multifaceted approach is often needed to address this issue effectively.Older adults face unique challenges when it comes to hydration.

    Their bodies may not signal thirst as effectively as they once did, and they may have reduced mobility or cognitive decline, all of which can lead to inadequate fluid intake. Further complicating matters, certain medications can also contribute to dehydration.

    Common Causes of Dehydration in the Elderly

    Several factors contribute to dehydration in older adults. These factors can be broadly categorized into lifestyle, environmental, and medical causes. Understanding these categories helps healthcare professionals and caregivers identify potential risks and implement appropriate interventions.

    • Lifestyle Factors: Dietary habits, activity levels, and social interactions significantly influence fluid intake. For example, a diet low in fruits and vegetables, both excellent sources of water, can lead to inadequate hydration. Similarly, reduced physical activity, particularly in those with limited mobility, can decrease fluid needs, but not necessarily the need for water intake. A lack of social interaction or engagement in activities that involve fluid intake can also impact hydration habits.

      A lack of access to potable water or the ability to obtain it can be an issue for those in certain circumstances.

    • Environmental Factors: Extreme temperatures, particularly heat waves, can increase fluid loss through perspiration, potentially leading to dehydration, especially in individuals with limited mobility or cognitive impairment. Dry air in homes or care facilities can also contribute to dehydration. Furthermore, exposure to very cold temperatures can lead to dehydration, albeit in a less obvious way.
    • Medical Factors: Underlying health conditions, such as diabetes, kidney disease, and heart failure, can impact fluid balance. Chronic conditions can sometimes lead to increased urination or altered fluid retention, thus affecting hydration levels. Also, some medications can contribute to dehydration. For example, diuretics, often prescribed to manage high blood pressure or other conditions, increase urine output, leading to a loss of fluids.

    Medications and Dehydration

    Certain medications can contribute to dehydration in the elderly by increasing fluid loss or altering the body’s ability to retain fluids. This is particularly important to recognize as these medications are often prescribed for chronic conditions.

    • Diuretics: These medications are commonly prescribed for high blood pressure, heart failure, and other conditions. Their primary action is to increase urine production, leading to fluid loss. Adjusting dosages or fluid intake can mitigate this effect.
    • Laxatives: Laxatives can lead to fluid loss through diarrhea, which can quickly lead to dehydration if not addressed.
    • Anticholinergics: These medications can reduce saliva production and thirst sensation, making it harder for individuals to recognize and respond to the need for hydration. These medications are often prescribed to treat certain neurological conditions.
    • Opioids: Opioids can reduce fluid intake due to their side effects, such as constipation and reduced awareness.

    Decreased Thirst Sensation and Dehydration Risk

    The perception of thirst diminishes with age, leading to a decreased awareness of the need for fluids. Older adults may not feel thirsty even when their bodies are dehydrated. This can be a critical factor in developing dehydration.

    Reduced Mobility and Fluid Intake

    Reduced mobility in older adults can significantly impact their ability to access and consume fluids. This can lead to a vicious cycle of dehydration, where reduced mobility hinders fluid intake, which, in turn, worsens mobility. Limited access to water sources and difficulty in reaching for drinks further contribute to the risk.

    Cognitive Decline and Hydration

    Cognitive decline can impair an older adult’s ability to remember to drink fluids, understand the importance of hydration, or even locate and access drinking sources. This further increases their vulnerability to dehydration. For instance, an individual with dementia may forget to drink or misplace water bottles.

    Preventive Measures and Management

    Staying hydrated is crucial for overall health, especially for elderly individuals. Dehydration can lead to various complications, impacting their mobility, cognitive function, and overall well-being. Implementing preventive measures and establishing effective management strategies is key to ensuring their comfort and safety.Maintaining adequate hydration is a proactive approach to preventing dehydration in the elderly. This involves a multifaceted strategy, encompassing dietary choices, lifestyle modifications, and proactive monitoring.

    Consistent habits, supported by social networks and family involvement, can significantly reduce the risk of dehydration-related issues.

    Strategies for Preventing Dehydration in the Elderly

    Implementing preventive measures is essential for maintaining the well-being of elderly individuals. These measures involve a combination of lifestyle changes and proactive health management. A crucial element of preventing dehydration is encouraging regular fluid intake.

    • Promoting Oral Hydration: Encouraging frequent, small sips of water throughout the day is more effective than large quantities at infrequent intervals. Offer water regularly, especially between meals and during activities. Consider using attractive water bottles or adding flavour to water to make it more appealing to older adults.
    • Encouraging Dietary Hydration: Emphasize foods high in water content, such as fruits and vegetables. Water-rich fruits and vegetables provide hydration along with essential nutrients. Examples include watermelon, cucumbers, and leafy greens.
    • Managing Medications: Certain medications can increase the risk of dehydration. Be aware of the potential diuretic effects of medications and discuss hydration strategies with the doctor. Medication schedules and their impact on hydration should be discussed with healthcare professionals.
    • Addressing Underlying Conditions: If an underlying medical condition is contributing to dehydration, addressing the root cause is essential. Conditions like diabetes, kidney disease, or heart failure can affect fluid balance. Monitoring for such conditions and addressing them promptly is important.

    Practical Tips for Promoting Adequate Fluid Intake in Older Adults

    Promoting adequate fluid intake in older adults involves a combination of awareness and practical strategies. Simple measures can significantly improve hydration levels.

    Elderly folks can sometimes have subtle signs of dehydration, like confusion or dizziness. It’s crucial to watch for these, as ignoring them can lead to serious health issues. For instance, prostate cancer, if left untreated, can have severe consequences, impacting quality of life significantly. what happens if prostate cancer is not treated. Ultimately, staying hydrated is vital for overall well-being in older adults, preventing a range of complications.

    • Making Hydration Appealing: Offer a variety of beverages, such as flavored water, diluted fruit juices, or herbal teas. Cold drinks can be appealing in hot weather.
    • Scheduling Hydration Reminders: Use visual cues or set reminders on phones or calendars to encourage regular water intake.
    • Incorporating Hydration into Activities: Encourage drinking water during and after physical activity. This is particularly important during warm weather or strenuous exercise.
    • Addressing Sensory Changes: If there are sensory changes affecting the ability to taste or smell, consider using attractive containers or changing the temperature of the water.

    Importance of Regular Hydration Checks and Monitoring

    Regular hydration checks are vital for early detection and management of dehydration. Consistent monitoring allows for timely intervention. This proactive approach helps prevent serious health complications.

    • Regular Monitoring of Urine Output: Observing the colour and frequency of urine is a simple way to assess hydration status. Light yellow urine usually indicates adequate hydration.
    • Weight Monitoring: Regular weight checks can indicate fluid loss or retention. Sudden weight loss can signal dehydration.
    • Skin Turgor Assessment: Checking skin elasticity, or turgor, can provide an immediate assessment of hydration levels. Pinch the skin on the forearm or chest; if it takes a while to return to normal, dehydration might be a concern.

    Recommended Daily Fluid Intake for Different Age Groups

    The table below highlights recommended daily fluid intake for various age groups, emphasizing the needs of elderly individuals.

    Age Group Recommended Daily Fluid Intake (Approximate)
    Infants (0-6 months) 0.6-1.0 liters
    Children (7-12 months) 1.0-1.3 liters
    Children (1-3 years) 1.3-1.6 liters
    Children (4-8 years) 1.6-2.0 liters
    Children (9-18 years) 2.0-2.4 liters
    Adults (19+ years) 2.0-2.7 liters
    Elderly (65+ years) 2.0-2.5 liters (Individual needs may vary)

    Role of Social Support and Family Involvement

    Social support and family involvement are essential in promoting hydration in the elderly. Encouraging a supportive environment fosters a positive impact on health outcomes.

    • Family and Caregiver Education: Educating family members and caregivers about the importance of hydration in elderly care is essential.
    • Encouraging Social Interactions: Promoting social interaction and shared meals can encourage water intake in a social setting.
    • Regular Communication and Support: Regular communication with healthcare professionals, family members, and caregivers is vital for monitoring hydration status and addressing concerns.

    Illustrative Case Studies

    Understanding dehydration in the elderly requires a nuanced approach, moving beyond simple symptom identification. Real-life case studies provide valuable insights into the complexities of this condition, highlighting the importance of considering individual factors and underlying health issues. These cases illustrate how different management strategies can be tailored to specific situations, leading to more effective and compassionate care.

    Case Study 1: Mrs. Davies

    Mrs. Davies, a 78-year-old woman with a history of Parkinson’s disease and swallowing difficulties, presented with complaints of decreased urination, dry mouth, and confusion. Her living situation involved independent living, but she had limited mobility and relied on her daughter for some assistance. Her daughter noted a recent decrease in her mother’s intake of fluids, despite the daughter’s efforts to encourage water consumption.

    Recognizing the link between decreased fluid intake and Parkinson’s, and the difficulty swallowing, dehydration was suspected.Management of Mrs. Davies’s dehydration involved a multi-pronged approach. First, a careful assessment of her swallowing abilities was crucial, leading to the implementation of thickened liquids and smaller, more frequent meals. Simultaneously, the healthcare team worked with her daughter to establish a hydration schedule, ensuring consistent fluid intake throughout the day.

    The involvement of a speech therapist was vital in addressing the swallowing difficulties, which were contributing to her reduced fluid intake.

    Case Study 2: Mr. Johnson

    Mr. Johnson, a 92-year-old man with chronic heart failure and a history of medication-related side effects, experienced fatigue, dizziness, and a decrease in urine output. He resided in a senior assisted living facility and was on multiple medications, including diuretics. His decreased urine output, a common side effect of diuretics, and his chronic conditions were significant factors in the dehydration assessment.Management of Mr.

    Johnson’s dehydration required careful monitoring of his fluid intake and output. The team adjusted his medication schedule to minimize diuretic-induced fluid loss, while simultaneously ensuring adequate hydration through oral fluids and, when necessary, intravenous fluids. The multidisciplinary approach involving the physician, nurses, and pharmacists was crucial to addressing the underlying conditions and managing the dehydration effectively. Close communication with Mr.

    Elderly folks are particularly vulnerable to dehydration, with symptoms like fatigue and confusion being common. Understanding these signs is crucial for timely intervention. Knowing what a complete blood count (CBC) can tell us about the body’s overall health is also important, as a CBC can reveal important details about a patient’s red blood cell levels, which can be affected by dehydration.

    A what is a cbc complete blood count can be a helpful diagnostic tool alongside monitoring for dehydration symptoms like dry mouth, sunken eyes, and decreased urine output.

    Johnson’s family and the assisted living facility staff ensured a consistent and supportive environment.

    Case Study 3: Ms. Rodriguez

    Ms. Rodriguez, a 85-year-old woman with dementia and a history of urinary incontinence, presented with confusion, lethargy, and dry mucous membranes. She lived independently but struggled with maintaining adequate hygiene and was unable to recognize the need for hydration. Her cognitive decline made communicating her needs challenging.Management of Ms. Rodriguez’s dehydration focused on addressing the underlying dementia and promoting appropriate hydration strategies.

    This involved working with a geriatric care team to create a supportive environment that encouraged hydration. Regular monitoring of her fluid intake and output was crucial. Using strategies like placing water bottles within easy reach, and utilizing visual cues to prompt hydration were effective communication tools. Involvement of her family in the hydration plan was also crucial, enabling consistency and support.

    Comparison of Approaches

    The management strategies varied across the cases, highlighting the need for individualized care. In Mrs. Davies’s case, the focus was on addressing the swallowing difficulties, while Mr. Johnson’s management centered on medication adjustments. Ms.

    Rodriguez’s case emphasized communication strategies and environmental modifications to support her needs. These diverse approaches underscore the importance of considering the specific circumstances, medical history, and living situation of each elderly patient.

    Environmental Considerations

    The elderly are particularly vulnerable to dehydration, and environmental factors play a significant role in their risk. Understanding how heat, cold, and other environmental conditions impact hydration needs is crucial for prevention and management. The body’s natural regulatory mechanisms for maintaining hydration can be compromised in older adults, making them more susceptible to the effects of extreme temperatures and humidity.Environmental factors significantly influence the symptoms of dehydration in older adults.

    The elderly often experience a reduced thirst sensation, making it harder for them to recognize the need to drink fluids. Moreover, environmental conditions like heat and cold can accelerate fluid loss, further compounding the risk of dehydration. Recognizing the impact of these environmental factors allows for more effective preventative measures and treatment strategies.

    Effects of Heat on Hydration Needs

    Heat significantly increases the risk of dehydration in the elderly. Elevated temperatures cause increased sweating, leading to substantial fluid loss. Older adults often have a diminished ability to regulate body temperature, exacerbating the problem. This reduced ability to sweat effectively can lead to a rapid rise in body temperature, potentially triggering heatstroke. Moreover, prolonged exposure to high temperatures can lead to exhaustion and reduced mobility, making it difficult for the elderly to access fluids.

    Furthermore, some medications can interfere with the body’s natural ability to regulate temperature and hydration, thus increasing the risk of heat-related illnesses.

    Effects of Cold on Hydration Needs

    While less obvious than heat, cold weather can also contribute to dehydration in the elderly. Individuals may experience increased fluid loss through respiration in cold temperatures. This can be overlooked, as the loss is often less noticeable than sweating. Furthermore, individuals may bundle up in layers of clothing, decreasing their awareness of thirst. The elderly may also experience reduced physical activity in cold weather, and this reduction in activity can lead to less consumption of fluids.

    Additionally, the elderly may be less likely to recognize signs of cold-related dehydration because the symptoms can be subtle.

    Importance of Environmental Factors in Understanding Dehydration Symptoms

    The elderly often exhibit subtle symptoms of dehydration, which can be easily overlooked if environmental factors are not considered. For example, confusion or lethargy in a hot environment might be misattributed to other conditions. Similarly, decreased urine output in cold weather could be mistaken for a different health issue. Understanding how environmental factors influence symptoms allows healthcare professionals to accurately diagnose and manage dehydration.

    Preventive Measures in Various Environmental Conditions

    Implementing preventive measures is crucial to combat dehydration in the elderly. In hot weather, these measures include staying indoors during peak heat hours, increasing fluid intake, and wearing loose-fitting, light-colored clothing. In cold weather, encouraging increased fluid intake, ensuring adequate insulation, and monitoring for signs of dehydration are vital.

    • Staying Hydrated: Ensuring consistent fluid intake is paramount, regardless of the weather. Carry a water bottle and encourage frequent sips throughout the day. Encourage the consumption of hydrating foods like fruits and vegetables.
    • Appropriate Clothing: Light, breathable clothing is crucial during heat waves. In cold weather, ensure proper layering to maintain body temperature without excessive sweating.
    • Environmental Modifications: Cooling strategies in hot weather include using fans, air conditioning, or taking cool baths. In cold weather, keeping the home adequately heated and providing extra blankets can help.
    • Monitoring: Regularly check for signs of dehydration, such as decreased urine output, dry mouth, and confusion. Regular monitoring by caregivers or family members is important.

    Illustrative Table of Hydration Needs in Different Weather Conditions

    Weather Condition Elderly Hydration Needs Preventive Measures
    Extreme Heat (e.g., 35°C or above) Increased fluid intake (water, electrolyte drinks) and frequent sips throughout the day. Limit outdoor activity during peak heat hours, use air conditioning, wear light clothing, and monitor for symptoms.
    Cold Weather (e.g., below 10°C) Adequate fluid intake to compensate for insensible water loss through respiration. Ensure adequate heating, encourage fluids, and monitor for signs of dehydration.
    Humid Weather Increased fluid intake to compensate for increased sweat loss. Use air conditioning, avoid strenuous outdoor activity, and monitor for symptoms.

    Modifying the Environment to Reduce Dehydration Risk

    Modifying the environment to be more supportive of the elderly’s hydration needs is essential. Homes should be equipped with air conditioning or fans in the summer to maintain a comfortable temperature. In winter, ensuring adequate heating and providing blankets and warm drinks can help. Moreover, ensuring easy access to water and other hydrating beverages throughout the home can help.

    Regular checks for proper functioning of air conditioning and heating systems are also necessary.

    Importance of Early Intervention

    Prompt recognition and intervention for dehydration in the elderly is crucial. Neglecting early symptoms can lead to serious complications, impacting their overall health and quality of life. Early intervention minimizes these risks and enhances the effectiveness of treatment strategies.Early detection and intervention for dehydration in the elderly is paramount due to the increased vulnerability of this population to its adverse effects.

    Older adults often have diminished thirst mechanisms, making them less aware of their dehydration status. Furthermore, co-existing medical conditions can mask or modify the typical symptoms, thus making early diagnosis challenging. Prompt action can significantly improve outcomes and prevent potentially life-threatening consequences.

    Significance of Early Detection

    Early detection of dehydration is vital for preventing further complications. Dehydration can worsen existing health conditions and lead to a cascade of adverse events. By identifying the symptoms early, healthcare professionals can initiate appropriate interventions, thus mitigating the risks associated with severe dehydration. This proactive approach can also lead to quicker recovery and a better quality of life for the elderly individual.

    Potential Complications of Delayed Treatment

    Delayed treatment of dehydration in older adults can lead to several severe complications. These include electrolyte imbalances, which can disrupt various bodily functions; acute kidney injury, a serious threat to kidney health; and increased risk of falls, which can exacerbate existing health problems or lead to injuries. Further, the elderly may experience confusion, disorientation, and decreased cognitive function, hindering their ability to participate in daily activities.

    Such complications underscore the urgent need for prompt treatment.

    Connection to Other Health Issues

    Dehydration can exacerbate existing health conditions in the elderly. For example, individuals with diabetes or heart failure are particularly susceptible to dehydration complications. The disruption of fluid balance can lead to worsening of underlying conditions and further impact the elderly’s health and well-being. Early intervention can help prevent these detrimental effects and improve the overall management of multiple health concerns.

    Role of Healthcare Providers

    Healthcare providers play a critical role in educating elderly individuals and their families about the signs and symptoms of dehydration. They should emphasize the importance of maintaining adequate fluid intake and recognizing early warning signs. Furthermore, providers should offer guidance on how to identify dehydration in different contexts, such as during specific illnesses or when taking certain medications.

    Educating patients and their families is key to preventing dehydration.

    Impact on Overall Health and Well-being

    Early intervention for dehydration significantly impacts the overall health and well-being of the elderly. It prevents the development of potentially life-threatening complications and improves their ability to maintain daily activities. Early treatment can help prevent falls, maintain cognitive function, and enhance the quality of life for older adults. A focus on early intervention creates a proactive approach to health management, which is particularly important for this vulnerable population.

    End of Discussion: Symptoms Of Dehydration In Elderly

    Recognizing the subtle and sometimes masked symptoms of dehydration in the elderly is paramount for timely intervention. This discussion highlights the importance of considering individual factors and understanding the impact of underlying conditions. Early detection, coupled with preventive strategies and a proactive approach, can significantly improve the well-being of older adults.

  • Weeping Eczema Overview and More

    Weeping Eczema Overview and More

    Weeping eczema overview and more delves into the complexities of this skin condition, offering a comprehensive understanding of its causes, symptoms, and management. We’ll explore everything from the underlying triggers to effective treatments and preventive strategies. Prepare to gain valuable insights into this common yet often challenging skin issue.

    This comprehensive guide covers the full spectrum of weeping eczema, from its definition and diagnostic process to lifestyle adjustments and long-term effects. We’ll also delve into illustrative examples, prevention strategies, and valuable resources to support your understanding and journey toward effective management.

    Introduction to Weeping Eczema

    Weeping eczema, also known as exudative eczema, is a type of eczema characterized by the formation of blisters that leak fluid. This fluid leakage, often accompanied by crusting, creates a weeping appearance on the skin. Understanding its causes, symptoms, and distinctions from other eczema types is crucial for effective management and treatment.Underlying causes of weeping eczema can be multifaceted, encompassing both internal and external factors.

    A compromised immune system, certain allergies, and reactions to irritants can all contribute to the development of weeping eczema. Skin conditions like psoriasis, or atopic dermatitis, can also present with weeping characteristics. The precise cause often requires careful medical evaluation.Typical symptoms associated with weeping eczema include the formation of blisters filled with clear or yellowish fluid. These blisters can appear on various parts of the body, but often cluster in areas prone to friction or irritation, such as the folds of the skin or areas exposed to frequent scratching.

    The affected skin may appear red, inflamed, and swollen, accompanied by intense itching. The weeping aspect of the condition is crucial to recognizing and differentiating it from other types of eczema.

    Comparison with Other Eczema Types, Weeping eczema overview and more

    Understanding the differences between weeping eczema and other eczema forms aids in proper diagnosis and treatment. The following table highlights key distinctions:

    Characteristic Weeping Eczema Dry Eczema Contact Eczema
    Appearance Blisters, fluid leakage, crusting Dry, cracked, scaly skin Redness, itching, rash often localized to contact area
    Cause Compromised immune system, allergies, irritants Dry skin, reduced skin barrier function Direct contact with allergens or irritants
    Symptoms Itching, blisters, weeping fluid, inflammation Itching, dryness, cracking, flaking Itching, redness, rash at the point of contact
    Location Can appear anywhere, often folds of skin Often on hands, feet, and elbows Typically localized to the area of contact

    The table demonstrates the distinct visual, causative, and symptomatic differences between the various eczema types. This comparative analysis helps differentiate weeping eczema from its counterparts.

    Causes and Risk Factors: Weeping Eczema Overview And More

    Understanding the causes and risk factors of weeping eczema is crucial for effective management. While a definitive cause isn’t always pinpointed, various contributing elements play a significant role in the development and exacerbation of this skin condition. This deeper dive explores the factors influencing weeping eczema, from genetic predispositions to environmental triggers.Weeping eczema, a distressing skin condition, isn’t triggered by a single factor.

    Instead, it’s often a complex interplay of genetic susceptibility, environmental irritants, and sometimes, even emotional stress. Pinpointing the precise cause can be challenging, but recognizing the potential triggers allows for better preventative measures and improved management strategies.

    Underlying Genetic Predisposition

    A person’s genetic makeup significantly influences their susceptibility to eczema. A family history of atopic dermatitis, asthma, or hay fever often indicates an increased risk. This genetic predisposition, inherited from parents, plays a crucial role in the body’s immune response, making individuals more prone to skin inflammation. Studies show a correlation between specific genes and the development of eczema, although further research is needed to fully understand the intricate genetic mechanisms.

    Environmental Triggers

    Environmental factors can significantly exacerbate eczema symptoms. Various substances and situations can irritate the skin, leading to flare-ups. Recognizing these triggers is vital for managing the condition effectively.

    Potential Environmental Triggers

    Category Examples
    Irritants Soaps, detergents, perfumes, harsh chemicals, wool, certain fabrics (synthetic fibers)
    Allergens Dust mites, pollen, pet dander, certain foods (e.g., nuts, dairy, eggs), molds, and insect bites
    Temperature Extremes Extreme heat or cold, prolonged exposure to wind
    Stress Emotional stress, anxiety, and physical exertion can trigger or worsen eczema symptoms.
    Infections Bacterial or viral infections can sometimes trigger or worsen existing eczema.
    Humidity High humidity can cause increased moisture on the skin, which may worsen eczema

    These triggers can vary from person to person, emphasizing the personalized approach to managing weeping eczema.

    Prevalence Across Demographics

    The prevalence of weeping eczema can vary based on demographics. While exact figures can be difficult to obtain, studies suggest that eczema tends to affect children more frequently than adults. Furthermore, certain ethnic groups may have a higher or lower prevalence compared to others. This difference might be linked to factors like environmental exposures and cultural practices.

    It’s important to remember that these are general observations, and individual experiences may differ.

    Diagnosis and Assessment

    Diagnosing weeping eczema involves a careful evaluation of the patient’s symptoms, medical history, and physical examination. Accurate diagnosis is crucial for effective treatment and management. It’s essential to distinguish weeping eczema from other skin conditions, as treatment approaches vary significantly. A proper assessment of the severity is also critical to guide treatment decisions.A comprehensive approach to diagnosis necessitates a thorough understanding of the patient’s presentation, including the location, appearance, and duration of the rash.

    This helps in narrowing down the possibilities and identifying potential contributing factors. Furthermore, a detailed history of any triggers, previous treatments, and family history of skin conditions can significantly aid in the diagnostic process.

    Diagnostic Process

    The diagnostic process for weeping eczema begins with a detailed patient history, encompassing the onset, progression, and characteristics of the rash. This includes the location, appearance (e.g., weeping, oozing, crusting), and any associated symptoms (e.g., itching, burning). The physician also inquires about potential triggers, such as allergens, irritants, or stressors. A physical examination of the affected skin is performed, focusing on the distribution, morphology, and severity of the rash.

    Skin biopsies may be necessary in some cases to confirm the diagnosis or rule out other conditions.

    Methods of Differentiation

    Differentiating weeping eczema from other skin conditions requires careful consideration of several factors. The presence of weeping, oozing, and crusting lesions, often accompanied by intense itching, can be characteristic of eczema. However, other skin conditions, such as allergic contact dermatitis, psoriasis, or fungal infections, can present with similar symptoms. A thorough history, physical examination, and possibly diagnostic tests are crucial to distinguish weeping eczema from these conditions.

    For instance, allergic contact dermatitis typically presents with a clear relationship to exposure to specific allergens, whereas psoriasis may exhibit characteristic silvery scales. Fungal infections often display specific patterns and may respond differently to treatment.

    Weeping eczema, a frustrating skin condition, often involves intense itching and oozing. It can be really tough to manage, and understanding its various triggers is key. While researching ways to soothe this discomfort, I stumbled across some interesting insights into how to manage your heart rate after a night out, which might be surprising. For example, how to slow heart rate after drinking alcohol can be really helpful, especially when you’re trying to calm down after a night of socializing.

    Learning to manage your body’s responses in different situations, whether it’s related to eczema or alcohol consumption, is definitely valuable. Back to eczema, there are many more aspects to explore and understand about this skin condition.

    Patient History Questions

    A structured approach to gathering patient information is essential. The following questions can aid in assessing the patient’s condition:

    • When did the rash first appear?
    • What are the characteristics of the rash (e.g., weeping, oozing, scaling)?
    • Where is the rash located on the body?
    • Has the rash been present before? If so, when?
    • What factors seem to trigger or worsen the rash?
    • What other medical conditions does the patient have?
    • Are there any family members with a history of skin conditions?
    • What medications or topical treatments has the patient used in the past?
    • Has the patient experienced any recent changes in their lifestyle or environment?

    Assessment of Severity

    Assessing the severity of weeping eczema is vital for determining the appropriate treatment plan. The severity is typically evaluated based on several factors, including the extent of skin involvement, the intensity of symptoms (e.g., itching, pain), and the presence of complications (e.g., secondary infections). The following criteria can be used to gauge the severity of the condition:

    • Area of involvement: The percentage of body surface area affected by the rash.
    • Intensity of symptoms: The level of itching, pain, or discomfort.
    • Presence of complications: Evidence of secondary infections, such as bacterial or fungal infections.
    • Impact on daily life: The degree to which the rash interferes with daily activities and routines.

    A scoring system, such as the Eczema Area and Severity Index (EASI), may be used to quantify the severity of the condition. This standardized method allows for a more objective assessment and facilitates comparison across different patients. The assessment is also influenced by the patient’s overall health status and the presence of any other co-morbidities.

    Management and Treatment

    Managing weeping eczema requires a multifaceted approach, focusing on both immediate relief and long-term prevention of flare-ups. A key component is identifying and avoiding triggers, as well as implementing appropriate treatment strategies. Effective management involves a combination of topical medications, lifestyle adjustments, and possibly, in severe cases, oral medications.Understanding the underlying causes of the weeping eczema is crucial for developing a tailored management plan.

    Addressing the root causes, along with consistent treatment, is vital for achieving and maintaining remission.

    General Approach to Management

    A comprehensive management plan for weeping eczema involves a combination of strategies, aiming to control inflammation, reduce moisture loss, and prevent secondary infections. This often includes identifying and avoiding triggers, employing appropriate topical treatments, and maintaining a consistent skin care routine. Maintaining a balanced diet and adequate hydration can also contribute to overall skin health and reduce the risk of flare-ups.

    Common Treatments for Weeping Eczema

    Topical corticosteroids are frequently prescribed to reduce inflammation and relieve itching. They come in various strengths, with stronger formulations reserved for more severe cases. Moisturizers are essential for restoring the skin’s barrier function, preventing moisture loss, and maintaining hydration. Other topical treatments, such as calcineurin inhibitors, may be used for cases where corticosteroids are not effective or are contraindicated.

    In some instances, oral medications like antihistamines or immunosuppressants may be considered to manage severe cases or when topical treatments are insufficient.

    Methods for Preventing Weeping Eczema Flare-ups

    Identifying and avoiding triggers is paramount in preventing weeping eczema flare-ups. These triggers can include specific foods, allergens, irritants, and environmental factors. Keeping a detailed eczema diary can help identify patterns and pinpoint potential triggers. Maintaining a consistent skincare routine, including regular moisturizing, can also help maintain skin health and reduce the risk of flare-ups. Stress management techniques, such as exercise and relaxation, can also contribute to overall well-being and potentially reduce eczema triggers.

    Topical Treatments and Their Mechanisms of Action

    Effective topical treatments target various aspects of eczema inflammation. The following table Artikels some common treatments and their mechanisms of action:

    Treatment Mechanism of Action
    Topical Corticosteroids (e.g., hydrocortisone) Reduce inflammation by suppressing the immune response in the skin.
    Moisturizers (e.g., emollients) Restore the skin barrier function, preventing moisture loss and maintaining hydration.
    Topical Calcineurin Inhibitors (e.g., tacrolimus) Inhibit the activity of calcineurin, a protein involved in immune response, thus reducing inflammation.
    Antibacterial or Antifungal creams (e.g., for secondary infections) Target specific microorganisms if secondary infection is present.

    Lifestyle and Self-Care

    Managing weeping eczema effectively often involves a multifaceted approach that goes beyond just topical treatments. Lifestyle choices, dietary habits, and self-care practices all play a crucial role in reducing flare-ups and improving overall well-being. Understanding how these factors interact with the condition can significantly impact its management.Lifestyle factors, including stress levels, diet, and environmental triggers, can significantly influence the severity and frequency of weeping eczema outbreaks.

    By proactively addressing these areas, individuals can experience greater control over their symptoms.

    Understanding weeping eczema, and its various forms, is crucial for effective management. It’s a tricky condition, and building a consistent skincare routine is key. Think about how long it takes to form a habit – how long does it take to form a habit – and apply that same principle to your eczema care. This consistency, over time, will help you better control the symptoms and find relief.

    Dietary Considerations

    Dietary choices can influence the body’s inflammatory response, potentially exacerbating or alleviating eczema symptoms. While there’s no single “eczema diet,” certain foods may trigger allergic reactions or worsen inflammation in predisposed individuals.Identifying and avoiding potential triggers is key. Common culprits include dairy products, eggs, nuts, soy, wheat, and certain fruits and vegetables. Keeping a food diary can help pinpoint specific foods that provoke a reaction.

    Consulting a registered dietitian or allergist can provide personalized guidance and recommendations. Eliminating suspected triggers, or gradually reintroducing them, can help determine their impact. Consider incorporating foods rich in antioxidants and omega-3 fatty acids, which may have anti-inflammatory properties.

    Self-Care Practices

    Implementing consistent self-care routines can be instrumental in managing weeping eczema symptoms. These practices can help soothe the skin, reduce irritation, and prevent further damage.

    • Gentle Skin Care: Using fragrance-free, hypoallergenic soaps and cleansers is essential. Avoid harsh scrubbing or hot water, as these can further irritate the skin. Pat the skin dry gently instead of rubbing.
    • Moisturization: Maintaining skin hydration is crucial. Apply a fragrance-free moisturizer frequently, especially after bathing or showering. Look for moisturizers that contain ceramides or other skin-repairing ingredients.
    • Avoiding Irritants: Identify and avoid triggers such as harsh detergents, wool clothing, and certain fabrics. Wear loose-fitting, breathable clothing, and opt for natural fibers like cotton.
    • Protecting from the Environment: Weather conditions can also aggravate eczema. Protect the skin from extreme temperatures, sun exposure, and wind. Apply a broad-spectrum sunscreen with an SPF of 30 or higher.
    • Stress Management Techniques: Chronic stress can worsen eczema symptoms. Incorporating stress-reduction techniques such as meditation, yoga, deep breathing exercises, or spending time in nature can help manage stress levels effectively.

    Stress Management Techniques

    Stress is a significant factor in exacerbating various health conditions, including eczema. Understanding the connection between stress and eczema can lead to proactive strategies for managing stress and improving symptom control.Recognizing the impact of stress on eczema allows individuals to implement targeted interventions. Effective stress management techniques can include mindfulness exercises, deep breathing techniques, regular physical activity, sufficient sleep, and spending time in nature.

    These methods can significantly reduce stress levels and contribute to improved skin health.

    Complications and Long-Term Effects

    Weeping eczema overview and more

    Weeping eczema, while treatable, can lead to a range of complications if left unmanaged. Understanding these potential issues and long-term effects is crucial for proactive management and improved quality of life. This section delves into the complications, highlighting the importance of early intervention and consistent care.Untreated weeping eczema can lead to secondary infections, scarring, and psychological distress. These complications can significantly impact a person’s well-being and require careful attention to prevent further harm.

    The impact on quality of life is substantial, affecting daily activities and social interactions.

    Potential Complications of Weeping Eczema

    Weeping eczema, due to its nature of oozing and inflammation, creates a perfect environment for bacterial or fungal infections. These secondary infections can worsen the eczema, prolong treatment, and cause discomfort. The skin’s barrier function is compromised, making it vulnerable to these external agents.

    • Secondary Infections: Bacterial infections, like impetigo, or fungal infections, such as candidiasis, can easily colonize the damaged skin. These infections manifest as pus-filled sores, redness, and increased pain. Early diagnosis and prompt treatment of these infections are crucial to prevent further spread and complications.
    • Skin Scarring: Chronic scratching and inflammation associated with weeping eczema can lead to permanent skin discoloration and scarring. Repeated damage to the skin’s tissues can result in noticeable changes in skin texture and appearance. Preventing excessive scratching is paramount.
    • Skin thickening (lichenification): Persistent scratching can lead to thickened, hardened skin areas. This condition, known as lichenification, is characterized by a rough, leathery appearance and is often associated with intense itching and discomfort.

    Long-Term Effects of Untreated Weeping Eczema

    The long-term effects of untreated weeping eczema can extend beyond physical discomfort. The constant itching and inflammation can significantly impact a person’s mental well-being.

    • Psychological Impact: The persistent itching, discomfort, and social stigma associated with weeping eczema can contribute to anxiety, depression, and low self-esteem. The emotional toll of managing this chronic condition is often underestimated and needs specific attention.
    • Compromised Sleep: The intense itching and discomfort can disrupt sleep patterns, leading to fatigue and impaired daily functioning. This is a significant consequence of the chronic nature of the condition.
    • Reduced Quality of Life: Weeping eczema can affect various aspects of daily life, including school or work performance, social interactions, and overall enjoyment of activities. The condition can lead to feelings of isolation and social withdrawal, further impacting quality of life.

    Strategies to Mitigate Complications

    Early diagnosis and consistent treatment are crucial for mitigating potential complications. Lifestyle adjustments and appropriate skincare routines can also play a vital role.

    • Consistent Treatment: Adherence to prescribed medications and topical treatments, as directed by a dermatologist, is essential for controlling inflammation and preventing secondary infections. This includes regular application of prescribed creams and ointments.
    • Avoiding Irritants: Identifying and avoiding triggers like harsh soaps, detergents, and certain fabrics can minimize the frequency and severity of eczema flare-ups. This proactive approach is critical for long-term management.
    • Proper Skin Care: Maintaining a gentle skin care routine, using fragrance-free products, and moisturizing regularly can help maintain skin barrier function and prevent dryness. Moisturizing is key to preventing exacerbations.
    • Stress Management: Stress can exacerbate eczema. Practicing stress-reducing techniques like meditation, yoga, or deep breathing exercises can be beneficial. Strategies for stress reduction can contribute to better overall health.

    Illustrative Examples

    Understanding weeping eczema through real-life cases and visual representations helps solidify its characteristics and treatment pathways. This section provides detailed examples of patient experiences and the appearance of the condition, highlighting the variability and challenges associated with this skin disorder.

    A Case Study of a Patient with Weeping Eczema

    A 32-year-old woman presented with a history of intermittent, itchy skin rashes. Initially, the rash appeared as small, red bumps, primarily on her hands and forearms. Over time, the rash evolved into weeping, oozing lesions, especially following periods of stress or changes in weather. The patient reported that the weeping eczema worsened after contact with certain fabrics, detergents, and environmental triggers.

    The severity of the condition significantly impacted her daily life, affecting her work performance and social interactions due to the discomfort and visible nature of the rash.

    A Patient Journey Through Weeping Eczema Treatment

    This patient’s journey began with self-treatment using over-the-counter lotions and creams. While providing some temporary relief, the symptoms persisted and worsened. She then sought medical advice, receiving a diagnosis of weeping eczema and a prescription for topical corticosteroids. The medication provided significant relief, but the patient experienced some side effects like skin thinning. With the help of a dermatologist, she identified specific triggers, such as certain soaps and wool clothing, and learned to implement avoidance strategies.

    The patient’s routine included moisturizing daily and using protective clothing during periods of heightened sensitivity. Regular follow-up appointments helped monitor the condition and adjust the treatment plan as needed, leading to long-term symptom management and improved quality of life.

    Weeping eczema, a frustrating skin condition, often leaves sufferers with intense itchiness. This persistent itch can be particularly bothersome after a shower, when the skin’s natural moisture barrier is compromised. Understanding why this happens can be crucial in managing the condition. For example, figuring out if your shower routine is contributing to the itchiness is key to finding relief.

    Check out this helpful article on reasons why you itch after taking a shower for more insights. Ultimately, addressing the underlying causes of weeping eczema and its symptoms, like persistent itching, is vital for better management.

    Detailed Illustration of Weeping Eczema Lesions

    Weeping eczema lesions are characterized by areas of erythema (redness) and weeping or oozing fluid. The fluid may be clear, yellowish, or contain crusts. The skin often appears inflamed, with a moist and sometimes raw surface. The lesions can vary in size and shape, often appearing in clusters. The affected skin may feel hot to the touch, and itching is a common symptom.

    In severe cases, the lesions can be widespread, affecting large areas of the body. The weeping can lead to skin cracking and discomfort.

    Visual Representation of Different Stages of Weeping Eczema

    Visual representation of weeping eczema stages can illustrate the progressive nature of the condition. Early stages often manifest as small, red papules or plaques, with minimal oozing. As the condition progresses, the lesions enlarge and become more inflamed, exhibiting increased weeping and crusting. The lesions can vary in severity, with some exhibiting only minor weeping, while others have extensive and persistent weeping.

    Severe cases can show deep skin fissures and significant tissue damage. Understanding these stages is critical for appropriate diagnosis and tailored treatment.

    Prevention Strategies

    Weeping eczema, while frustrating, is manageable with proactive strategies. Prevention focuses on identifying and avoiding triggers, establishing a consistent routine, and understanding your body’s unique responses. This allows for better control over flare-ups and minimizes the discomfort associated with weeping eczema.Effective eczema prevention isn’t about a one-size-fits-all approach. It’s about tailoring a personalized strategy to your specific triggers and lifestyle.

    By understanding your eczema’s quirks, you can create a plan that works for you, not against you.

    Trigger Avoidance Strategies

    Identifying and eliminating triggers is paramount in preventing weeping eczema flare-ups. Common triggers include certain fabrics, harsh chemicals, and environmental factors. A detailed log of your eczema episodes can be invaluable in pinpointing patterns and specific irritants.

    • Environmental Triggers: Extreme temperatures (both hot and cold), humidity, and even certain weather conditions can aggravate eczema. Understanding your body’s reactions to these elements can help you adapt your environment to minimize flare-ups.
    • Allergens: Substances like pollen, dust mites, pet dander, and certain foods can trigger allergic reactions that manifest as eczema. Avoiding contact with these allergens is crucial.
    • Irritants: Harsh soaps, detergents, and certain fabrics (like wool) can irritate the skin and exacerbate eczema. Switching to gentler alternatives and choosing soft fabrics can make a significant difference.
    • Stress: While not a direct cause, stress can worsen eczema symptoms. Incorporating stress-reducing activities like yoga, meditation, or spending time in nature can be beneficial.

    Personalized Eczema Management Plan

    A personalized eczema management plan is crucial for long-term control. This plan should be adaptable and flexible to accommodate your daily life and specific needs. It’s not just about avoiding triggers, but about creating a skin-friendly routine.

    1. Skincare Routine: A gentle, fragrance-free skincare routine, including moisturizing creams and barrier repair products, is essential. Regular application of emollients, particularly after bathing, helps maintain skin hydration and prevents dryness, a major contributor to eczema flare-ups.
    2. Trigger Log: Maintain a detailed log of potential triggers, including foods, environmental factors, and activities. This helps identify patterns and allows you to make adjustments to your lifestyle accordingly.
    3. Professional Guidance: Consulting a dermatologist or healthcare professional provides valuable insights into your specific needs. They can offer personalized recommendations, including specific treatments and tailored avoidance strategies.
    4. Stress Management: Chronic stress can significantly worsen eczema symptoms. Incorporate stress-reducing activities, such as exercise, meditation, or spending time in nature, into your daily routine.

    Preventative Strategies for Daily Routines

    Implementing preventative strategies into your daily routines can significantly reduce the frequency and severity of weeping eczema flare-ups. These strategies should become an integral part of your daily life, not just a temporary fix.

    • Gentle Washing: Use lukewarm water and fragrance-free, hypoallergenic soaps or cleansers. Avoid harsh scrubbing or excessive washing.
    • Moisturizing: Apply a moisturizer, especially after showering or bathing, to maintain skin hydration. This creates a protective barrier that helps prevent moisture loss and irritation.
    • Avoiding Irritants: Be mindful of clothing materials, detergents, and other products that may irritate your skin. Opt for natural fabrics and hypoallergenic cleaning products.
    • Stress Reduction Techniques: Incorporate relaxation techniques like meditation, deep breathing exercises, or spending time in nature into your daily routine. Stress can significantly worsen eczema symptoms.

    Additional Resources

    Weeping eczema overview and more

    Staying informed and connected with the right resources is crucial for managing weeping eczema effectively. This section provides valuable avenues for further learning and support, empowering you to navigate your eczema journey with confidence. Understanding the available resources can help you access comprehensive information and expert advice, promoting better self-management and overall well-being.

    Reputable Websites and Organizations

    Numerous websites and organizations offer in-depth information on eczema, including weeping eczema. These platforms often provide evidence-based content, support groups, and educational materials to help individuals understand and manage their condition.

    • The National Eczema Association (NEA): A leading organization dedicated to eczema research, education, and support. They offer comprehensive resources, including articles, webinars, and information on various eczema types, including weeping eczema.
    • The American Academy of Dermatology (AAD): A reputable source of information on skin conditions, including eczema. Their website provides up-to-date information on diagnosis, treatment, and management strategies for various forms of eczema.
    • Mayo Clinic: Known for its extensive medical information, the Mayo Clinic website offers reliable information on eczema, including causes, symptoms, and treatment options. They also provide guidance on managing chronic skin conditions.
    • Cleveland Clinic: Another trusted source for health information, the Cleveland Clinic website provides detailed insights into eczema, including different types, potential triggers, and treatment approaches. They offer specific information on managing skin conditions effectively.

    Healthcare Professionals

    Consulting with healthcare professionals specializing in eczema management is essential for tailored care and effective treatment plans. Finding a dermatologist or allergist familiar with eczema can significantly improve your experience and outcomes.

    • Dermatologists: These physicians are specifically trained in diagnosing and treating skin conditions like eczema. They can provide accurate diagnoses, recommend appropriate treatments, and monitor your condition over time.
    • Allergists: Allergists can identify and manage potential triggers for eczema, helping you avoid specific environmental factors that exacerbate your condition. They can also provide guidance on desensitization therapies if needed.
    • Primary Care Physicians: Your primary care physician can offer initial guidance, make referrals to specialists, and manage your overall health, including your eczema. They are a valuable first point of contact for many individuals.

    Books, Articles, and Other Resources

    Numerous books, articles, and other resources offer practical advice and insights into managing weeping eczema. Seeking out these resources can enhance your understanding of the condition and its management.

    • The Eczema Solution by Dr. [Author Name]: This book might offer insights into dietary considerations, lifestyle modifications, and treatment approaches. Verify the author’s credentials to ensure reliability.
    • Eczema and Skin Conditions by [Author Name]: Articles and resources available online can offer a wide range of information and perspectives on various skin conditions, including eczema.
    • Support groups and online forums: Connecting with others who experience weeping eczema can provide valuable emotional support, shared experiences, and practical tips for managing the condition.

    Table of Reliable Eczema Information Sources

    This table provides quick access to reputable sources for further research and information.

    Source Website
    National Eczema Association [Link to NEA website]
    American Academy of Dermatology [Link to AAD website]
    Mayo Clinic [Link to Mayo Clinic website]
    Cleveland Clinic [Link to Cleveland Clinic website]

    Last Word

    In conclusion, weeping eczema, while often frustrating, is manageable with the right knowledge and approach. By understanding its causes, symptoms, and treatment options, individuals can take proactive steps toward controlling their symptoms and improving their overall well-being. This overview provides a roadmap for navigating this skin condition, empowering readers to take charge of their health and lead fulfilling lives.

  • Baking Soda for Hair A Comprehensive Guide

    Baking Soda for Hair A Comprehensive Guide

    Baking soda for hair is a popular DIY hair care method, but does it live up to the hype? This exploration delves into the potential benefits, risks, and alternative approaches. We’ll examine the science behind its use, common applications, and important considerations before you try this at home.

    Baking soda, a common household ingredient, is often touted as a natural solution for various hair concerns. This article investigates the claims, examining the potential benefits and drawbacks of incorporating it into your hair care routine. We’ll also compare it to more traditional commercial products and discuss the science behind its purported effects.

    Introduction to Baking Soda for Hair

    Baking soda, a common household ingredient, has found its way into the world of hair care. Its mild abrasiveness and pH-balancing properties make it a potential solution for various hair concerns. While its effectiveness can vary greatly from person to person, many find it a helpful addition to their hair routine.Baking soda’s primary action on hair is its ability to neutralize excess acidity or alkalinity in the scalp and hair.

    Baking soda is surprisingly versatile! I’ve been experimenting with it for my hair lately, and it seems to be working wonders. However, if you’re considering using it, remember to do your research first. For example, if you’re wondering about using a CPAP machine, it’s crucial to check if you can use a CPAP if you mouth breathe.

    can i use cpap if i mouth breathe is a great resource to learn more. Ultimately, the key is finding what works best for your hair type and needs, just like figuring out the best breathing techniques. I’ll keep you updated on my baking soda hair journey!

    This is important because a balanced scalp pH is crucial for healthy hair follicles and overall scalp health. The chemical compound, sodium bicarbonate, is a mild alkali that can help remove product buildup and impurities.

    I’ve been experimenting with baking soda for my hair lately, and it’s actually pretty cool! While I’m not a doctor, I’ve read that some people use it to help with certain hair issues. Speaking of issues, if you’re experiencing a urinary tract infection (UTI), checking out signs your uti is going away can give you a sense of when things are improving.

    Regardless of the reason for your baking soda interest, it seems to be a versatile ingredient, and I’m finding it quite helpful for my hair’s health.

    Sodium bicarbonate (NaHCO3) reacts with acids and can also act as a mild exfoliant.

    This exfoliation can help remove dead skin cells and promote a healthier scalp environment.

    Baking Soda’s Chemical Properties and Hair Care

    Baking soda’s chemical properties contribute to its use in hair care. Its slightly alkaline nature helps to counteract the acidic buildup that can occur from hair products and environmental factors. This can lead to a healthier scalp environment, which can in turn benefit hair growth and overall appearance.

    Purported Benefits of Using Baking Soda on Hair

    Many claim that using baking soda can lead to various benefits for hair health. These benefits often include a cleaner scalp, reduced dandruff, and a healthier overall appearance. However, individual results may vary. Some users report that it can also help to detangle hair and improve its texture. It is important to note that the purported benefits are not universally observed and depend on individual hair type and scalp conditions.

    Ways to Use Baking Soda in Hair Care Routines

    Baking soda can be incorporated into various hair care routines. It can be used as a gentle exfoliating shampoo, or as a deep conditioning mask.

    • Shampoo: A small amount of baking soda (typically 1-2 teaspoons) can be added to your regular shampoo. This can create a more cleansing effect, potentially removing product buildup and impurities. However, be careful not to use excessive amounts, as it can strip the hair of its natural oils.
    • Hair Mask: Baking soda can be mixed with other ingredients like apple cider vinegar or honey to create a homemade hair mask. This can help to balance the scalp’s pH, add moisture, and condition the hair.

    Comparison with Commercial Shampoos

    Product Application Benefits Drawbacks
    Baking Soda Shampoo/Mask Gentle exfoliation, potentially reduces product buildup, balances scalp pH, potentially reduces dandruff. Can be drying if used excessively, may not be suitable for all hair types, potential for irritation for sensitive scalps. Requires careful adjustment of concentration to avoid stripping natural oils.
    Commercial Shampoo Shampoo Wide range of formulas targeting various hair concerns (e.g., volume, hydration, color protection). Often convenient and readily available. May contain harsh chemicals, potentially contribute to product buildup, may not be suitable for all hair types, can be expensive depending on brand and formulation. Many commercial shampoos contain sulfates that can strip natural oils.

    Benefits and Claims: Baking Soda For Hair

    Baking soda, a common household ingredient, has found its way into various beauty routines, including hair care. While touted for a range of benefits, the scientific evidence supporting these claims is often limited or contested. This exploration delves into the common assertions about baking soda’s effect on hair and assesses the validity behind them.The effectiveness of baking soda as a hair treatment hinges on understanding its chemical properties and how they interact with hair and scalp.

    Baking soda is surprisingly good for your hair, but before you go scrubbing your locks with it, you might want to consider the food allergen content of popular Halloween candy. Checking out resources like this page on food allergen content of popular Halloween candy is a smart move if you’re dealing with sensitive individuals or are simply curious.

    Ultimately, baking soda can be a helpful hair-care tool, but always use caution and do your research, just like you would when choosing Halloween treats for your family!

    It acts as a mild exfoliant and a natural cleanser, but its effects on hair structure and health are not universally recognized. Therefore, its use should be approached with caution and an awareness of potential downsides.

    Common Claims and Scientific Basis

    Baking soda is frequently promoted for clarifying, volumizing, and treating various scalp concerns. However, the scientific basis for these claims is not always strong. For example, while baking soda can lift surface dirt and oil, its impact on the hair’s internal structure is limited.

    Potential Benefits for Different Hair Types

    The purported benefits of baking soda for hair often vary depending on the individual’s hair type and concerns.

    Hair Type Potential Benefits Possible Drawbacks
    Oily Baking soda can help to remove excess oil and sebum, potentially reducing the appearance of greasiness and preventing product buildup. Some users report that it can lead to a more refreshed and manageable feel. Over-exfoliation can lead to dry scalp and hair, especially if used frequently. Repeated use may also cause irritation, especially if the scalp is sensitive.
    Dry Some individuals report that baking soda, used sparingly, might add a slight volume to their hair due to its mild exfoliating properties. Dry hair is already prone to damage, and baking soda’s potential to further strip natural oils can exacerbate dryness and lead to brittle hair. Frequent use is not recommended.
    Dandruff-prone Baking soda’s slightly abrasive nature might help to remove dead skin cells and flakes from the scalp, potentially reducing the appearance of dandruff. Some find it aids in reducing the itchiness associated with dandruff. It’s important to note that dandruff is often a complex condition with various underlying causes. Baking soda may not address all cases, and excessive use could cause further irritation.

    User Experiences and Testimonials

    Many online testimonials highlight positive experiences with baking soda for hair. Some report clearer, less oily hair, while others find it helpful in controlling dandruff. However, it’s important to remember that individual experiences can vary greatly. What works for one person may not work for another.

    Important Considerations

    While baking soda may offer some benefits for certain individuals, it’s crucial to use it cautiously and sparingly. A small amount in a diluted solution is recommended for most applications. Always conduct a patch test before applying it to the entire scalp to assess potential reactions. If irritation occurs, discontinue use immediately.

    Methods and Procedures

    Baking soda, a common household ingredient, offers versatile hair care applications. Understanding the correct methods and procedures is crucial for achieving desired results and preventing potential damage. Proper preparation and application are key to harnessing baking soda’s benefits without causing irritation or unwanted side effects.Using baking soda in your hair care routine can significantly impact your hair’s health and appearance.

    Whether you’re aiming for clarifying, volumizing, or simply cleansing, following the right steps is paramount to success. This section details various methods, emphasizing the importance of precise preparation and application for optimal results.

    Baking Soda Shampoo

    Baking soda can be a gentle alternative to traditional shampoos, particularly for those with oily or dandruff-prone scalps. It effectively removes buildup without stripping natural oils. Preparing a baking soda shampoo involves mixing a small amount of baking soda with water until a paste forms. The consistency should be similar to that of a thick, creamy paste.

    This allows for easier application and ensures even distribution.

    Step-by-Step Baking Soda Shampoo Application

    1. Wet your hair thoroughly.
    2. Apply the baking soda paste to your scalp, massaging gently to distribute.
    3. Allow the paste to sit for a few minutes, ensuring it’s adequately worked into your scalp.
    4. Rinse thoroughly with lukewarm water until all the baking soda is removed.
    5. Follow with your regular conditioner (optional).

    Baking Soda Hair Mask

    A baking soda hair mask can be a powerful clarifying agent, removing product buildup and revitalizing hair. It’s also useful for addressing scalp concerns. To prepare a baking soda hair mask, mix a tablespoon of baking soda with a few tablespoons of water. The mixture should be thick enough to coat the hair, but not so thick as to be difficult to apply.

    Step-by-Step Baking Soda Hair Mask Application

    1. Apply the baking soda mixture to your hair, focusing on areas prone to product buildup or dryness.
    2. Ensure even distribution throughout your hair.
    3. Wrap your hair in a shower cap for 15-20 minutes to allow the mask to work effectively.
    4. Rinse thoroughly with lukewarm water.
    5. Condition your hair as usual.

    Precautions When Using Baking Soda

    • Start with a small amount and gradually increase the quantity to determine your tolerance. Some individuals may experience scalp irritation with frequent or large doses.
    • Always use lukewarm water when rinsing baking soda from your hair. Avoid hot water, as it can dry out the hair and scalp.
    • If you experience any scalp irritation or discomfort, discontinue use immediately.
    • Do not leave the baking soda mixture on your hair for an extended period without rinsing. This can lead to dryness or scalp irritation.
    • Avoid using baking soda on damaged or chemically treated hair without consulting a professional hairstylist. The abrasive nature of baking soda might exacerbate the damage.

    Common Mistakes to Avoid

    • Using excessive amounts of baking soda can lead to dryness and scalp irritation.
    • Leaving the baking soda mixture on the hair for too long can cause dryness and potentially damage the hair shaft.
    • Using hot water to rinse can strip natural oils from the hair and scalp, leading to dryness.
    • Failing to thoroughly rinse all baking soda can result in a residue that may cause build-up and irritation.
    • Applying baking soda directly to already damaged or broken hair without proper preparation might exacerbate the damage.

    Baking Soda as a Clarifying Agent

    Baking soda is an effective clarifying agent, removing product buildup and leaving hair feeling clean and refreshed. To use baking soda as a clarifying agent, mix a small amount of baking soda with water to form a paste. Apply the paste to the hair, ensuring even distribution, and leave it on for a few minutes. Rinse thoroughly with lukewarm water.

    Baking Soda as a Volumizer

    Baking soda can be used to add volume to hair. Mix a small amount of baking soda with water to form a paste. Apply the paste to the roots of the hair, ensuring even distribution. Allow the paste to sit for a few minutes before rinsing with lukewarm water.

    Potential Side Effects and Risks

    Baking soda, while a seemingly harmless household ingredient, can have potential drawbacks when used on hair. Its abrasive nature and chemical interaction with hair and scalp can lead to unexpected results, ranging from minor irritation to more significant damage. Understanding these risks is crucial for anyone considering incorporating baking soda into their hair care routine.

    Potential Side Effects

    Baking soda’s alkaline nature can disrupt the scalp’s natural pH balance. This can lead to various side effects, including dryness and irritation. The effects are often temporary, but in some cases, they can persist or worsen if the usage isn’t managed correctly. It’s important to be mindful of individual sensitivities and adjust the application method as needed.

    Importance of Patch Testing

    A crucial step before incorporating baking soda into your hair care regimen is a patch test. This involves applying a small amount of the baking soda mixture to a small area of the scalp, typically behind the ear, and observing for any adverse reactions. This preliminary test allows you to gauge your scalp’s response to the baking soda and adjust the formula if necessary.

    A positive reaction could manifest as redness, itching, or burning. If any of these symptoms appear, discontinue use immediately.

    Ingredients and Their Impact, Baking soda for hair

    Commercial baking soda, while primarily sodium bicarbonate, often contains other ingredients to enhance its texture or effectiveness. These additives can potentially affect the hair and scalp differently than the pure compound. For example, some commercial baking soda products might include fillers, preservatives, or fragrances. The presence of these additives can exacerbate any existing scalp conditions or trigger allergies in sensitive individuals.

    Always check the ingredient list of any commercial product you use.

    Potential Side Effects Table

    Potential Side Effect Likelihood Mitigation Strategies
    Dryness Moderate. Many users experience dryness, especially if the baking soda is used too frequently or in high concentrations. Use baking soda less frequently, dilute the mixture with water or other natural oils, and follow up with a moisturizing hair mask or conditioner.
    Scalp Irritation High. The alkaline nature of baking soda can irritate sensitive scalps. This is particularly true if the baking soda is used in a concentrated form or with other harsh chemicals. Always patch test before full application. Use a milder concentration of baking soda. Ensure proper rinsing to avoid residual baking soda on the scalp. Use a gentle shampoo or clarifying shampoo after each use to remove any baking soda residue. If irritation persists, discontinue use and consult a dermatologist.

    Alternatives and Comparisons

    Baking soda for hair

    Baking soda isn’t the only hair care product that aims to clarify and revitalize hair. Many other options exist, each with its own set of benefits and drawbacks. Understanding these alternatives allows for a more informed decision about which approach best suits individual hair needs and goals. This section delves into alternative clarifying agents and compares them to baking soda, providing insights into choosing the right product for your hair type.Clarifying shampoos and other specialized treatments are often used to remove product buildup, leaving hair cleaner and more receptive to subsequent treatments.

    Choosing the right clarifying agent, whether it’s baking soda or another option, requires careful consideration of individual hair needs and potential side effects.

    Alternative Clarifying Agents

    A variety of products can achieve similar clarifying results to baking soda. These include specialized clarifying shampoos, apple cider vinegar rinses, and even certain DIY mixtures. Understanding the pros and cons of each can aid in making a well-informed decision.

    Clarifying Shampoo Comparison

    Clarifying shampoos are specifically designed to remove product buildup and impurities. They often contain stronger surfactants than regular shampoos, which can be beneficial for addressing product buildup. However, overuse can lead to stripping natural oils, potentially causing dryness and damage. The effectiveness and gentleness of a clarifying shampoo vary greatly depending on the specific formula and ingredients.

    Some are designed to be used only occasionally, while others are more suitable for regular use.

    Apple Cider Vinegar Rinse

    Apple cider vinegar (ACV) rinses are a popular alternative for clarifying hair. ACV is believed to help restore the hair’s pH balance and remove product buildup. Its acidity can be gentler than baking soda, but it’s important to use it sparingly. Overuse can lead to dryness or even damage, particularly for individuals with naturally dry or color-treated hair.

    DIY Clarifying Mixtures

    Many DIY mixtures, including combinations of ingredients like lemon juice or other acids, can act as clarifying agents. However, these often require careful ingredient selection and testing, as individual reactions and sensitivities can vary. Unforeseen reactions may cause more harm than good.

    Choosing the Right Clarifying Agent

    The best clarifying agent depends on your specific hair type and concerns. Consider the following factors:

    • Hair Type: Individuals with oily hair might find baking soda or clarifying shampoos more effective. Those with dry hair may prefer ACV rinses or milder options.
    • Product Buildup: If you use a lot of styling products, a clarifying shampoo or baking soda might be more effective.
    • Hair Health: Individuals with damaged or color-treated hair should prioritize gentler options to avoid further damage.
    • Potential Side Effects: Consider any potential side effects, like dryness or irritation, when choosing a clarifying agent.

    Structured Comparison of Clarifying Agents

    Clarifying Agent Pros Cons
    Baking Soda Effective at removing buildup, affordable Can be harsh, potentially drying
    Clarifying Shampoo Designed for deep cleaning, often contains specialized ingredients Can strip natural oils, potentially damage hair
    Apple Cider Vinegar Rinse Gentle, affordable, helps restore pH balance Can be drying if overused, not as effective for heavy buildup
    DIY Mixtures Potentially customized to individual needs Requires careful testing, potential for adverse reactions

    Expert Opinions and Research

    Baking soda for hair

    Baking soda’s purported hair benefits have sparked considerable interest, but what do experts really think? Let’s delve into the opinions of professionals and the scientific backing, or lack thereof, for using baking soda in hair care. A critical look at the available evidence is essential for making informed decisions about incorporating this ingredient into your routine.Expert opinions on baking soda’s use in hair care are varied and often lack substantial scientific backing.

    While some individuals report positive results, this doesn’t necessarily translate into a scientifically validated benefit. It’s crucial to evaluate the evidence with a critical eye, considering the potential risks and benefits.

    Expert Perspectives on Baking Soda

    Various professionals, including hair stylists and dermatologists, have expressed reservations about the use of baking soda in hair care. They often emphasize the potential for drying and irritation, especially for those with sensitive scalps. The lack of rigorous scientific trials supporting its effectiveness as a hair treatment is a recurring theme.

    • Stylists frequently observe that baking soda’s alkalinity can disrupt the scalp’s natural pH balance. This can lead to dryness, flaking, and increased sensitivity. Some stylists recommend consulting with a dermatologist before incorporating baking soda into a hair care routine, especially if you have pre-existing scalp conditions.
    • Dermatologists typically advise against using baking soda on the scalp without proper guidance, as it can potentially exacerbate existing scalp issues or cause new ones. They emphasize the importance of a gentle approach to hair care and the potential for unintended consequences with harsh ingredients like baking soda.

    Scientific Research on Baking Soda for Hair

    The scientific literature on baking soda’s effectiveness in hair care is limited and often inconclusive. While anecdotal evidence exists, robust, peer-reviewed studies are scarce. This lack of comprehensive research makes it challenging to definitively support or refute the claims surrounding baking soda’s use in hair care.

    • Numerous studies have investigated the effects of alkaline substances on skin and scalp, but few have focused specifically on baking soda. The existing research largely centers on the use of baking soda for other purposes, and not its direct application to hair.
    • The limited research available often highlights the potential for skin irritation and dryness associated with baking soda’s alkaline nature. This suggests a need for further investigation into the specific effects of baking soda on the scalp and hair follicle structure.

    Contradictory Findings and Limitations

    Some studies suggest a possible cleansing effect, but the overall findings often highlight the potential for harm due to the disruption of the scalp’s natural pH. The lack of controlled studies and long-term data makes it difficult to draw conclusive findings.

    Study Findings Limitations
    Study A Slight improvement in hair cleanliness. Small sample size, no long-term data.
    Study B Increased scalp dryness and irritation in some participants. Short duration, lack of control group.

    “While baking soda might offer a temporary solution, its long-term effects on hair health are uncertain. I strongly recommend consulting a professional before using any new product on your hair, especially those with sensitive scalps.”

    Closing Summary

    In conclusion, baking soda for hair offers a potentially effective, budget-friendly alternative for some hair care needs. However, it’s crucial to be aware of the potential risks, and to proceed cautiously. This guide aims to equip you with the knowledge to make informed decisions about your hair care routine. Ultimately, the choice is yours, but we hope this guide provides a balanced perspective on this popular DIY hair treatment.

  • Can Fingering Give You an STD?  The Truth

    Can Fingering Give You an STD? The Truth

    Can fingering give me an STD? This is a crucial question for anyone engaging in this type of intimate contact. Understanding the potential risks and taking preventative measures is key to maintaining sexual health. This discussion will explore the transmission of STIs through skin-to-skin contact, focusing on the specifics of fingering.

    We’ll delve into the anatomical structures involved, the role of bodily fluids, and the factors that influence transmission risk. Hygiene practices, the presence of sores, and frequency of exposure are all critical considerations. We’ll also compare the risks of fingering to other sexual activities, and highlight the importance of individual health status and partner health status.

    Understanding the Risks of STIs

    Sexually transmitted infections (STIs), formerly known as sexually transmitted diseases (STDs), are infections that are spread primarily through sexual contact. Understanding the various types of STIs, their transmission methods, and potential consequences is crucial for maintaining sexual health and preventing the spread of these infections. It’s important to remember that safe sexual practices and regular testing are vital for protecting yourself and your partners.Sexually transmitted infections (STIs) encompass a diverse range of infectious agents, each with unique characteristics.

    These infections can affect various parts of the body, including the genitals, rectum, and mouth. While some STIs may present with noticeable symptoms, others may remain asymptomatic, making regular testing crucial for early detection and treatment.

    Wondering if fingering can transmit STDs? It’s definitely something to consider, especially if you’re looking for ways to boost your overall health. While some people explore the potential efficacy of cinnamon for diabetes treatment, efficacy of cinnamon for diabetes treatment isn’t a substitute for safe sexual practices. Ultimately, safe sex is key to preventing STIs, no matter what natural remedies you might be interested in.

    Types of STIs

    Different types of STIs have different causative agents, modes of transmission, and potential health implications. Some STIs are caused by bacteria, while others are caused by viruses or parasites. This variation in causative agents dictates the range of symptoms and treatment approaches.

    Transmission Methods

    STIs can be transmitted through various forms of sexual contact, including vaginal, anal, and oral sex. Direct skin-to-skin contact, such as through fingering or other forms of genital contact, can also facilitate the transmission of certain STIs. The risk of transmission varies depending on the specific STI and the precautions taken.

    Wondering if fingering can transmit STIs? It’s definitely something to consider, as skin-to-skin contact can spread certain infections. Think about how dry skin after shower dry skin after shower can be, and how that could affect the delicate skin in that area. It’s important to prioritize safe practices to protect your health. Ultimately, safe sex practices are key to avoiding any potential risks.

    Common STIs and Symptoms

    A number of STIs can affect individuals, and their symptoms can vary significantly. Some STIs may not exhibit any noticeable symptoms, while others can manifest as sores, discharge, pain, or itching. Early detection and treatment are crucial for preventing long-term health complications.

    • Chlamydia: Often asymptomatic in its early stages, chlamydia can cause painful urination, abnormal vaginal discharge, or testicular pain in men. In women, it can lead to pelvic inflammatory disease (PID) if left untreated.
    • Gonorrhea: Similar to chlamydia, gonorrhea can be asymptomatic initially. Symptoms may include painful urination, pus-like discharge, and in women, pain during menstruation. Untreated gonorrhea can lead to serious complications, including infertility.
    • Syphilis: Syphilis progresses in stages, each with unique symptoms. Primary syphilis is characterized by a chancre (sore) at the site of infection. Secondary syphilis can manifest as a skin rash, fever, and swollen lymph nodes. If left untreated, syphilis can cause severe neurological and cardiovascular damage.
    • Human Papillomavirus (HPV): HPV is a common viral STI, often causing genital warts or asymptomatic infections. Some strains of HPV are linked to cervical cancer, making regular screenings essential.
    • Herpes Simplex Virus (HSV): HSV, including genital herpes, often presents with sores or blisters around the genitals or mouth. While no cure exists, antiviral medications can manage symptoms and reduce transmission risk.

    Long-Term Health Consequences

    Untreated STIs can have serious long-term health consequences. These consequences can range from infertility to life-threatening conditions. Early diagnosis and treatment are essential for preventing these adverse outcomes.

    Comparison of Transmission Routes

    STI Vaginal Anal Oral Fingering
    Chlamydia High High Low Moderate
    Gonorrhea High High Low Moderate
    Syphilis High High Low Moderate
    HPV High High Moderate Moderate
    HSV High High Moderate Moderate

    Note: Transmission risk is dependent on various factors including the specific strain of the pathogen, the amount of exposure, and the individual’s overall health.

    Analyzing Fingering and STI Transmission

    Understanding the risks associated with any form of intimate contact is crucial for maintaining sexual health. While fingering can be a pleasurable experience, it’s essential to recognize that it can also expose individuals to sexually transmitted infections (STIs). This section delves into the anatomical aspects, bodily fluids, and risk factors related to STI transmission during this activity.

    Anatomical Structures Involved

    The anatomy of the hands and genitals plays a significant role in the potential transmission of STIs. The skin on the hands, while often thought of as a barrier, can contain microscopic cuts, abrasions, or even unnoticed lesions that can provide entry points for pathogens. Similarly, the genital area, including the skin, mucous membranes, and tissues, can have these vulnerabilities.

    The presence of these minor abrasions or lesions increases the risk of transmission.

    Role of Bodily Fluids

    Bodily fluids are crucial vectors for STI transmission. These fluids can contain infectious agents, which can then enter the body through mucous membranes or breaks in the skin. During fingering, various fluids, such as pre-ejaculate, vaginal secretions, or blood, might be present. The presence of these fluids, even in small quantities, can potentially transmit STIs. The amount of fluid and the concentration of pathogens within that fluid are factors in determining the risk.

    Factors Influencing STI Transmission Risk

    Several factors influence the likelihood of STI transmission during fingering. Hygiene practices, such as handwashing before and after contact, significantly reduce the risk. The presence of open sores or lesions on either the hands or genitals greatly increases the risk, as these areas provide direct pathways for pathogens. The frequency of exposure also plays a role; the more frequent the contact, the higher the potential for transmission.

    The presence of existing STIs in either partner is another key risk factor.

    Comparison of STI Transmission Risks, Can fingering give me an std

    Sexual Activity Risk of STI Transmission Explanation
    Fingering Moderate Can transmit STIs if bodily fluids are exchanged and one or both partners have open sores or lesions.
    Vaginal Intercourse Higher Higher risk due to greater contact and potential for deeper penetration, exposing more tissue to pathogens.
    Anal Intercourse Higher High risk due to the delicate tissue of the anus and the potential for tears or trauma.
    Oral Sex Moderate to High Risk depends on the area being stimulated and the presence of oral sores or lesions.

    Impact of Individual Health Status

    The individual’s health status plays a critical role in the risk of STI transmission. Someone with a weakened immune system, due to illness or other factors, might be more susceptible to infection. Likewise, the partner’s health status, including the presence of active STIs, is a significant factor. A partner with an existing STI significantly increases the risk for the other partner.

    For example, someone with HIV might transmit the virus through bodily fluids.

    Preventive Measures for Safe Fingering

    Can fingering give me an std

    Fingering, while a common sexual activity, carries potential risks if not approached with caution. Understanding how to minimize those risks is crucial for both partners’ sexual health and well-being. This section delves into practical preventive measures to ensure safe and enjoyable experiences.Safe fingering isn’t about eliminating all risk, but about significantly reducing it through informed choices and responsible practices.

    By prioritizing hygiene, communication, and consistent safe sex strategies, individuals can significantly decrease the chances of STI transmission.

    Hygiene Practices for Safe Fingering

    Maintaining high standards of hygiene is essential for reducing the risk of STI transmission during fingering. Both partners should adopt meticulous hygiene practices before, during, and after the activity.

    Hygiene Practice Partner 1 Partner 2
    Handwashing Thoroughly wash hands with soap and water for at least 20 seconds before and after contact. Thoroughly wash hands with soap and water for at least 20 seconds before and after contact.
    Cleanliness of the area Ensure the area is clean and free from any visible contaminants. Ensure the area is clean and free from any visible contaminants.
    Using Clean Tools (if applicable) If using any objects, ensure they are clean and disinfected. If using any objects, ensure they are clean and disinfected.
    Avoiding Sharing Avoid sharing sex toys or other items that may come into contact with the genitals. Avoid sharing sex toys or other items that may come into contact with the genitals.

    Importance of Consistent Condom Use

    Condom use, when appropriate, is a crucial aspect of safe sex. Condoms act as a physical barrier, preventing the exchange of bodily fluids that can transmit STIs.

    Condom use significantly reduces the risk of STI transmission during all types of sexual contact, including fingering.

    While fingering itself may not always involve the exchange of semen, the presence of pre-existing infections or bodily fluids on the fingers can still pose a risk.

    Regular STI Testing and Partner Communication

    Regular STI testing is vital for maintaining sexual health. This proactive approach allows individuals to identify potential infections early and receive treatment if necessary. Open communication with partners about sexual health history and STI testing is also essential.Honest and open conversations about sexual health are fundamental to safe sex practices. Understanding each other’s history and testing habits helps to make informed decisions and ensure the well-being of both partners.

    Creating a Clean and Safe Environment

    Creating a clean and safe environment is crucial for minimizing risks during fingering. This involves paying attention to cleanliness of the area, avoiding using unclean objects, and ensuring both partners are comfortable and feel safe. Cleanliness is paramount in maintaining a healthy and enjoyable experience.

    Interpreting the Data and Recommendations

    Can fingering give me an std

    Understanding the risks associated with sexual activity, including the potential for STI transmission, requires a thoughtful approach to personal choices and relationship dynamics. This section delves into the importance of responsible decision-making, access to resources, and the significance of open communication in mitigating risks. Taking proactive steps to protect yourself and your partner is crucial.

    STI Testing and Treatment Resources

    Accessing accurate STI testing and treatment is paramount. Public health clinics, local health departments, and private healthcare providers offer confidential testing services. Many organizations provide low-cost or free testing options, particularly for individuals in underserved communities. Finding these resources is often just a phone call or online search away. Knowing where to go for reliable testing is an essential component of safe sexual practices.

    Open Communication and Mutual Understanding

    Open and honest communication with sexual partners is fundamental to a healthy and safe sexual relationship. Discussing sexual history, concerns, and preferences is vital. This dialogue creates a foundation of trust and respect, allowing both partners to make informed decisions. Open communication also allows for a proactive approach to potential risks and ensures both parties are comfortable with the level of safety and protection involved in any sexual activity.

    Honest discussions can significantly reduce the risk of transmitting STIs.

    Wondering if fingering can transmit STIs? The short answer is yes, unprotected contact can definitely lead to infections. It’s crucial to prioritize safe practices and consider your overall health, like a potential magnesium and calcium deficiency impacting brain health, which can significantly affect your well-being. Magnesium calcium deficiency brain health can be a serious concern, but even with optimal nutrient levels, safe sex practices are essential for avoiding STIs.

    So, always prioritize protection when engaging in any intimate activity.

    Comparing Risks of Sexual Activities

    Different types of sexual activity carry varying degrees of STI transmission risk. Anal sex, for example, often carries a higher risk compared to oral sex or vaginal sex, due to the greater likelihood of direct contact with mucosal membranes. Fingering, while potentially involving mucosal contact, generally carries a lower risk than anal or vaginal sex when proper precautions are taken.

    This difference in risk stems from the specific anatomical areas involved and the likelihood of bodily fluids exchanging.

    Impact of Personal Choices on STI Transmission Risk

    Personal choices significantly impact STI transmission risk. Consistent condom use, regular STI testing, and open communication with partners are all proactive steps that can dramatically reduce the likelihood of transmission. Choosing to abstain from sexual activity entirely is also a valid choice, eliminating any risk of STI transmission. Avoiding risky behaviors, such as unprotected sex or sex with multiple partners, plays a key role in reducing exposure to STIs.

    Safe Sexual Practices Summary

    Sexual Activity Key Safe Practices
    Fingering
    • Use condoms or dental dams for added protection.
    • Wash hands thoroughly before and after fingering.
    • Avoid sharing sex toys without proper sanitization.
    • Openly discuss any concerns or health history with your partner.
    • Regular STI testing for both partners is recommended.
    Oral Sex
    • Use condoms or dental dams.
    • Practice good oral hygiene.
    • Avoid sharing sex toys without sanitization.
    • Open communication about sexual health.
    • Regular STI testing.
    Vaginal Sex
    • Use condoms.
    • Regular STI testing.
    • Open communication about sexual health.
    Anal Sex
    • Always use condoms.
    • Use plenty of lubricant.
    • Regular STI testing is highly recommended.
    • Open and honest communication is crucial.

    Additional Considerations: Can Fingering Give Me An Std

    Beyond the physical risks, safe sexual practices are deeply intertwined with psychological factors and social contexts. Understanding these elements is crucial for fostering a holistic approach to STI prevention. This section delves into the interplay between mindset, consent, professional support, and readily available resources.Psychological factors play a significant role in shaping individual choices regarding sexual health. For instance, anxieties, insecurities, and past experiences can influence risk perception and decision-making.

    A healthy self-esteem, coupled with a realistic understanding of potential risks, empowers individuals to prioritize their safety and the well-being of their partners. Open communication and a supportive environment are essential to overcome anxieties and make informed choices.

    Psychological Factors Influencing Safe Practices

    Factors such as anxiety, insecurities, or past trauma can significantly impact an individual’s approach to sexual health. A positive self-image and a clear understanding of the potential risks are essential for making informed choices. Building trust, effective communication, and a supportive network can help individuals overcome anxieties and make decisions that prioritize their well-being. Open conversations with trusted friends, family, or professionals can provide valuable guidance and support.

    Role of Consent and Mutual Respect

    Consent is non-negotiable in any sexual encounter. It’s crucial for establishing a safe and respectful environment where both partners feel empowered to make choices that align with their desires and comfort levels. Mutual respect, characterized by open communication, active listening, and shared responsibility, is fundamental to minimizing risks. A healthy sexual relationship is built on trust, empathy, and a commitment to prioritizing each other’s well-being.

    Importance of Seeking Professional Medical Advice

    Seeking professional medical advice is essential for comprehensive sexual health management. Healthcare providers can offer guidance on STI prevention, testing, and treatment. Early detection and prompt intervention are critical for managing STIs effectively and preventing potential complications. Medical professionals can also provide valuable insights into individual health histories and offer tailored recommendations. Don’t hesitate to reach out to a doctor or other qualified healthcare provider if you have concerns.

    Available Support Systems for Individuals Concerned about STIs

    Individuals experiencing anxieties or concerns about STIs can access various support systems. Confidential counseling services offer a safe space for discussing concerns and developing coping mechanisms. Support groups provide a platform for sharing experiences and fostering a sense of community. Online resources, such as helplines and dedicated websites, offer readily accessible information and support. Remember that you are not alone and help is available.

    Resources for Reliable Information on Sexual Health

    Organization Website Description
    Planned Parenthood www.plannedparenthood.org Provides comprehensive sexual and reproductive health information, including STI prevention and testing.
    The American Sexual Health Association (ASHA) www.ashastd.org Offers reliable information on STIs, prevention, and treatment.
    Centers for Disease Control and Prevention (CDC) www.cdc.gov Provides authoritative data and guidance on STIs and sexual health.
    National Institutes of Health (NIH) www.nih.gov Offers research-based information and resources on various aspects of health, including STIs.

    Summary

    Ultimately, safe sexual practices are paramount in minimizing STI transmission risk, including during fingering. Consistent communication, mutual respect, and seeking professional medical advice are crucial. We’ve examined the potential risks, prevention strategies, and resources available for reliable information. Remember, open communication and a focus on safety are essential for healthy sexual relationships.

  • What Happens to My Body Right After I Die?

    What Happens to My Body Right After I Die?

    What happens to my body right after I die? This exploration delves into the immediate physiological shifts, cellular processes, and external manifestations that mark the transition from life to death. We’ll examine the cascade of events, from the cessation of brain function to the visible signs of rigor mortis, livor mortis, and algor mortis. The journey will be both scientific and thought-provoking, offering insights into the fascinating yet often overlooked processes of the human body’s final moments.

    The immediate cessation of brain function triggers a domino effect throughout the body. Respiration stops, blood circulation ceases, and various organs experience profound changes. These changes, though swift, are complex, and we’ll unpack the biochemical processes that take place within the first few minutes after death. The subsequent cellular breakdown, influenced by enzymes and environmental factors, further shapes the body’s transformation.

    We’ll also examine the visible signs of death, which offer clues about the time of death.

    Immediate Physiological Changes

    What happens to my body right after i die

    The moment life ceases, a cascade of physiological changes begins, unfolding in a predictable sequence. These changes, though often unsettling, are a natural consequence of the body’s intricate systems shutting down. Understanding these immediate transformations offers a glimpse into the final moments of a biological existence.

    Cessation of Brain Function

    The brain, the command center of the body, is the first to exhibit significant changes. The cessation of electrical activity, or brain death, is the hallmark of irreversible cessation of all brain functions. This immediate loss of electrical impulses halts the brain’s ability to regulate bodily processes, including breathing and circulation. The lack of conscious thought and perception is a direct result of the cessation of neural activity.

    Sequence of Events After Respiration Cessation

    Following the cessation of respiration, the body rapidly depletes its oxygen supply. This leads to a cascade of events, affecting every organ system. The lack of oxygen deprives the cells of the energy they need to function, leading to their gradual deterioration. The heart, deprived of its own oxygen supply, loses its ability to pump blood, initiating the chain reaction of organ failure.

    Cellular metabolism slows, and eventually ceases.

    Effects of Blood Circulation Loss

    The cessation of blood circulation, triggered by cardiac arrest, has profound and immediate effects on various organs. Oxygen deprivation quickly leads to cellular damage and death in tissues and organs throughout the body. The lack of blood flow prevents the delivery of nutrients and oxygen to vital organs like the brain, heart, and kidneys, leading to their dysfunction.

    The brain is particularly vulnerable, as it is highly sensitive to oxygen deprivation. Damage occurs within minutes, progressing to irreversible harm.

    Biochemical Changes in the First Few Minutes

    Within the first few minutes after death, biochemical changes become increasingly evident. The body’s metabolic processes begin to shut down, and cellular respiration ceases. This leads to the accumulation of waste products, such as lactic acid, within the cells. Autolysis, the self-digestion of cells, commences, further contributing to the decomposition process. The breakdown of cellular components results in the release of various enzymes and chemicals, impacting the surrounding tissues.

    Physiological Changes in Different Organs and Systems

    Organ/System Change Timeframe Impact
    Brain Cessation of electrical activity Immediate Loss of consciousness
    Heart Cessation of pumping Immediate Loss of blood circulation
    Lungs Cessation of respiration Immediate Lack of oxygen
    Kidneys Loss of filtration function Minutes Accumulation of waste products
    Liver Loss of metabolic functions Minutes to hours Biochemical imbalances
    Gastrointestinal Tract Loss of motility Minutes to hours Digestion stops
    Skin Changes in appearance (e.g., pallor) Minutes to hours Visual indication of circulatory cessation

    Visual Representation of Circulatory System Changes

    Imagine a diagram of the human circulatory system. The heart, normally depicted as a powerful pump, would be depicted as a still organ, no longer contracting. The arteries and veins, once filled with flowing blood, would now appear empty, with the blood pooling in the lower extremities. This stagnation of blood flow is a direct consequence of the heart’s cessation of function.

    The once vibrant network of capillaries, responsible for nutrient and oxygen exchange, would appear as a network of static channels. This visual representation highlights the profound impact of cardiac arrest on the entire circulatory system.

    Ever wondered what happens to your body right after you kick the bucket? Well, your cells start shutting down, and your skin, which needs protection from the sun, especially if you have tattoos, might need some serious TLC. To keep your ink looking vibrant, finding the best sunscreen for tattoos is crucial. What is the best sunscreen for tattoos will help you in that regard.

    But back to the body’s post-mortem processes, it’s a fascinating (and slightly morbid) journey.

    Cellular Processes After Death

    What happens to my body right after i die

    The cessation of life marks a profound shift in the body’s internal environment, triggering a cascade of cellular changes. These processes, driven by the absence of metabolic functions and the activation of degradative enzymes, are essential for the eventual decomposition of the body. Understanding these cellular processes offers insights into the natural biological cycle and the complex mechanisms governing life’s transition.Cellular processes following death involve the breakdown of cellular structures and the release of cellular contents.

    So, what exactly happens to your body right after you kick the bucket? Well, your muscles relax, and your breathing stops. Interestingly, if you’re experiencing a tension headache, trying some simple techniques like applying a warm compress or practicing deep breathing exercises might help ease the discomfort. Finding a method that works for you, like the ones explained in this helpful guide on how to relieve a tension headache , can make a big difference.

    After that, your body starts to cool down, and eventually, decomposition sets in. Fascinating, isn’t it? Just don’t let a headache get in the way of your next philosophical pondering.

    The rate and extent of these processes vary considerably depending on factors such as environmental conditions, the individual’s health prior to death, and the specific tissues involved.

    Cellular Structure and Function Degradation

    The cessation of cellular respiration and other metabolic processes immediately following death leads to a significant disruption of cellular structure and function. Mitochondria, the powerhouses of the cell, cease their energy production, resulting in the depletion of ATP, the cellular energy currency. This depletion disrupts the integrity of cell membranes, leading to leakage of intracellular components. The loss of osmotic balance further contributes to cellular swelling and eventual rupture.

    Cellular Component Degradation and Release

    Following the initial disruption, cellular components begin to degrade. Proteins, the workhorses of the cell, are broken down into smaller peptides and amino acids by proteolytic enzymes. Nucleic acids, the genetic material, undergo hydrolysis, releasing their constituent nucleotides. Lipids, crucial for membrane structure, are broken down into fatty acids and glycerol. The release of these cellular contents into the surrounding environment contributes to the overall decomposition process.

    Enzymes in Decomposition, What happens to my body right after i die

    Enzymes play a critical role in the degradation of cellular components after death. These proteins act as biological catalysts, speeding up the breakdown of complex molecules into simpler ones. Examples include proteases, lipases, and nucleases. These enzymes are naturally present within cells or are released from lysosomes, cellular organelles responsible for waste disposal. The activation of these enzymes, often triggered by the increase in pH or the presence of other chemical signals, initiates the decomposition cascade.

    Rate of Cellular Breakdown in Different Tissues and Organs

    The rate of cellular breakdown varies considerably across different tissues and organs. For example, tissues with high protein content, such as muscle, will show faster degradation than tissues with lower protein content, such as bone. The presence of oxygen and moisture also influences the speed of decomposition. For example, a body in a dry environment will decompose more slowly than a body in a moist environment.

    Cellular Processes After Death by Organ System

    Organ System Cellular Processes Timeframe Impact
    Nervous System Neuronal disintegration, synaptic breakdown Hours/Days Cell death, tissue breakdown, loss of neurological function
    Muscular System Muscle protein breakdown, rigor mortis Hours/Days Muscle rigidity, decomposition
    Cardiovascular System Blood coagulation, tissue ischemia Minutes/Hours Loss of blood circulation, oxygen deprivation to tissues
    Respiratory System Lung tissue breakdown, loss of respiratory function Hours/Days Accumulation of fluids, cessation of gas exchange
    Digestive System Enzyme activation, tissue breakdown Days/Weeks Decomposition of ingested material, further tissue degradation
    Integumentary System Skin protein degradation, dehydration Days/Weeks Skin discoloration, dehydration, and breakdown

    Mechanisms Triggering Cellular Damage After Death

    The cessation of life triggers a multitude of cellular processes that result in damage and degradation. Depletion of ATP, the primary energy source, disrupts cellular functions. The accumulation of cellular waste products and the activation of enzymes contribute to the breakdown of cellular structures. Furthermore, the loss of oxygen and nutrient supply further exacerbates cellular damage. These combined effects lead to the eventual decomposition of the body.

    External Manifestations of Death

    The transition from life to death is marked by a series of observable changes in the body. These changes, collectively known as post-mortem changes, provide valuable clues for forensic scientists and medical examiners in determining the time of death and understanding the circumstances surrounding the demise. Understanding these external signs is crucial for accurately assessing the post-mortem interval (PMI).These changes are not simply a matter of aesthetics; they represent a complex interplay of biological processes that cease once life ceases.

    Careful observation and documentation of these changes can provide critical information for investigations.

    Visible Signs of Death

    The external signs of death are a combination of chemical and physical processes that begin immediately following cessation of the circulatory system. These processes include rigor mortis, livor mortis, and algor mortis. Each of these processes unfolds in a predictable sequence and is influenced by various factors.

    Rigor Mortis

    Rigor mortis, meaning “stiffness of death,” is the post-mortem stiffening of muscles. This phenomenon is due to the depletion of ATP (adenosine triphosphate), the energy currency of cells. Without ATP, the myosin heads in muscle fibers cannot detach from the actin filaments, leading to a sustained contraction.The onset of rigor mortis typically begins several hours after death and peaks within 6 to 12 hours.

    Following the peak, the muscles gradually relax over the next few days as the proteins begin to degrade. Factors such as ambient temperature, muscle mass, and the cause of death can influence the speed and intensity of rigor mortis. For example, in a cold environment, the process might be slower, while individuals with larger muscle mass will exhibit rigor mortis more intensely.

    So, what actually happens to my body right after I die? Well, the cooling process begins, a fascinating biological phenomenon. Interestingly, some people experience a distinct “hot sleeper” or “cold sleeper” phenomenon, which can be related to underlying health conditions, but ultimately doesn’t alter the eventual cooling of the body. Understanding how the body temperature changes post-mortem can provide valuable insights into the broader process of decay.

    For more on the nuances of body temperature regulation during sleep, check out this informative article on hot sleeper vs cold sleeper. It’s all part of the complex dance of life and death.

    Livor Mortis

    Livor mortis, also known as post-mortem lividity, is the purplish discoloration of the skin due to the settling of blood in the lower parts of the body. Gravity pulls the blood, which is no longer being circulated, to the dependent areas, resulting in a bluish-purple discoloration.Livor mortis typically begins within a few hours of death and becomes fixed within 8 to 12 hours.

    The distribution of the discoloration provides clues about the body’s position after death. If the body is moved after livor mortis has begun to develop, the discoloration may not be evenly distributed.

    Algor Mortis

    Algor mortis is the cooling of the body after death. The body loses heat to the surrounding environment at a predictable rate. The rate of cooling depends on factors such as the environmental temperature and the clothing or covering of the body.Algor mortis is a more gradual process, typically occurring over several hours or even days, depending on the surrounding conditions.

    The body temperature decreases at a predictable rate and can be used to estimate the time of death. For instance, in a cold environment, the body will cool significantly slower than in a hot environment.

    Factors Influencing the Rate of Post-Mortem Changes

    The rate of post-mortem changes is influenced by a number of factors, including:

    • Ambient temperature:
    • A warmer environment accelerates the rate of decomposition, while a cooler environment slows it down.

    • Body mass:
    • Larger individuals tend to retain heat for longer periods, thus slowing the cooling process.

    • Clothing:
    • Clothing can insulate the body, influencing both cooling and the development of rigor mortis.

    • Cause of death:
    • Certain conditions, such as exertion or trauma, can accelerate or decelerate the onset of these changes.

    Estimating Time of Death

    A combination of these external signs can assist in estimating the time since death. For instance, if rigor mortis is fully developed, and livor mortis is fixed, then the body has been deceased for a period of time. The forensic scientist considers all the factors, and together with the observed signs, they provide an estimate of the time of death.

    Table of Post-Mortem Changes

    Post-Mortem Change Description Timeframe Factors influencing rate
    Rigor Mortis Stiffening of muscles Hours to days Temperature, muscle mass, cause of death
    Livor Mortis Discoloration of skin Hours Blood settling, body position, and movement after death
    Algor Mortis Cooling of body Hours/Days Environmental temperature, body mass, clothing

    Flow Chart of External Post-Mortem Changes

    (A complex flow chart is not possible to represent in text format. A visual diagram would be necessary to represent the order and interconnectedness of these post-mortem changes effectively.)

    Decomposition Processes

    The final stage of the human journey after death is decomposition, a complex and fascinating process driven by the tireless activity of microorganisms and influenced by the environment. Understanding this process offers a glimpse into the intricate interplay between life, death, and the natural world. It also plays a vital role in forensic science, enabling estimations of time since death and the identification of potential contributing factors.The decomposition of a body is a gradual and multifaceted process, driven by a symphony of biological and chemical reactions.

    Microorganisms, including bacteria and fungi, play a crucial role in breaking down the complex organic molecules of the body. Environmental factors like temperature, humidity, and access to oxygen significantly affect the speed and nature of this process. This intricate dance between biology and environment shapes the visible stages of decomposition, allowing forensic experts to gather vital clues.

    Microorganisms in Decomposition

    The decomposition process is heavily reliant on the presence of microorganisms. These tiny organisms, including bacteria and fungi, thrive on the organic matter of the body. Their enzymes break down proteins, carbohydrates, and lipids, ultimately reducing the body to simpler substances. Different types of microorganisms thrive in various conditions, dictating the rate and manner of decomposition. This microbial activity is the driving force behind the various stages of decomposition.

    Stages of Decomposition

    Decomposition progresses through distinct stages, each marked by specific characteristics. The stages are influenced by factors such as the body’s location, the surrounding environment, and the presence of specific microorganisms.

    • Fresh Stage: This initial stage immediately follows death. No significant changes are visible to the naked eye. Cellular processes within the body are still active, though gradually ceasing.
    • Bloated Stage: Gas production by bacteria leads to swelling, primarily in the abdominal region. The skin may appear taut and the body may emit foul odors. This stage typically lasts for several days. The body’s internal environment becomes increasingly anaerobic, creating an environment conducive to the growth of different microorganisms.
    • Decay Stage: The decomposition process intensifies, with tissues breaking down and liquefying. The body’s structure begins to disintegrate, and the skin may start to slough off. This stage can last for several days to weeks. The release of gases and fluids from the body becomes more pronounced. The foul odor intensifies, and the body becomes increasingly vulnerable to insect colonization.

    Factors Influencing Decomposition Rate

    Numerous factors influence the rate of decomposition. These factors are critical in forensic investigations.

    • Temperature: Higher temperatures generally accelerate decomposition, while lower temperatures slow it down. A warmer climate will lead to faster decomposition compared to a cold one. For example, a body left in a desert will decompose faster than a body buried in a frozen tundra.
    • Humidity: High humidity can accelerate decomposition, providing a favorable environment for microorganisms to thrive. Conversely, extremely dry conditions can slow down the process. The moisture content in the air can significantly affect the microbial activity, which, in turn, dictates the pace of decomposition.
    • Environmental Conditions: Factors like access to oxygen, burial depth, and the presence of scavengers all impact the decomposition rate. A body left in an open field will decompose faster than a body buried deep underground. The presence of scavengers can accelerate the decomposition process.

    Role of Insects in Decomposition

    Insects play a significant role in the decomposition process, particularly in the later stages. They are attracted to the decaying body, and their activity contributes to the breakdown of tissues. Different insects colonize the body at different stages, and this pattern can provide valuable information for forensic scientists. The sequence of insect colonization can aid in estimating the time of death.

    Stages of Decomposition Table

    Stage Characteristics Timeframe Indicators
    Fresh No significant changes Immediate No obvious changes
    Bloated Swelling, gas formation Days Abdominal distension, foul odor
    Decay Decomposition, liquefaction Days/Weeks Tissue disintegration, skin slippage, odor intensification
    Post-Decay Skeletonization, dry remains Weeks/Months Skeleton remains, dry skin

    Complete Breakdown of the Body

    The complete breakdown of the body involves the progressive degradation of tissues and the conversion of complex organic molecules into simpler substances. This process is driven by microbial action and environmental factors. The body eventually reduces to its basic components, which are then released into the environment. This breakdown is essential for the natural recycling of nutrients.

    Conclusive Thoughts: What Happens To My Body Right After I Die

    In conclusion, the transition from life to death is a fascinating and complex process, marked by a cascade of physiological and cellular changes. Understanding these events offers a unique perspective on the human body’s remarkable capabilities and the inevitable journey towards decomposition. From the immediate cessation of brain function to the gradual breakdown of tissues, the body’s response to death is a symphony of biological events.

    We’ve explored the scientific details of this journey, but the larger philosophical implications are also significant. This journey through death is a reminder of the cyclical nature of life, and the profound impact our bodies have on the world around us.

  • Understanding the Purpose of Lymph Nodes A Deep Dive

    Understanding the Purpose of Lymph Nodes A Deep Dive

    Understanding the purpose of lymph nodes sets the stage for this enthralling narrative, offering readers a glimpse into the intricate network of these vital structures within the human body. This exploration delves into the anatomical structure of lymph nodes, revealing their role in maintaining a healthy immune system. We’ll examine how these tiny filters work to defend us against disease, and how they can be involved in various health conditions.

    This deep dive will unravel the mechanisms behind lymph node function, highlighting their crucial role in immune responses and disease diagnosis.

    From their microscopic structure to their role in disease detection, we’ll explore the multifaceted nature of lymph nodes. We’ll also uncover the intricate processes involved in lymph node assessment, diagnosis, and imaging. This comprehensive guide is designed to provide a thorough understanding of lymph nodes, making complex information accessible and engaging.

    Lymph Node Structure and Function

    Understanding the purpose of lymph nodes

    Understanding the intricate structure and function of lymph nodes is crucial for grasping their vital role in the immune system. These small, bean-shaped structures act as filters for lymph, a fluid containing immune cells and waste products. They are strategically positioned throughout the body, connecting lymphatic vessels to help maintain fluid balance and identify and neutralize pathogens.

    Anatomical Structure of a Lymph Node

    Lymph nodes possess a characteristic bean-shaped structure, encased in a fibrous capsule. This capsule extends inward, creating partitions that divide the node into distinct regions. The outer region, known as the cortex, is densely populated with lymphocytes, primarily B cells, and dendritic cells. These cells are crucial for initiating immune responses. The inner region, the medulla, contains aggregates of lymphocytes and plasma cells, which are responsible for antibody production.

    Specialized networks of sinuses, spaces filled with lymph, permeate the cortex and medulla, facilitating the flow of lymph and the interaction of immune cells.

    Cellular Components of Lymph Nodes

    A diverse array of immune cells populate lymph nodes. Lymphocytes, specifically B cells and T cells, are paramount. B cells mature into plasma cells, producing antibodies that neutralize pathogens. T cells play a critical role in cell-mediated immunity, directly attacking infected cells. Macrophages and dendritic cells, antigen-presenting cells, capture and process foreign substances, presenting them to T cells for activation.

    Natural killer (NK) cells are also present, providing a rapid response to infected or cancerous cells. These various cell types interact within the lymph node environment, orchestrating an effective immune response.

    Lymphatic Vessels and Lymph Flow

    Lymphatic vessels form a network throughout the body, collecting lymph from tissues. These vessels converge, leading to larger vessels that eventually drain into the bloodstream. Afferent lymphatic vessels carry lymph into the lymph node, while efferent lymphatic vessels transport filtered lymph out. The one-way valves within these vessels ensure unidirectional lymph flow, preventing backflow. Lymph nodes act as checkpoints, allowing immune cells to encounter and respond to pathogens or foreign substances within the lymph.

    Comparison of Lymph Node Regions

    Region Structure Function
    Cortex Outer layer, densely packed with lymphocytes (especially B cells), dendritic cells. Contains germinal centers, where B cells proliferate and differentiate. Initial encounter of antigens with lymphocytes, initiation of immune responses, B cell maturation.
    Medulla Inner layer, contains medullary cords (aggregates of lymphocytes and plasma cells) and medullary sinuses. Antibody production by plasma cells, further filtering of lymph, interaction of immune cells.
    Sinuses Networks of spaces filled with lymph, located throughout the cortex and medulla. Passageway for lymph, allowing interaction between lymphocytes and antigens, facilitating immune cell migration.

    Lymph Node Function in Immunity: Understanding The Purpose Of Lymph Nodes

    Understanding the purpose of lymph nodes

    Lymph nodes, small bean-shaped structures strategically positioned throughout the lymphatic system, are crucial components of the immune system. They act as filters for lymph, a fluid containing immune cells and debris, playing a pivotal role in identifying and eliminating pathogens. Understanding their function in immunity provides insight into how our bodies defend against infections and maintain overall health.Lymph nodes are not just passive filters; they are dynamic hubs where immune cells interact and orchestrate responses to invading pathogens.

    This intricate process involves a complex interplay of cell-to-cell communication, antigen presentation, and activation, ultimately leading to the elimination of threats and the development of immunological memory.

    Filtering Lymph

    Lymph, a clear fluid containing white blood cells, waste products, and cellular debris, circulates throughout the lymphatic system. Lymph nodes act as checkpoints along this network, filtering the lymph as it passes through. Specialized cells within the lymph nodes, including macrophages and dendritic cells, actively scan the lymph for foreign particles, cellular debris, and pathogens. This filtering process ensures that harmful substances are removed from the lymphatic system, preventing them from spreading throughout the body.

    The effectiveness of this filtering process is crucial for maintaining the body’s overall health.

    Antigen Presentation and Immune Cell Activation

    The process of antigen presentation is central to the activation of immune cells within lymph nodes. Macrophages and dendritic cells, acting as professional antigen-presenting cells (APCs), engulf and process foreign antigens. They then present these processed antigens on their surface, combined with major histocompatibility complex (MHC) molecules. This presentation allows T lymphocytes (specifically helper T cells) to recognize the specific antigen.

    Upon recognition, T cells become activated, initiating a cascade of events leading to the activation of other immune cells, such as B cells, to eliminate the pathogen.

    Initiating and Regulating Immune Responses

    Lymph nodes play a vital role in initiating and regulating immune responses. The presence of specific antigens within the lymph node triggers a focused immune response. The organized structure of lymph nodes, with distinct zones for different immune cell types, ensures that the immune response is appropriately targeted and regulated. The interaction between various immune cells, such as T cells, B cells, and macrophages, within the lymph node is carefully orchestrated to maximize the effectiveness of the immune response.

    Different Immune Cell Interactions

    Various immune cells interact within lymph nodes to effectively combat pathogens. B cells, responsible for antibody production, encounter activated T cells presenting the same antigen. This interaction, mediated by specific surface receptors and cytokines, leads to the activation and proliferation of B cells, resulting in the production of antibodies tailored to neutralize the pathogen. T cells, another critical component of the adaptive immune response, play a crucial role in coordinating the entire process.

    Their interaction with other immune cells fine-tunes the immune response and prevents excessive inflammation.

    Understanding the purpose of lymph nodes is crucial for overall health. They’re part of our immune system, filtering out harmful substances and helping our bodies fight off infection. This intricate network plays a vital role in our well-being, much like the complexities surrounding a diagnosis like diabetes. For more information on whether diabetes is considered a disability, check out this resource: is diabetes a disability.

    Ultimately, a strong understanding of the body’s systems, like the lymphatic system, is essential for informed decisions about health and well-being.

    Activation of B and T Lymphocytes in Lymph Nodes

    Step B Lymphocyte Activation T Lymphocyte Activation
    1 Antigen encounter and uptake by B cells Antigen presentation by APC (e.g., dendritic cell) to T cell receptor (TCR)
    2 Processing and presentation of antigen on MHC class II molecules Recognition of antigen-MHC complex by T cell receptor (TCR)
    3 Interaction with helper T cell (Th) that recognizes the same antigen Activation of the T cell
    4 Activation and proliferation of B cells, leading to antibody production Release of cytokines that activate other immune cells

    This table Artikels the key steps in B and T lymphocyte activation within lymph nodes, highlighting the coordinated nature of these processes.

    Lymph Node Involvement in Disease

    Lymph nodes, tiny filters throughout the body’s lymphatic system, play a crucial role in immune responses. They are strategically positioned to encounter and trap pathogens and abnormal cells. When these nodes become involved in disease processes, they often show characteristic changes that provide valuable diagnostic clues for healthcare professionals. This involvement can arise from infections, cancerous growths, or other pathological conditions.

    Understanding these changes is essential for accurate diagnosis and appropriate treatment.Pathological changes in lymph nodes are frequently observed in a wide range of diseases, providing critical information about the underlying cause and severity of the condition. The appearance and consistency of these nodes, along with other clinical findings, contribute to the diagnostic process.

    Lymph Node Involvement in Infections, Understanding the purpose of lymph nodes

    Infections trigger an immune response, often leading to alterations in lymph node structure and function. Lymph nodes swell and become tender, a visible sign of increased activity within. This swelling is often accompanied by inflammation, characterized by redness and warmth in the surrounding tissues. Inflammatory cells, such as lymphocytes and macrophages, accumulate within the lymph node, attempting to eliminate the invading pathogens.

    Understanding the purpose of lymph nodes is crucial for overall health. They’re essentially the body’s filtration system, helping to fight off infection. Factors like blood pressure and heart rate can indirectly affect lymph node function, influencing how effectively they clear out waste products. Monitoring these vital signs, like blood pressure heart rate , can offer insights into the body’s overall health and how well the lymphatic system is functioning.

    Ultimately, understanding lymph node function is key to a healthier immune response.

    Pathological Changes in Lymph Nodes During Infections

    Lymph nodes, when challenged by pathogens, exhibit specific changes. These include an increase in the number of lymphocytes and other immune cells, resulting in enlargement. The nodes become more cellular and less organized. Macrophages, responsible for engulfing pathogens, may accumulate in significant numbers. Suppurative (pus-forming) infections can lead to the formation of pus within the node, causing localized abscesses.

    The presence of these changes can be indicative of the type and severity of the infection.

    Lymph Node Involvement in Cancer Development

    Cancer cells, like pathogens, can spread throughout the body, including the lymphatic system. Metastasis, the spread of cancer from its primary site to distant locations, frequently involves the lymphatic system. Cancer cells can enter the lymphatic vessels, traveling to regional lymph nodes. These nodes can become involved through the process of metastasis, leading to the formation of secondary tumor growths.

    Metastasis Through the Lymphatic System

    Cancer cells detach from the primary tumor and enter the lymphatic capillaries. The cells travel through the lymphatic vessels, arriving at regional lymph nodes. If the cancer cells evade the immune defenses within the nodes, they can continue to proliferate and form new tumors in these nodes. This process, metastasis, is a critical aspect of cancer progression. The extent of lymph node involvement is a key prognostic factor for the patient’s survival and guides treatment decisions.

    Diagnostic Use of Lymph Node Involvement

    Examination of lymph nodes is a critical diagnostic tool. The size, consistency, and appearance of lymph nodes can provide valuable clues about the underlying disease. Biopsies of involved lymph nodes allow pathologists to analyze the cellular composition and identify the specific type of cells present. This analysis is instrumental in diagnosing infections, malignancies, and other diseases. The presence and extent of lymph node involvement are often included in staging systems, which help determine the extent of the disease and guide treatment strategies.

    Summary Table of Diseases Affecting Lymph Nodes

    Disease Type Characteristics
    Infectious Mononucleosis Characterized by enlarged, tender lymph nodes, often in the neck and armpits. Fever and fatigue are common.
    Lymphoma Cancers of the lymphatic system, resulting in the formation of malignant tumors in lymph nodes. Various subtypes exist, each with distinct characteristics.
    Metastatic Cancer Cancer cells spread from a primary tumor site to regional lymph nodes, forming secondary tumors. The extent of metastasis significantly influences treatment strategies.
    Tuberculosis Infectious disease affecting the lungs and other organs. Can lead to granulomatous inflammation in lymph nodes.

    Lymph Node Assessment and Diagnosis

    Understanding the status of lymph nodes is crucial in diagnosing various diseases, particularly those affecting the immune system. Proper assessment methods, including physical examination and imaging techniques, are vital for identifying potential abnormalities and guiding further investigations. Accurate diagnosis hinges on a thorough evaluation of lymph node characteristics and their correlation with clinical symptoms.

    Methods of Lymph Node Assessment

    Assessment of lymph nodes involves a multifaceted approach, combining physical examination with sophisticated imaging techniques. Physical examination, often the first step, relies on palpation to detect abnormalities in size, consistency, and mobility. Imaging modalities, such as ultrasound, CT scans, and MRI, provide detailed visualization of lymph nodes, allowing for more precise evaluation of their morphology and extent of involvement.

    Understanding the purpose of lymph nodes is crucial for overall health. They’re like tiny filtering stations in your body, helping your immune system fight off infections. But sometimes, issues like allergies can lead to fatigue, which can be mistaken for other things. For instance, are you experiencing unusual tiredness? If so, exploring potential links between your allergies and overall health, like the impact on your lymph nodes, might be worthwhile.

    Knowing more about the role of your lymph nodes in your immune system can be key to understanding how your body works in dealing with allergies. Check out this informative article on can allergies make you tired to learn more.

    Lymph Node Biopsy

    A lymph node biopsy is a crucial procedure for obtaining tissue samples for microscopic examination, aiding in the definitive diagnosis of suspected pathologies. This invasive technique allows pathologists to examine the cellular composition and architecture of the lymph node, offering critical insights into the nature of any observed abnormalities.

    Lymph Node Biopsy Procedure

    The procedure for a lymph node biopsy typically involves the following steps:

    • Patient Preparation: The patient is prepped and draped, and the area around the lymph node to be biopsied is cleansed. Local anesthesia is often administered to minimize discomfort during the procedure.
    • Incision: A small incision is made over the targeted lymph node. The incision size is carefully determined based on the anticipated size of the sample needed.
    • Excision: The lymph node, or a portion of it, is carefully excised, maintaining tissue integrity as much as possible. Techniques like fine-needle aspiration (FNA) may be used for smaller or more superficial nodes.
    • Closure: The incision site is meticulously closed with sutures, and a dressing is applied.
    • Pathology Review: The excised tissue is sent to a pathologist for microscopic examination and subsequent interpretation.

    Comparison of Imaging Techniques

    Imaging Technique Advantages Disadvantages
    Ultrasound Real-time imaging, portable, relatively inexpensive Limited depth penetration, operator-dependent, not ideal for deep-seated nodes
    Computed Tomography (CT) Scan Excellent spatial resolution, multiplanar imaging, can evaluate adjacent structures Exposure to ionizing radiation, potential for contrast reactions
    Magnetic Resonance Imaging (MRI) Excellent soft-tissue contrast, allows for detailed visualization of nodal architecture Longer scan times, can be more expensive than CT

    Significance of Lymph Node Characteristics

    The size, consistency, and location of lymph nodes can offer valuable clues in the diagnostic process. Enlarged lymph nodes (lymphadenopathy) often signal an underlying inflammatory or neoplastic process. Hard or firm consistency might suggest malignancy, whereas soft consistency may point to an inflammatory condition. The location of the enlarged nodes can also provide clues about the possible source of the disease.

    Lymph Node Pathologies and Imaging Appearances

    Pathology Typical Imaging Appearance
    Reactive Lymphadenitis Enlarged, sometimes tender, nodes; often with homogeneous appearance on imaging.
    Metastatic Cancer Enlarged, firm, or hard nodes, often with irregular margins on imaging; may show calcification or necrosis.
    Lymphoma Enlarged, sometimes matted nodes; may have heterogeneous appearance, and potentially show a mass effect on surrounding structures on imaging.

    Lymph Node Imaging and Biopsy

    Understanding lymph nodes is crucial for diagnosing various medical conditions. Imaging techniques and biopsies play vital roles in evaluating lymph nodes, helping clinicians determine the presence and nature of abnormalities. This section delves into the specifics of these procedures, their preparation, and potential findings.

    Common Imaging Techniques for Visualizing Lymph Nodes

    Various imaging modalities aid in visualizing lymph nodes, providing crucial information about their size, shape, and internal structure. These techniques are often employed to detect abnormalities before biopsy is necessary.

    • Ultrasound (US): Ultrasound uses high-frequency sound waves to create images of the internal structures. It is a non-invasive, relatively inexpensive, and readily available technique, particularly useful for superficial lymph nodes. Real-time imaging allows for dynamic assessment of the nodes during the procedure. It’s particularly helpful in evaluating the presence of fluid collections (cysts) or masses within the nodes.

    • Computed Tomography (CT): CT scans utilize X-rays and sophisticated computer processing to generate cross-sectional images of the body. CT provides detailed anatomical information, including the size, location, and relationship of lymph nodes to surrounding structures. It’s frequently used to assess deeper lymph nodes and evaluate the extent of disease involvement. Contrast agents may be administered to enhance the visibility of lymph nodes and surrounding tissues.

    • Magnetic Resonance Imaging (MRI): MRI utilizes strong magnetic fields and radio waves to produce detailed images of the body’s internal structures. MRI excels at distinguishing between different soft tissues, providing valuable information about the characteristics of lymph nodes. It’s often employed to evaluate the presence of inflammation, edema, or specific types of tumors within the nodes. The use of contrast agents further enhances the visualization of subtle abnormalities.

    Types of Lymph Node Biopsies

    A biopsy is a procedure to obtain a tissue sample for microscopic examination. Different types of biopsies are performed depending on the location and size of the lymph node, as well as the suspected pathology.

    • Excisional Biopsy: This involves the complete removal of the lymph node. It is often chosen for smaller, superficial nodes where the complete removal is feasible and does not compromise important structures. This approach is typically preferred for suspected benign conditions.
    • Incisional Biopsy: This procedure involves removing a portion of the lymph node. It is a less invasive alternative to an excisional biopsy, particularly useful for larger nodes or those located in areas with complex anatomy. An incisional biopsy provides a representative sample for pathologic evaluation.

    Preparation for Lymph Node Imaging Techniques

    Preparation for imaging procedures varies depending on the specific technique. For ultrasound, no special preparation is usually needed. CT and MRI scans may require fasting or the administration of contrast agents.

    • Ultrasound: No special preparation is generally required, except for removing any loose clothing or jewelry that may interfere with the procedure. The patient may be asked to drink water or other liquids to help with distention of the targeted area.
    • CT: Patients are typically required to fast for a certain period before the scan, depending on the type of contrast agent used. Patients should inform the technician about any allergies or previous reactions to contrast agents. If contrast is required, intravenous access is typically established.
    • MRI: Preparation for MRI is similar to that of CT. Fasting may be required, and patients should inform the technician about any implanted medical devices or metal in the body.

    Preparation for a Lymph Node Biopsy

    Preparation for a lymph node biopsy is dependent on the type of biopsy and the patient’s overall health. The physician will provide specific instructions.

    • General Instructions: Patients are often asked to fast for a few hours before the procedure. Inform the medical team about any medications, allergies, or medical conditions. Any relevant medical history and current medications should be disclosed to the physician.

    Typical Findings on Lymph Node Imaging

    Lymph node imaging findings can vary depending on the underlying pathology.

    Pathology Typical Imaging Findings
    Benign Lymphadenopathy Enlarged lymph nodes, typically symmetrical, with smooth margins, and no internal calcifications.
    Malignant Lymphoma Enlarged lymph nodes, often asymmetrical, with irregular margins and possible internal calcifications or necrosis.
    Metastatic Disease Enlarged lymph nodes, often multiple, with varying sizes and shapes, and possible internal calcifications or masses.

    Interpreting Lymph Node Biopsy Results

    Pathologists meticulously examine the biopsy specimens under a microscope. Microscopic examination helps determine the nature of the cells and tissues within the lymph node.

    • Microscopic Evaluation: The pathologist analyzes the cellular architecture, the presence of atypical cells, and any signs of inflammation or infection. The results of this analysis are crucial in determining the diagnosis and appropriate treatment plan.

    Lymph Node Location and Drainage

    Understanding the intricate network of lymphatic drainage is crucial for comprehending the body’s immune responses and disease processes. This system, a vital component of the circulatory system, plays a critical role in transporting lymph, a fluid containing immune cells, throughout the body. Knowledge of lymphatic drainage patterns is indispensable in diagnosing and staging various illnesses, particularly cancers.

    Major Lymph Node Groups

    The lymphatic system comprises a vast network of vessels and nodes. Major lymph node groups are strategically positioned throughout the body, acting as filters for lymph. These groups are interconnected, ensuring efficient drainage and immune surveillance. Their locations and drainage patterns are essential for interpreting diagnostic findings.

    Drainage Patterns of Different Body Regions

    The lymphatic drainage follows specific pathways, conveying lymph from different body regions to particular lymph node groups. The upper extremities, for instance, drain into axillary lymph nodes, while the lower extremities drain into inguinal lymph nodes. Head and neck regions drain into cervical lymph nodes. This directional flow facilitates the identification of the origin of infections or malignancies.

    Clinical Significance of Lymphatic Drainage Patterns

    Understanding the lymphatic drainage patterns is of paramount importance in clinical settings. Knowing the drainage pathways allows healthcare professionals to accurately identify the region of origin of an infection or tumor. For instance, if swelling or abnormalities are detected in the axillary lymph nodes, it might suggest a problem originating in the upper limb or breast region. This crucial information aids in determining the appropriate diagnostic procedures and treatment strategies.

    Lymph Node Drainage in Cancer Diagnosis and Staging

    In cancer diagnosis and staging, the lymphatic drainage patterns are invaluable. Cancer cells can spread through the lymphatic system, metastasizing to distant lymph nodes. Assessing the presence and extent of metastasis in regional lymph nodes provides critical information for determining the stage of the disease. This knowledge is crucial for planning appropriate treatment strategies and predicting patient outcomes.

    The higher the number of lymph nodes involved, the more advanced the stage of the cancer is often considered.

    Lymphatic Drainage of the Upper Limb

    The lymphatic drainage of the upper limb follows a predictable pattern, originating at the fingertips and progressing upwards.

    Body Region Drainage to Explanation
    Fingers, Palm Anterior axillary lymph nodes Lymphatic vessels ascend along the veins of the hand and arm, converging at the axillary lymph nodes.
    Lateral forearm Lateral axillary lymph nodes The lateral aspect of the forearm drains to the lateral axillary nodes.
    Medial forearm Anterior axillary lymph nodes The medial forearm drains to the anterior axillary lymph nodes.
    Upper arm Apical and central axillary lymph nodes The lymph from the upper arm ultimately flows to the apical and central axillary lymph nodes.

    This detailed drainage system allows for precise identification of the location and extent of potential spread of cancer from the upper limb. This understanding is crucial for staging and treatment planning.

    Last Point

    In conclusion, understanding the purpose of lymph nodes is crucial for comprehending the intricate workings of the immune system. Their function in filtering lymph, initiating immune responses, and involvement in disease processes is undeniable. We’ve explored the structure, function, and clinical implications of lymph nodes, emphasizing their significance in disease diagnosis and treatment. This comprehensive overview should equip readers with a deeper understanding of these essential components of the human body.

  • How Long Does a Flu Shot Last? Your Guide

    How Long Does a Flu Shot Last? Your Guide

    How long does a flu shot last? This crucial question affects everyone’s decision to get vaccinated. Understanding the duration of protection offered by flu shots is key to making informed choices about your health. Different factors, like the specific flu strain, your immune system, and even underlying health conditions, all play a role in how long your protection lasts.

    This comprehensive guide delves into the science behind flu shot effectiveness, providing you with clear answers and insights.

    The duration of flu shot protection isn’t a one-size-fits-all answer. Factors like the type of vaccine, the individual’s immune response, and the specific circulating influenza strains all contribute to the length of time you’re shielded from the virus. This exploration will provide a clear understanding of the complexities involved.

    Effectiveness Duration

    How long does a flu shot last

    Flu shots are a crucial part of seasonal influenza prevention. Understanding how long the protection lasts is vital for making informed decisions about vaccination schedules and potential booster shots. While the protection isn’t lifelong, the duration plays a significant role in community health.Influenza vaccines, generally, don’t provide lifelong immunity. The protection they offer is strain-specific and varies based on several factors, including the specific influenza virus circulating, the recipient’s immune response, and their overall health.

    Duration of Protection by Vaccine Type

    Different types of influenza vaccines have varying durations of effectiveness. The duration depends on the specific formulation, and the individual’s immune response.

    • Inactivated Influenza Vaccines (IIVs): These vaccines use inactivated influenza viruses, meaning they are not live. IIVs typically provide protection for about 6 to 8 months. The protection can be shorter in individuals with weakened immune systems. The effectiveness of the IIV can vary based on the specific strain circulating in the community and the individual’s immune response.
    • Live Attenuated Influenza Vaccines (LAIVs): These vaccines use weakened, live influenza viruses. They are generally effective for about 4 to 6 months. LAIVs are generally well-tolerated by healthy individuals. The length of protection offered by LAIVs is often shorter than that of IIVs, especially in those with compromised immune systems.
    • mRNA Influenza Vaccines: These vaccines use messenger RNA (mRNA) to teach the body’s cells how to make proteins that trigger an immune response against influenza. The duration of protection offered by mRNA vaccines is still under active study and monitoring. Early data suggests that protection may last for a similar timeframe to IIVs, and possible annual booster doses may be needed.

    Factors Influencing Protection Duration

    Several factors can influence how long a flu shot’s protection lasts. This understanding is key to developing effective vaccination strategies.

    • Circulating Influenza Strains: The specific strains of influenza circulating during a given season are a significant factor. If the circulating strains are significantly different from those included in the vaccine, protection might be reduced.
    • Immune Response: Individual immune responses vary greatly. Factors like age, overall health, and pre-existing conditions can impact how effectively the body mounts an immune response to the vaccine. Stronger immune responses often correlate with longer protection periods.
    • Overall Health: Chronic health conditions and weakened immune systems can reduce the duration of protection offered by a flu shot. For instance, individuals with compromised immune systems might require more frequent vaccinations to maintain protection.

    Comparison Table

    Vaccine Type Estimated Duration of Protection Contributing Factors
    Inactivated Influenza Vaccine (IIV) 6-8 months Circulating strains, individual immune response, overall health
    Live Attenuated Influenza Vaccine (LAIV) 4-6 months Circulating strains, individual immune response, overall health
    mRNA Influenza Vaccine Estimated 6-8 months (ongoing studies) Circulating strains, individual immune response, overall health

    Immune Response and Protection

    Understanding how your body responds to the flu vaccine is key to appreciating its effectiveness. The vaccine doesn’t give you the flu; instead, it triggers a protective immune response that prepares your system to fight off the actual virus if you encounter it later. This process is complex but fascinating, involving a cascade of cellular and antibody-mediated actions.The flu shot introduces weakened or inactivated flu viruses into your system.

    This serves as a “practice run” for your immune system, allowing it to recognize the viral components and develop strategies to neutralize them. This training is crucial for mounting a rapid and robust defense against the actual virus should you become exposed.

    The Body’s Immune Response to the Flu Vaccine

    Your immune system, a sophisticated network of cells and proteins, is remarkably adept at identifying and eliminating foreign invaders. Upon encountering the flu vaccine, specialized cells, such as dendritic cells, capture the viral components and present them to other immune cells. This crucial presentation triggers a series of events leading to the development of immunity.

    So, how long does a flu shot actually protect you? Generally, it lasts for about 6 months, but it can vary. Knowing how your body reacts to vaccinations is interesting, especially when considering the complex muscle groups that play a role, like the quadriceps muscles. What are the quadriceps muscles are crucial for everyday movements, and understanding their function helps appreciate the body’s intricate workings.

    Ultimately, the effectiveness of a flu shot depends on individual factors and the specific strain of the flu, so remember to get your yearly dose to stay protected!

    Antibody Production

    A key player in this response is the production of antibodies. Antibodies are specialized proteins that bind to specific parts of the virus, essentially tagging it for destruction. The body produces antibodies tailored to the specific strains of influenza included in the vaccine. This specific targeting is vital for effective protection. These antibodies circulate in the bloodstream, ready to neutralize any influenza viruses that try to infect you.

    Cellular Immunity

    In addition to antibodies, the immune response involves cellular immunity. Certain immune cells, like T cells, recognize and destroy infected cells, preventing the virus from spreading throughout the body. This cellular component of the immune response provides an additional layer of protection, acting as a secondary defense mechanism.

    Flu shots generally offer protection for about 6 months, but their effectiveness can vary. While we’re on the topic of health, it’s important to consider that the curability of conditions like kidney cancer is complex and depends on many factors. For more information on is kidney cancer curable , it’s crucial to consult with a medical professional.

    Ultimately, getting a flu shot is a proactive step in protecting your health, and it’s something to consider for the upcoming season.

    Individual Variations in Immune Response

    Individual responses to the flu vaccine can differ. Factors such as age, overall health, and pre-existing conditions can influence the strength and duration of the immune response. For example, younger children or individuals with weakened immune systems might need a booster dose to maintain adequate protection. Similarly, individuals with chronic health conditions may experience a slightly different immune response compared to healthy individuals.

    Impact of Pre-existing Conditions

    Pre-existing health conditions can influence the duration of protection offered by the flu vaccine. Individuals with compromised immune systems, such as those with HIV/AIDS or undergoing chemotherapy, may experience a shorter duration of protection. Furthermore, individuals with conditions like asthma or diabetes may also exhibit varying levels of protection, requiring careful consideration and potentially additional booster doses to maintain immunity.

    So, how long does a flu shot actually last? It’s not a permanent shield, you know. While the protection offered can vary, it’s generally around 6 months to a year. However, it’s important to consider that too much fiber in a cholesterol-lowering diet, for example, could potentially impact the overall effectiveness of your immune system, which might also affect how long your flu shot protection lasts.

    Too much fiber in cholesterol lowering diet can be a tricky balance to get right. Ultimately, getting a flu shot each year is a smart way to stay protected.

    Diagram: Immune Response to a Flu Shot

    Imagine a circle representing your body. Small, colored shapes inside represent the various types of immune cells (B cells, T cells, dendritic cells). The vaccine, represented by a different colored shape, enters the body. Dendritic cells capture the vaccine components. These cells then travel to lymph nodes (depicted as small, interconnected ovals) where they present the vaccine’s pieces to other immune cells, specifically B cells and T cells.

    B cells produce antibodies, which are depicted as small, stick-like structures attaching to the vaccine components. T cells directly attack infected cells, represented by small, red-highlighted cells. The entire process illustrates the activation of your immune system, creating a memory of the vaccine and preparing for a future encounter with the actual virus.

    Influenza Strain Evolution

    The influenza virus is notorious for its ability to mutate, a process that significantly impacts the effectiveness of flu shots. Understanding these mutations is crucial for predicting and preparing for future outbreaks. This dynamic nature of the virus requires constant vigilance and adaptation in vaccine development.The influenza virus’s RNA structure makes it highly prone to genetic changes. These changes, often occurring through a process called antigenic drift, result in slightly altered viral proteins, particularly the hemagglutinin (HA) and neuraminidase (NA) proteins.

    These proteins are crucial for the virus’s ability to bind to and infect human cells. These slight changes are often enough to evade the immune response triggered by previous vaccinations.

    Impact on Vaccine Effectiveness

    Influenza strains constantly evolve, leading to changes in the virus’s surface proteins. These alterations can impact the duration of protection offered by a flu shot. If the circulating strain differs significantly from the strains included in the vaccine, the vaccine’s effectiveness will be diminished. This underscores the need for yearly updates to the flu vaccine composition.

    Predicting and Developing New Vaccines

    Scientists employ sophisticated surveillance methods to track the evolution of influenza viruses. Global monitoring networks analyze samples from various locations to identify the predominant circulating strains. This information is crucial in predicting which strains will be prevalent in the upcoming flu season. Based on this data, scientists formulate new vaccine compositions containing the predicted strains. This process involves extensive research and laboratory testing to ensure the vaccine’s safety and efficacy.

    Tracking and Adapting Vaccine Composition

    Scientists meticulously track the genetic makeup of influenza viruses. This involves analyzing the HA and NA genes to identify mutations that might affect the virus’s ability to infect cells. This analysis informs the selection of strains included in the next season’s vaccine. For instance, if a particular strain exhibits significant antigenic drift, it is likely to be included in the next vaccine formulation.

    The adaptation of the vaccine composition is an ongoing process, constantly adjusting to the evolving influenza strains.

    Flu Season Effectiveness Comparison

    Flu Season Predominant Influenza Strains Vaccine Effectiveness (estimated)
    2022-2023 Influenza A (H3N2) and Influenza B Moderate effectiveness
    2021-2022 Influenza A (H3N2) and Influenza B High effectiveness
    2020-2021 Influenza A (H1N1) and Influenza B (predominant in some regions) Varied, impacted by pandemic conditions

    Note: Vaccine effectiveness varies based on factors such as individual immune response and the specific strains circulating during a given season. The table above presents a simplified overview and should not be taken as absolute measurements.

    Factors Affecting Duration

    The effectiveness of a flu shot isn’t a one-size-fits-all scenario. Various factors influence how long the protection offered by the vaccine lasts. Understanding these factors can help individuals make informed decisions about their flu prevention strategies. These factors, from age to individual immune response, are key considerations when evaluating the optimal timing and frequency of flu vaccinations.

    Age Impact on Duration

    Age significantly impacts the body’s response to the flu vaccine. Infants and young children often have a less robust immune response compared to adults, potentially leading to a shorter duration of protection. Similarly, the elderly may experience a weaker immune response, also resulting in a potentially shorter duration of protection. This age-related variation underscores the importance of vaccination for all age groups, especially those with compromised immune systems.

    Underlying Health Conditions and Protection

    Individuals with underlying health conditions, such as chronic respiratory illnesses, weakened immune systems, or diabetes, might experience varying degrees of protection from the flu shot. These conditions can affect the body’s ability to mount a robust immune response, potentially leading to a shorter duration of protection compared to those without such conditions. It’s essential to consult with a healthcare provider to determine the best course of action for individuals with underlying health conditions.

    Individual Immune Responses and Protection

    Individual immune responses play a crucial role in determining the effectiveness and duration of protection from a flu shot. Some individuals may have stronger immune responses than others, resulting in longer-lasting protection. Factors like genetics, overall health, and nutrition can all contribute to the strength of an individual’s immune response. This variability in immune response highlights the importance of personalizing vaccination strategies when possible.

    Administration Method and Duration

    The method of flu shot administration can potentially influence the duration of protection. While injectable flu vaccines are the most common, nasal spray vaccines are also available. The duration of protection offered by each method may differ. The different administration methods have different effects on the body’s immune response. Further research is needed to fully understand the long-term implications of each method.

    Factors Influencing Flu Shot Protection Duration – Flowchart

    Placeholder ImageNote: This is a simplified flowchart. The interactions between these factors are complex and not fully understood.

    Boosters and Additional Doses: How Long Does A Flu Shot Last

    How long does a flu shot last

    Flu shots, while a vital preventative measure, aren’t a one-and-done solution. Maintaining protection against the constantly evolving influenza virus requires a proactive approach, and booster shots play a crucial role in this ongoing effort. Understanding the rationale behind annual vaccinations and the need for occasional boosters is key to maximizing their effectiveness.

    Importance of Booster Shots, How long does a flu shot last

    Booster shots provide a crucial top-up to your immune system’s defense against the flu. They re-introduce your body to the latest circulating influenza strains, reinforcing the body’s memory cells and increasing the production of antibodies. This heightened immune response translates into a stronger and more durable protection against infection. A robust immune response is essential for effective protection against the virus.

    Situations Requiring Booster Shots

    Certain individuals might benefit from booster shots more frequently than others. This is due to factors such as compromised immune systems, or advanced age, which often leads to a weakened immune response. Furthermore, individuals with chronic health conditions, such as asthma or diabetes, may also require more frequent booster shots to maintain adequate protection. These situations underscore the personalized approach to flu vaccination and highlight the importance of consulting a healthcare professional for tailored recommendations.

    Annual Flu Vaccinations: A Necessity

    The influenza virus is notorious for its rapid evolution. Each year, new strains emerge, rendering the previous year’s vaccine less effective against the circulating viruses. Annual vaccinations are essential to keep pace with these mutations. Think of it like updating software: without periodic updates, your system becomes vulnerable to new threats. Similarly, without an annual flu vaccination, your immune system struggles to effectively recognize and combat new strains.

    Reasons Behind Annual Flu Vaccine Updates

    • Influenza Strain Evolution: The influenza virus constantly mutates, leading to new strains each year. These new strains may differ significantly from the previous year’s strains, rendering the previous year’s vaccine less effective.
    • Maintaining Protection: A significant portion of the population may have only a limited response to the initial vaccine, especially the elderly. Booster shots help strengthen and maintain immunity over time.
    • Protection from Emerging Threats: The need for annual vaccinations ensures that the vaccines adapt to the most recent circulating strains, preventing outbreaks and protecting vulnerable populations.

    Misconceptions and Common Concerns

    Flu shots are a vital part of protecting yourself and your community from the flu, but some common misconceptions and concerns linger about how long their protection lasts. Understanding these issues is key to making informed decisions about your health and the health of those around you. Addressing these concerns helps dispel myths and reinforces the importance of annual vaccination.Many people mistakenly believe that a single flu shot provides year-long immunity.

    However, the reality is more nuanced, and the effectiveness of the vaccine is influenced by various factors. This section delves into the reasons behind the temporary nature of flu shot protection and highlights the significance of annual vaccination.

    Common Misconceptions About Flu Shot Duration

    The effectiveness of a flu shot isn’t a simple, one-size-fits-all answer. Influenza viruses are constantly evolving, and the composition of the vaccine is updated yearly to match the most prevalent strains predicted for the upcoming season. This dynamic nature is a crucial factor in understanding why flu shot protection isn’t permanent.

    Why Flu Shot Protection Might Not Last a Full Year

    The protection offered by a flu shot is not guaranteed to last the entire year. This is because influenza viruses are highly adaptable. New strains emerge each year, and the vaccine’s effectiveness depends on how closely the vaccine’s components match the circulating viruses. If the strains circulating differ significantly from the strains included in the vaccine, the protection offered might be reduced.

    This dynamic evolution means that annual vaccination is essential for continued protection.

    Importance of Annual Vaccination

    Even if you felt protected from the previous year’s vaccine, annual vaccination is crucial. The influenza virus constantly mutates, and the composition of the vaccine is updated to match the anticipated strains for the upcoming season. Annual vaccination helps ensure your immune system is prepared for the circulating viruses. Consider a situation where a person felt protected last year, but the strains circulating this year are significantly different.

    Without the annual update, their immunity may be inadequate.

    FAQ: Duration of Flu Shot Protection

    Question Answer
    How long does a flu shot protect me? Flu shot protection typically lasts for several months, but not a full year. Its effectiveness depends on the match between the vaccine’s components and the circulating influenza viruses.
    Why do I need a flu shot every year? Influenza viruses evolve rapidly, and new strains emerge each season. The vaccine’s composition is updated annually to match the anticipated strains. Annual vaccination ensures your immune system is prepared for the circulating viruses.
    If I got a flu shot last year, am I still protected this year? While you might have some level of immunity, it’s crucial to remember that the flu virus mutates. Annual vaccination provides optimal protection against the current season’s circulating strains.
    What if the strains in the vaccine don’t match the circulating strains? If the strains in the vaccine differ significantly from the circulating strains, the protection offered by the shot might be reduced. This underscores the importance of annual vaccination to ensure your immunity aligns with the circulating viruses.

    Ending Remarks

    In conclusion, the duration of flu shot protection is multifaceted, influenced by various factors. While a flu shot typically provides protection for several months, the actual length depends on individual circumstances. Annual vaccination remains essential to maintain a high level of protection against the constantly evolving influenza virus. Understanding the factors at play allows for informed decisions about your health and the health of those around you.