Tag: emergency

  • How to Treat an Impaled Object A Guide

    How to Treat an Impaled Object A Guide

    How to treat an impaled object is a critical skill to possess. This guide will walk you through the essential steps for initial assessment, stabilization, first aid, and transport, ensuring the best possible outcome for the injured person. From recognizing potential dangers to understanding specific scenarios, this comprehensive approach will empower you to handle this challenging situation safely and effectively.

    The initial assessment is paramount. Quickly evaluating the situation, determining the type of object, and preventing further injury are crucial first steps. Ignoring these steps could lead to more serious complications. The key is to act calmly and decisively.

    Initial Assessment and Safety

    Assessing a situation where someone has an impaled object requires immediate, calm action. Panicking can lead to further harm. The priority is to ensure the safety of everyone involved and to prevent any additional injuries. This involves a careful evaluation of the situation, and importantly, not attempting any self-treatment.

    Safe Assessment of the Situation

    A crucial initial step is to ensure the scene is safe. Evaluate the immediate surroundings for potential hazards. Is there a risk of falling debris, or other dangers that could put you or the injured person at further risk? If the scene is unsafe, carefully move the person to a safer location, while maintaining the impaled object’s stability.

    It is vital to keep the impaled object from moving further, which could cause additional injury. This careful approach helps maintain the stability of the impaled object, reducing the risk of further damage.

    Importance of Not Removing the Object

    Attempting to remove an impaled object yourself is extremely dangerous. This action could cause more damage to the person’s body, increasing blood loss and nerve damage. The impaled object may be stabilizing a wound, and any sudden movement could disrupt the delicate balance of the situation. The vital organs and blood vessels may be at risk. The best course of action is to stabilize the person and the object, and seek professional medical help.

    Dealing with an impaled object? First, try to keep calm and assess the situation. Don’t try to pull it out yourself; it could worsen the injury. Seeking immediate medical attention is crucial. While researching how to best handle this, I stumbled across an interesting article about natural remedies for erectile dysfunction, like ashwagandha for erectile dysfunction here.

    Ultimately, though, remembering the importance of immediate professional help is key when it comes to impaled objects.

    Preventing Further Injury

    Preventing further injury is paramount. This involves controlling any visible bleeding by applying direct pressure to the wound. Keep the person still and comfortable. Maintain their body temperature. Avoid giving them anything to eat or drink.

    Ensure that the person is not moving around or talking excessively, as this can cause additional stress and potential injury. This includes preventing any movement that could potentially dislodge the impaled object or cause further damage.

    Potential Impaled Object Types and Initial Responses

    Potential Impaled Object Types Potential Dangers Recommended Initial Responses
    Wood Possible deep penetration, potential for splinters, risk of infection Immobilize the object, control bleeding, cover the wound loosely with a sterile dressing, seek immediate medical attention.
    Metal High risk of deep penetration, potential for broken bones or internal damage, potential for electrical shock if the metal is conductive Immobilize the object, control bleeding, cover the wound loosely with a sterile dressing, seek immediate medical attention. Assess for electrical shock risks if appropriate.
    Glass Sharp edges, potential for deep cuts, risk of infection, possible eye injury if the object is close to the eye. Immobilize the object, control bleeding, cover the wound loosely with a sterile dressing, seek immediate medical attention. Pay particular attention to any injuries around the eyes.

    Never attempt to pull out an impaled object yourself. This is extremely dangerous and could cause additional harm.

    Stabilizing the Impaled Object

    Once you’ve assessed the situation and ensured your safety, the next crucial step is stabilizing the impaled object. Moving the object could cause further injury to the victim. This process involves careful application of support and immobilization techniques to prevent any unintended movement of the object.

    Methods for Stabilizing the Impaled Object

    Stabilizing the impaled object involves creating a framework of support around the object without dislodging it. This approach aims to maintain the object’s position and prevent further harm to the underlying tissues. Different materials and methods can be employed depending on the available resources and the nature of the impaled object.

    Using Readily Available Materials for Splinting

    A variety of readily available materials can be used to create a makeshift splint or brace. The key is to create a stable framework that immobilizes the affected area and prevents the impaled object from shifting. Examples include sturdy sticks, cardboard, cloth, or even towels. These items can be fashioned into splints to support the area surrounding the impaled object, preventing further damage.

    First aid for an impaled object involves careful stabilization, not removal. Before rushing to yank it out, consider whether almond milk is a good source of nutrients, which can be important for recovery. While you’re waiting for medical help, keeping the object stable is crucial to avoid further injury. Checking out is almond milk good for you might give you some insight into its nutritional value, but remember that proper medical attention is paramount when dealing with impaled objects.

    Focus on keeping the injured area stable and preventing any more harm.

    Immobilizing the Affected Area

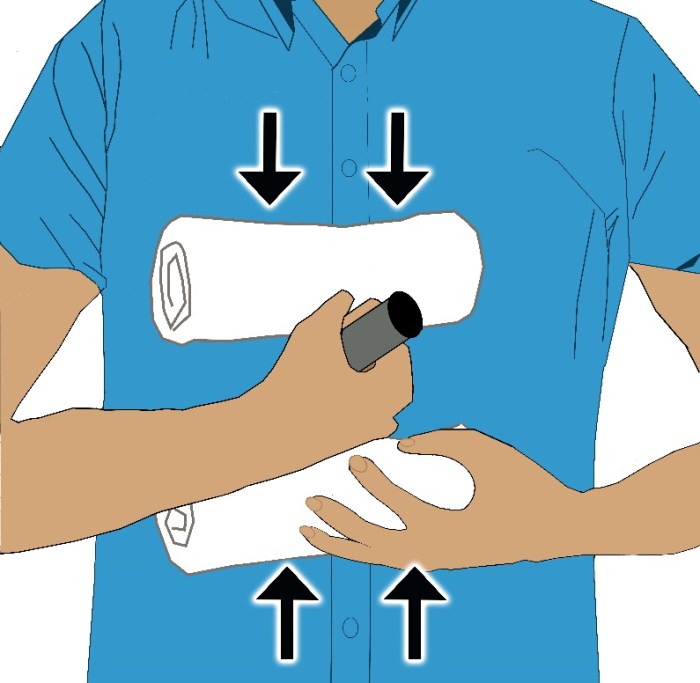
    Immobilizing the affected area is crucial to prevent any movement that could further injure the victim. This involves securing the impaled object and the surrounding area to prevent any unwanted shifting or movement. This is achieved through the application of bandages, dressings, or splints, ensuring that the affected area remains stable and protected. For example, a long stick impaled in the arm can be stabilized by wrapping a bandage around the arm, securing the stick in its place.

    Examples of Immobilization Techniques

    One technique involves using a sturdy stick or board as a splint. Place the stick along the affected limb, supporting the impaled object. Secure the splint in place with bandages or cloth, ensuring the object remains immobile. If the object is in the torso or neck, consider using a wide, soft material, such as a blanket, to support the area around the impaled object, followed by the use of cloth or bandages to stabilize it further.

    Dealing with an impaled object? First, try to stabilize the object, preventing further movement. Don’t attempt to remove it yourself unless it’s a minor injury; a brain aneurysm headache, for example, could be a sign of a much more serious issue, and seeking immediate medical attention is critical. While you wait for help, keep the wound covered to prevent infection and control bleeding.

    Remember, the correct procedure for treating an impaled object depends on the location and type of injury, so always prioritize professional medical assistance. how long does a brain aneurysm headache last is a question that needs immediate medical attention and shouldn’t be ignored. Ultimately, your safety and well-being hinge on proper medical handling of the situation.

    This will prevent unnecessary movement and pain.

    Table of Stabilization Methods

    Stabilization Method Pros Cons Suitability for Impaled Object Types
    Using a rigid stick as a splint Simple, readily available, provides good support. May not be suitable for all body regions or object types. Long, relatively straight objects, such as sticks or metal rods.
    Using a wide, soft material for support Gentle support for sensitive areas like the neck or torso. May not be as effective for stabilizing larger or irregularly shaped objects. Blunt objects, irregular shapes.
    Using bandages and dressings Easy to apply, helps to contain bleeding and prevent infection. May not be sufficient for large or irregularly shaped objects. Smaller objects like arrows, knives, or glass shards.

    Immediate First Aid Measures

    Controlling bleeding is crucial in managing an impaled object injury. Prompt and effective first aid can significantly reduce blood loss and improve the chances of a positive outcome. Understanding the different methods of controlling bleeding and knowing how to apply them correctly is vital for anyone encountering such a situation.Proper immediate action can help minimize the severity of the injury and complications.

    A calm and systematic approach, following the established guidelines, is paramount in ensuring the best possible care for the injured person.

    Controlling Bleeding

    Effective bleeding control is essential in the initial stages of treating an impaled object injury. Uncontrolled bleeding can lead to shock, organ damage, and even death. The goal is to stop the flow of blood as quickly and safely as possible.

    Applying Direct Pressure

    Direct pressure is a fundamental technique for controlling bleeding. Applying firm, sustained pressure directly to the wound site is key. This helps to constrict blood vessels and reduce blood flow. A clean cloth or dressing should be used to apply the pressure. Avoid using excessive force, as this can cause further damage.

    Elevating the Injured Area

    Elevating the injured area above the heart helps to reduce blood flow to the wound. This is often done in conjunction with direct pressure. Elevating the injured limb or body part can significantly decrease blood loss, particularly if the impaled object is in an extremity. Care should be taken not to move the impaled object.

    Essential First Aid Supplies

    Having the right supplies readily available is crucial. A well-stocked first-aid kit can be the difference between a quick response and a delay in vital care.

    • Clean cloths or gauze pads
    • Sterile dressings
    • Bandages (various sizes and types)
    • Gloves (latex or nitrile)
    • Scissors
    • Tweezers
    • Antiseptic wipes (optional)

    Using Dressings and Bandages

    Using the appropriate dressings and bandages is essential to effectively control bleeding and protect the wound. A clean, sterile dressing should be placed directly over the wound. Bandages are then used to secure the dressing and provide additional support. The type of bandage used will depend on the location and extent of the injury. Always prioritize the safety and well-being of the person receiving the first aid.

    Comparison of Bleeding Control Methods

    The effectiveness of various bleeding control methods varies depending on the specific situation.

    Method Description Effectiveness Considerations
    Direct Pressure Applying firm pressure directly to the wound. High Requires consistent pressure and a clean dressing.
    Elevation Raising the injured area above the heart. Moderate Best used in conjunction with direct pressure.
    Tourniquet Tightly wrapping a material around the limb above the wound to cut off blood flow. High (in extreme cases) Should only be used as a last resort, as it can cause tissue damage if used incorrectly. Requires specific training.

    Transport and Medical Attention: How To Treat An Impaled Object

    Getting a person with an impaled object to medical care safely and efficiently is paramount. Every second counts in these situations, and proper transport protocols minimize further harm and maximize the chances of a positive outcome. This section Artikels the crucial steps to ensure a safe and timely transfer to a medical facility.The primary goal in transporting a victim with an impaled object is to avoid unnecessary movement that could dislodge the object and cause further injury.

    A controlled and methodical approach is essential. The safety of the victim and those assisting is equally important.

    Safe Transport Procedures

    Proper transport procedures are critical for minimizing risk. The key is to stabilize the impaled object and the victim’s condition to prevent additional injury during the transfer. Avoid unnecessary jostling or movement that could cause the object to shift or the victim to experience further pain. The following steps provide a comprehensive guide for safe transport.

    • Assess the situation and surroundings for potential hazards. Ensure the environment is safe for both the victim and the rescuers.
    • Maintain a calm and reassuring presence to reduce the victim’s anxiety and stress.
    • Assess the victim’s breathing, circulation, and level of consciousness, continuously monitoring vital signs.
    • Ensure the victim is positioned comfortably and safely to prevent further injury.
    • Immobilize the victim if necessary, using appropriate splints or other supportive devices. Ensure the stabilization does not disrupt the impaled object.
    • Protect the impaled object with padding to prevent movement or further damage. This prevents further injury.

    Emergency Service Notification

    Prompt notification of emergency services is crucial. Accurate and immediate communication is essential in these critical situations. This step can significantly impact the outcome of the incident.

    • Contact emergency services (e.g., 911 or equivalent local number) immediately.
    • Provide clear and concise information about the situation.
    • Relay the exact location of the incident, including street addresses, landmarks, and any other details that will help emergency responders locate the scene quickly.
    • Explain the nature of the injury, including the type of object and its location.
    • Describe the victim’s condition and any visible injuries.

    Key Information for Emergency Responders

    Providing clear and concise information to emergency services is vital. This allows them to prepare appropriately for the situation and initiate appropriate procedures promptly.

    • Type of Object: Describe the object precisely (e.g., metal rod, piece of wood, etc.) and its approximate size. This allows for appropriate handling and specialized equipment selection.
    • Location of Impalement: Specify the exact body part where the object is lodged. This assists medical professionals in planning their approach and minimizing further damage.
    • Victim’s Condition: Report the victim’s level of consciousness, breathing, and pulse. This information helps prioritize treatment and ensures appropriate measures are taken quickly.
    • Time of Incident: Provide the approximate time the incident occurred. This information is crucial for determining the best course of action and the potential need for specialized care.
    • Any other pertinent information: Include any other details that might help emergency responders. For instance, the cause of the impalement or any factors that might have influenced the victim’s condition. If you are aware of any medical conditions the victim may have, it is important to mention it.

    Preventing Further Injury

    How to treat an impaled object

    Treating an impaled object requires meticulous attention to preventing further harm to the victim and the surrounding tissues. Maintaining stability and avoiding unnecessary movement is paramount. Improper handling can lead to severe complications, including nerve damage, internal bleeding, and even death. A systematic approach to stabilization and immediate first aid is crucial in minimizing these risks.

    Maintaining Stability of the Impaled Object

    Maintaining the stability of the impaled object is vital. Trying to remove it yourself can worsen the injury. Any attempt to dislodge the object before professional medical help arrives can cause further trauma to the victim. The object’s position should be stabilized using the methods described in the previous section. Avoid applying pressure directly on the impaled object, as this can force the object deeper into the body.

    Instead, use firm, but gentle, supports to hold the object in place. A rigid structure such as a rolled-up towel or a board can be helpful.

    Avoiding Further Damage to Surrounding Tissues

    Preventing further damage to the surrounding tissues is crucial. Movement or pressure on the impaled area can cause further lacerations, bruising, and damage to blood vessels and nerves. It’s important to minimize movement and avoid any action that might push the object deeper into the body. Gently padding the area around the impaled object with sterile dressings or clean cloths can help to reduce friction and pressure.

    The key is to maintain the object’s position and stabilize the affected area without applying pressure to the wound.

    Preventing Shock and Other Potential Complications

    Preventing shock is paramount. Severe injuries, such as those involving impaled objects, can lead to shock. Maintaining the victim’s body temperature, ensuring adequate breathing, and controlling bleeding are critical in preventing shock. Additional complications, such as infections, can arise if the wound is not properly treated. The victim should be kept comfortable and reassured.

    Maintaining a calm and controlled environment is essential in reducing anxiety and potential complications.

    What NOT to Do

    Attempting to remove the impaled object yourself is extremely dangerous. This action can cause further damage and increase the risk of internal bleeding, nerve damage, or even death. Never try to pull or twist the object, as this could cause the object to rotate or move deeper into the body. Applying pressure directly to the object is also a critical mistake.

    Instead, prioritize stabilization and seek professional medical help immediately.

    Table of Potential Dangers of Improper Handling

    Potential Danger Preventative Measure
    Further tissue damage Maintain stability of the impaled object. Minimize movement of the injured area.
    Internal bleeding Stabilize the object, control bleeding using direct pressure on the wound, but not on the impaled object.
    Nerve damage Avoid unnecessary movement of the object. Stabilize the area with supportive materials.
    Infection Keep the wound covered and sterile. Seek immediate medical attention.
    Shock Maintain the victim’s body temperature and breathing. Keep the victim calm and reassured.

    Types of Impaled Objects and Their Treatments

    Understanding the type of impaled object is crucial for effective first aid. Different objects require specific stabilization techniques to prevent further injury and ensure proper transport to medical facilities. The nature of the object—whether sharp, blunt, or foreign—dictates the approach to handling the situation. Careful assessment and appropriate stabilization are paramount in minimizing harm.Knowing the material of the impaled object is equally important.

    Different materials react differently to force, and some may be more likely to cause internal damage. This knowledge empowers you to make informed decisions about how to manage the situation, while understanding the object’s potential for harm.

    Sharp Objects

    Sharp objects, like knives or metal shards, pose a significant risk of deeper penetration and potential internal damage. Stabilization is critical to prevent further injury. A crucial aspect is to avoid directly manipulating the object, as this can worsen the situation. The object should be stabilized in its current position.

    Blunt Objects, How to treat an impaled object

    Blunt objects, such as pieces of wood or bone, often cause significant trauma to the surrounding tissues. The focus in these cases is on stabilizing the object and managing the associated soft tissue injuries. Significant force might have been involved, and there’s a high chance of associated fractures or other injuries. Therefore, proper immobilization is key to avoid exacerbating the damage.

    Foreign Objects

    Foreign objects, such as splinters or pieces of glass, require careful handling. The stabilization process should minimize further damage to the surrounding tissue and prevent the object from shifting. Factors like the material and size of the object greatly influence the approach to stabilization. Often, a gentle approach is necessary to avoid causing further harm.

    Material Considerations

    The material of the impaled object significantly affects stabilization techniques. For example, a wooden stick may be more easily stabilized with a supportive bandage compared to a sharp metal object. The potential for infection is also a consideration. A metal object might require special attention to prevent contamination, while a wooden object might require different considerations.

    Importance of Understanding the Object’s Nature

    Accurate assessment of the impaled object’s type, sharpness, and material is crucial for appropriate stabilization and transport. A wrong assessment can lead to complications, further injury, and even life-threatening outcomes. Misjudging the nature of the object can result in serious errors in handling the situation.

    Handling Procedures

    Type of Impaled Object Handling Procedures
    Sharp Objects Stabilize in place; avoid directly manipulating; consider using bulky dressings or splints to hold it steady
    Blunt Objects Stabilize in place, ensuring no further movement; use padding and supportive dressings to minimize pressure on surrounding tissue; immobilize the affected area
    Foreign Objects Stabilize in place; avoid removing unless it’s a life-threatening risk; if removal is necessary, use sterile instruments

    Potential Complications and Prognosis

    How to treat an impaled object

    Treating an impaled object involves navigating a delicate balance between immediate stabilization and long-term recovery. While the initial focus is on removing the object and preventing further injury, potential complications can arise from both the injury itself and the subsequent treatment. Understanding these potential complications, along with the importance of ongoing monitoring and follow-up care, is crucial for ensuring a positive prognosis.

    A thorough understanding of these potential issues can help both the patient and medical professionals to anticipate and address potential problems.The impact of an impaled object extends beyond the immediate wound. The object’s trajectory, the tissues it penetrates, and the force of the impact can all contribute to a range of potential complications. The prognosis for recovery hinges on factors like the extent of tissue damage, the presence of infection, and the patient’s overall health.

    Early intervention and meticulous care significantly improve the chances of a favorable outcome.

    Potential Complications

    A wide array of complications can arise from impaled objects, stemming from the initial trauma to the body’s systems. These range from the immediate to the long-term, impacting various aspects of health and well-being.

    • Infection: Penetration of the skin and underlying tissues creates pathways for bacteria to enter and proliferate. Infection can range from localized abscesses to systemic sepsis. Prompt and appropriate antibiotic treatment is critical to control and prevent infection.
    • Internal Bleeding: The impaled object can damage blood vessels, leading to internal bleeding. The severity of the bleeding depends on the size and location of the damaged vessels. This can be a life-threatening complication and requires prompt medical intervention.
    • Nerve Damage: Penetration of nerves can result in varying degrees of nerve damage. This damage can cause temporary or permanent sensory loss, motor dysfunction, or pain. The specific type and severity of nerve damage depends on the location and extent of the injury.
    • Organ Damage: Impalement can directly damage internal organs, such as the lungs, liver, spleen, or kidneys. The extent of organ damage varies depending on the location and force of the impact. Organ damage may require surgical intervention and prolonged recovery.
    • Blood Vessel Thrombosis: Damage to blood vessels can lead to blood clots (thrombosis). These clots can block blood flow to vital organs and tissues, resulting in further complications. Prompt treatment is necessary to prevent or minimize the risk of blood clots.
    • Fistula Formation: A fistula is an abnormal connection between two body parts. Impalement can create fistulas, causing drainage of bodily fluids or pus, which necessitates surgical correction.

    Monitoring for Infection

    Close monitoring is crucial to identify and treat infections early.

    • Signs of Infection: Watch for increasing pain, swelling, redness, warmth, pus discharge, fever, chills, and a general decline in the patient’s overall condition.
    • Frequency of Monitoring: The frequency of monitoring depends on the severity of the injury and the presence of any other complications. Regular check-ups and assessments are necessary to detect any emerging problems.
    • Importance of Medical Attention: Any signs of infection should be reported to the treating physician immediately. Prompt medical attention is essential to prevent the infection from spreading and causing further complications.

    Long-Term Effects and Prognosis

    The long-term effects and prognosis of an impaled object injury depend on several factors. Early intervention and appropriate treatment are crucial to minimizing long-term complications.

    • Functional Limitations: Nerve damage or other injuries can lead to long-term functional limitations. Rehabilitation may be necessary to regain lost function.
    • Scarring: The impaled object injury may leave significant scarring. The extent of scarring depends on the depth and location of the injury. Scar management and treatment may be required.
    • Psychological Impact: Severe injuries can have a significant psychological impact on the patient. Support and counseling may be necessary to help the patient cope with the emotional and psychological challenges.

    Specific Cases and Scenarios

    Treating an impaled object requires careful consideration of the location and type of object. A standardized approach, while crucial, must be adaptable to the unique circumstances of each case. The focus should always be on minimizing further harm and ensuring the best possible outcome for the victim. Different body areas present unique challenges and necessitate specialized care.The critical first step in managing an impaled object is to assess the situation and the patient’s overall condition.

    Initial assessment focuses on the stability of the impaled object, the presence of life-threatening injuries, and any additional injuries. The specific treatment will then depend on the location of the impaled object and the potential complications.

    Impaled Objects in the Chest

    Chest injuries involving impaled objects are particularly serious due to the vital organs located in the area. Immediate stabilization of the object is paramount to prevent further damage to the heart, lungs, or major blood vessels. Carefully assess the stability of the object. Attempting to remove it yourself could worsen the situation. The priority is to control any bleeding and ensure adequate breathing.

    A person with an impaled object in the chest should receive immediate medical attention.

    Impaled Objects in the Abdomen

    Impaled objects in the abdomen pose a significant threat to the internal organs. The risk of internal bleeding and damage to vital organs is high. Stabilization is crucial. Do not attempt to remove the object yourself. Maintain the patient’s airway and ensure adequate breathing.

    The priority is to control bleeding and maintain the patient’s stability until professional medical help arrives. Immediate medical intervention is essential.

    Impaled Objects in the Extremities

    Impaled objects in the extremities, while potentially less life-threatening than injuries to vital organs, still require careful attention. Stabilize the object to prevent further injury. Control any bleeding using direct pressure. Ensure the limb is supported and not moved unnecessarily. Thorough assessment is critical to rule out additional damage.

    Impaled Objects in the Head or Neck

    Impaled objects in the head or neck are among the most serious types of injuries. Immediate stabilization is paramount to prevent further damage to the brain or spinal cord. Do not attempt to remove the object yourself. Keep the patient’s head and neck stable. The primary focus is on maintaining a clear airway and controlling bleeding.

    These injuries necessitate immediate and specialized medical attention. A skilled medical professional is needed to assess the extent of the damage.

    Treatment Considerations by Body Location

    Body Location Treatment Considerations
    Chest Stabilize the object, control bleeding, ensure breathing, and seek immediate medical attention.
    Abdomen Stabilize the object, control bleeding, maintain airway, and seek immediate medical attention.
    Extremities Stabilize the object, control bleeding, support the limb, and seek medical attention.
    Head/Neck Stabilize the object, maintain airway, control bleeding, and seek immediate specialized medical attention.

    Prevention and Education

    Impalement injuries, though often accidental, can be largely prevented through proactive safety measures and education. Understanding the potential hazards in various environments and activities, and adopting appropriate safety precautions, significantly reduces the risk of these types of injuries. This section Artikels preventive strategies and highlights specific activities and environments where impalement is a more significant concern.

    Preventing Impalement Injuries

    Preventing impalement injuries involves a multi-faceted approach focusing on awareness, preparation, and adherence to safety guidelines. This approach includes a strong emphasis on anticipating potential dangers and taking steps to mitigate them.

    Safety Tips for Specific Activities

    Several activities carry a higher risk of impalement. Awareness of these risks and adherence to safety precautions are crucial.

    • Outdoor Activities: Activities like hiking, camping, and gardening can involve encounters with sharp objects. Wearing sturdy footwear, avoiding walking near fallen branches or debris, and being cautious when using tools like shovels or saws are important precautions. For example, always check your surroundings for potential hazards before working in a wooded area.
    • Construction and Industrial Settings: Construction sites, factories, and workshops frequently use tools and equipment that can cause impalement injuries. Strict adherence to safety protocols, including wearing appropriate protective gear (e.g., safety glasses, gloves, and vests), and following established safety procedures, is critical in these environments.
    • Recreational Activities: Sports like fishing, hunting, and playing with potentially sharp objects require particular attention to safety precautions. Using appropriate equipment and maintaining situational awareness when handling these items are essential. For instance, using appropriate hooks and tackle, as well as practicing caution when walking through wooded areas during hunting season, can help mitigate risk.

    High-Risk Environments

    Certain environments inherently pose a greater risk of impalement. Understanding these risks and implementing appropriate safety measures is paramount.

    • Construction Sites: The presence of numerous sharp objects, heavy machinery, and potentially unstable structures increases the risk of impalement. Regular safety inspections, strict adherence to safety protocols, and proper training are essential for reducing hazards.
    • Woodlands and Forests: Fallen branches, sharp tree limbs, and debris present a significant impalement risk, particularly during outdoor activities like hiking and camping. Careful navigation, awareness of surroundings, and avoiding contact with potential hazards are critical in these environments.
    • Industrial Settings: The presence of heavy machinery, sharp tools, and other potential impalement hazards demands stringent safety protocols and proper protective gear to prevent injuries.

    Importance of Safety Precautions

    Safety precautions are crucial for preventing impalement injuries. Their importance stems from the potential for severe and lasting consequences from these types of injuries.

    Safety Tips and Preventive Measures

    Activity/Environment Safety Tips Preventive Measures
    Outdoor Activities Wear sturdy footwear, avoid walking near debris, be cautious with tools Regular inspections of equipment, clear paths, and appropriate clothing
    Construction/Industrial Settings Use protective gear, follow safety procedures, maintain equipment Strict adherence to safety regulations, comprehensive training, and regular safety inspections
    Recreational Activities Use proper equipment, maintain situational awareness Thorough equipment maintenance, clear guidelines, and safety briefings
    Woodlands/Forests Be aware of surroundings, avoid contact with hazards Clear paths, regular trail maintenance, and appropriate footwear
    Industrial Settings Use protective gear, follow procedures Regular safety inspections, training, and maintenance

    Conclusion

    In conclusion, treating an impaled object requires a systematic approach. Knowing how to stabilize the object, control bleeding, and ensure safe transport is vital. This guide provides a framework for immediate action, empowering you to take the necessary steps to prevent further harm and ensure the best possible outcome. Remember, prompt and appropriate action can significantly impact the recovery process.

    Seeking immediate medical attention is always recommended.

  • Tourniquet for First Aid Kit A Crucial Tool

    Tourniquet for First Aid Kit A Crucial Tool

    Tourniquet for first aid kit: This crucial tool is often overlooked, yet it plays a vital role in emergency situations. Knowing how to use it properly can mean the difference between life and death. Different types of tourniquets exist, each with specific characteristics and applications, which we’ll explore in detail. Proper selection, storage, and maintenance are essential to ensure its effectiveness when needed.

    This guide will cover everything you need to know about integrating a tourniquet into your first aid kit, including training, protocols, and legal considerations.

    From understanding the various tourniquet types and their strengths to recognizing the critical situations where immediate action is necessary, this comprehensive guide empowers you to approach first aid with confidence. We’ll delve into the essential considerations for selecting the right tourniquet, and how to ensure proper storage and maintenance for optimal performance. This knowledge will equip you to act decisively and effectively in emergency situations.

    Introduction to Tourniquets in First Aid Kits

    Tourniquets are crucial components of any comprehensive first aid kit, serving as a life-saving tool in situations involving severe bleeding. They act as a rapid, effective method to stop uncontrolled blood loss, a leading cause of preventable death in trauma cases. Proper understanding and application of tourniquets are essential for anyone who may encounter such emergencies.Tourniquets work by applying pressure to the blood vessels in a limb, effectively cutting off blood flow.

    This intervention is critical when other methods, like direct pressure, are insufficient to control the bleeding. The effectiveness of a tourniquet hinges on proper application, as improper use can lead to nerve damage or tissue necrosis. Knowing when and how to use a tourniquet is a valuable skill in emergency preparedness.

    Types of Tourniquets

    Tourniquets come in various forms, each with its own application and features. Common types in first aid kits include those designed for both adults and children, ensuring appropriate sizing for different body types. This flexibility in design allows for effective use in a wide range of situations.

    Essential Characteristics of a Tourniquet

    A reliable tourniquet for a first aid kit should possess several key characteristics. Firstly, it should be easy to apply, minimizing reaction time in critical situations. Secondly, it must be adjustable to accommodate various limb sizes and ensure adequate pressure. Durability and a long lifespan are also crucial, given the potential for repeated use. Finally, a clear and concise application instruction manual is critical to ensuring correct usage.

    A crucial item for any well-stocked first aid kit is a tourniquet. Knowing how to use it effectively can be a lifesaver in emergency situations. While focusing on the practical aspects of a tourniquet, it’s also important to consider the nutritional powerhouses that can aid in recovery, like watercress. Learning about the nutritional benefits of watercress, for example, from a site like watercress benefits and nutrition profile , can be incredibly insightful.

    Ultimately, the tourniquet is a critical tool for managing life-threatening bleeding, and understanding its use is a vital part of preparedness.

    Importance of Proper Tourniquet Application

    Correct tourniquet application is paramount to minimize complications. Applying the tourniquet too tightly can lead to nerve damage or tissue damage. Conversely, applying it too loosely may not effectively control the bleeding. The location of application should also follow established protocols, prioritizing critical arteries and minimizing the risk of further harm.

    A tourniquet is a crucial item for any first aid kit, and knowing how to use it properly is vital in life-threatening situations. While it’s not something you’d want to use frequently, understanding the potential risks of a severe reaction to gluten allergies, like those often seen in signs of gluten allergy , highlights the importance of preparedness.

    Having a well-stocked kit with a functioning tourniquet can make all the difference in a medical emergency.

    Tourniquet Types, Materials, and Typical Application

    Tourniquet Type Material Typical Application
    Fabric Tourniquet Strong woven fabric with a tightening mechanism Suitable for various limb sizes and situations.
    Military-style tourniquet Durable, adjustable straps Ideal for use in high-impact scenarios, often found in military and EMS settings.
    Improvised Tourniquet Available from any strong, long material like belts, cloths or even strips of fabric Can be constructed using available materials in emergency situations, where a specific tourniquet is not readily available.

    Tourniquet Selection for First Aid Kits

    Choosing the right tourniquet for your first aid kit is crucial for effective emergency response. A well-selected tourniquet can significantly improve outcomes in life-threatening situations involving severe bleeding. This involves understanding the various types, their pros and cons, and the specific needs of your intended users and the environment where the kit will be used.Proper tourniquet selection requires careful consideration of several factors, from the design and materials to the user’s familiarity and the potential use cases.

    This process ensures that the chosen tourniquet is both effective and safe to use in a range of situations.

    Factors to Consider When Selecting Tourniquets

    The selection process for tourniquets involves evaluating different criteria to determine the best fit for a specific first aid kit. Factors like ease of use, size, and cost are critical considerations. The chosen design should be intuitive and allow for rapid application, even under stress. Furthermore, the tourniquet’s size should accommodate a wide range of patients, while the cost should align with the budget constraints.

    Comparison of Different Tourniquet Designs

    Tourniquets come in various designs, each with its own set of advantages and disadvantages. Understanding these differences allows for a more informed decision. The most common designs include the traditional, the military, and the self-adhering type.

    • Traditional Tourniquets: These are often made of cloth or similar material, and they typically require a separate tightening device. They are generally more affordable but may require more practice to apply correctly. The added step of securing the tightening mechanism can increase application time in a critical situation.
    • Military-style Tourniquets: Often featuring a ratchet or similar mechanism for controlled tightening, these offer a more streamlined application process. This can be crucial in high-stress situations where speed is of the essence. They often come with more durable materials and a larger size range. However, they tend to be more expensive.
    • Self-adhering Tourniquets: These are designed with a strap or material that adheres to the skin. This reduces the need for separate tightening devices, making the application process quicker. However, they may require more care in removing them to avoid skin irritation. The ease of use and speed of application make this a popular choice.

    Widely Used and Trusted Tourniquet Models

    Several tourniquet models are frequently recommended and used in first aid kits. These are typically chosen based on their effectiveness and user feedback.

    • Combat Application Tourniquet (CAT): A popular choice for military and civilian first aid kits, the CAT is known for its ease of use and speed of application. Its design, incorporating a simple ratchet mechanism, allows for quick and efficient tightening. The wide range of sizes and the high reliability of its use are also key factors in its popularity.
    • Israeli-style Tourniquets: Often made of sturdy material and featuring a simple tightening mechanism, these tourniquets are known for their durability and effectiveness. Their ease of use and reliability have made them popular choices in various first aid settings.

    Safety and Efficacy Considerations

    Safety and efficacy are paramount when selecting a tourniquet. The chosen model should be easy to use in a variety of situations and ensure minimal risk of complications. Furthermore, the model should be thoroughly tested for safety and effectiveness to avoid unnecessary risk in critical situations.

    Tourniquet Model Comparison Table

    Tourniquet Model Ease of Use Size Range Cost
    Combat Application Tourniquet (CAT) High Large Medium
    Israeli-style Tourniquet Medium Medium Low
    Self-adhering Tourniquet High Medium Medium-High

    Storage and Maintenance of Tourniquets

    Proper storage and maintenance of tourniquets in a first aid kit are crucial for ensuring their effectiveness and safety. A well-maintained tourniquet is a life-saving tool, ready to be deployed when needed. Neglecting these procedures can compromise the tourniquet’s integrity and potentially lead to serious consequences in an emergency.Tourniquets are essential medical tools, but their effectiveness relies heavily on proper handling and storage.

    They need to be easily accessible and ready for use, yet safeguarded from contamination or damage. Careful attention to these details is paramount for optimal performance.

    Recommended Storage Procedures

    Tourniquets should be stored in a designated area within the first aid kit. A clear, labeled compartment or pouch is essential to ensure quick retrieval without searching. The specific placement depends on the kit’s design and overall layout, but accessibility is key. The tourniquet should be stored in a dry, cool place, away from direct sunlight and extreme temperatures.

    These environmental factors can degrade the material and reduce the tourniquet’s effectiveness over time.

    Maintaining Tourniquet Integrity

    Regular inspection of the tourniquet is vital. Check for any signs of damage, such as fraying, tears, or broken components. Any damage, no matter how minor, requires immediate replacement of the tourniquet. Periodically inspect the straps and buckles for signs of wear and tear. These components are critical for proper functioning and should be examined regularly.

    Handling Techniques to Avoid Damage

    Avoid unnecessary handling of the tourniquet. Only handle the tourniquet when necessary for inspection or storage. Avoid forceful pulling or bending of the straps, buckles, or any other components. The tourniquet should be handled with care and respect for its function.

    Precautions to Prevent Contamination

    Always ensure the tourniquet is stored in a clean, sealed container. This helps prevent contamination by dust, dirt, or other foreign materials. Do not expose the tourniquet to potentially contaminated surfaces or fluids. If the tourniquet becomes contaminated, it must be immediately replaced. Contamination can compromise its sterility and potentially introduce pathogens.

    Step-by-Step Procedure for Storage and Maintenance

    1. Inspection: Visually inspect the tourniquet for any signs of damage (tears, fraying, broken parts) or contamination. Any damage or contamination warrants immediate replacement.
    2. Cleaning (if necessary): If the tourniquet shows signs of contamination, clean it with a suitable disinfectant. Follow the manufacturer’s instructions.
    3. Storage: Store the tourniquet in a clean, dry, and designated area within the first aid kit. Ensure it is properly sealed and labeled for easy retrieval.
    4. Regular Checks: Schedule regular inspections of the tourniquet, ideally during routine first aid kit checks.
    5. Replacement: Replace the tourniquet according to the manufacturer’s recommendations or when damage or contamination is observed.

    Training and Protocols for Tourniquet Use

    Tourniquets, crucial life-saving tools, demand meticulous training and precise protocols for effective application. Proper training ensures responders can confidently and correctly utilize this tool in critical situations, maximizing its potential to save lives. This section delves into the essential training procedures and protocols for tourniquet use, providing a comprehensive guide for first aid responders.The application of a tourniquet is a high-stakes procedure.

    Having a tourniquet in your first aid kit is crucial, especially for potential life-saving situations. Knowing how to use it effectively is essential, but so too is understanding how to cope with the emotional and physical challenges of various health conditions. For instance, navigating a condition like wet AMD can be emotionally taxing, but resources like wet amd coping support and living well can provide valuable guidance on maintaining well-being.

    Ultimately, preparedness for any situation, whether it’s a medical emergency or dealing with a chronic condition, involves understanding your options and resources, and having a reliable tourniquet is a key element in that preparedness.

    A thorough understanding of the circumstances under which a tourniquet is necessary, coupled with practiced application technique, is paramount. Errors in judgment or execution can lead to severe complications, and proper training minimizes these risks.

    Necessary Training Procedures

    Training for tourniquet application should encompass both theoretical knowledge and practical skills. Responders must understand the anatomy and physiology involved, including the critical importance of rapid intervention to prevent or minimize shock and tissue damage. Practical exercises should be performed under supervision, ensuring accuracy and consistency. This includes various scenarios, such as upper and lower extremity bleeding, with varying degrees of severity.

    Protocol for Tourniquet Application

    The protocol for tourniquet application should be clear, concise, and easily memorized. The critical elements of a tourniquet protocol include a clear decision-making process to determine when a tourniquet is absolutely necessary. It should also detail the precise steps involved in application, from initial assessment to definitive placement.

    Steps Involved in Tourniquet Application

    The application process must be meticulously explained and demonstrated. It is crucial to emphasize the following steps:

    • Initial Assessment: Assess the patient’s condition, determine the extent of bleeding, and identify the location of the wound. Immediate stabilization is essential.
    • Positioning: Position the patient appropriately to facilitate the application process. Consider the patient’s comfort and the ease of access to the affected limb.
    • Tourniquet Placement: Apply the tourniquet proximal (closer to the heart) to the wound, ensuring proper tension. Avoid placing it directly over joints.
    • Application Technique: Tighten the tourniquet using the correct method and tools, ensuring adequate pressure. Never use a tourniquet over clothing. A firm and steady application is crucial.
    • Documentation: Record the time the tourniquet was applied and the patient’s condition before, during, and after the procedure.
    • Monitoring: Continuously monitor the patient’s vital signs and look for signs of complications.

    Recognizing When a Tourniquet is Needed

    A tourniquet should only be used in situations where significant, uncontrolled bleeding threatens a person’s life. Factors that necessitate its use include a high-pressure arterial bleed that is not controllable by other methods, like direct pressure or pressure points.

    Situations Requiring a Tourniquet

    Injury Type Description Justification for Tourniquet Use
    Severe Arterial Bleeding High-pressure bleeding from an artery, often spurting blood. Immediate intervention is crucial to stop the bleeding.
    Massive Blood Loss Large volume of blood loss, often accompanied by rapid pulse weakening and shock. Significant blood loss demands immediate intervention to prevent death.
    Uncontrollable Venous Bleeding Uncontrollable bleeding from a vein, potentially severe. If other methods fail, a tourniquet might be necessary.
    Amputations Severed limbs, often with significant arterial bleeding. Stop bleeding to prevent further shock and potential organ damage.
    Severe Trauma Wounds that cannot be controlled by direct pressure. The severity of the injury and uncontrolled bleeding necessitate immediate action.

    Legal and Ethical Considerations

    Tourniquet use in emergency situations carries significant legal and ethical weight. Understanding the potential implications and responsibilities associated with deploying a tourniquet is crucial for both medical professionals and laypeople who may find themselves in a position to assist. This section delves into the legal frameworks, ethical considerations, and practical steps to navigate potential legal issues that might arise from using a tourniquet.

    Legal Implications of Tourniquet Use

    The legal landscape surrounding tourniquet use varies depending on the jurisdiction and the specific circumstances. Generally, individuals acting in good faith and within the scope of their training or reasonable actions are protected from liability. However, misuse or failure to follow established protocols can expose individuals to potential legal challenges. The key lies in adhering to best practices and documenting the situation thoroughly.

    Ethical Considerations for Tourniquet Deployment

    Ethical considerations are intertwined with legal ones. The decision to use a tourniquet should always prioritize the patient’s well-being and safety. Factors such as the severity of the bleeding, the potential for further harm if not used, and the availability of other resources should be weighed carefully. Ethical considerations include ensuring the patient’s comfort and dignity throughout the process, and promptly seeking additional medical help.

    Guidelines and Regulations Concerning Tourniquet Use

    Various organizations, such as the American College of Surgeons (ACS), provide guidelines and protocols for tourniquet use. These resources emphasize the importance of proper training, consistent application techniques, and meticulous documentation. These guidelines aim to minimize risks while maximizing the chances of successful outcomes. Adhering to these protocols is critical for minimizing legal and ethical challenges.

    Addressing Potential Legal Issues

    In the unfortunate event of a legal challenge related to tourniquet use, a thorough understanding of the incident is essential. This includes a detailed account of the situation, the steps taken, and the reasons for using the tourniquet. Maintaining accurate records, including photos and documentation of the injuries, can provide valuable support during any legal proceedings. Seeking legal counsel specializing in medical malpractice cases is recommended.

    Table of Key Legal Considerations and Actions

    Key Legal Consideration Corresponding Actions
    Proper Training and Certification Ensure all individuals deploying tourniquets possess appropriate training and certification.
    Documentation of Incident Maintain a detailed record of the incident, including time of application, location, and circumstances surrounding the tourniquet use.
    Patient Consent (if possible) Obtain consent from the patient, if possible and appropriate, prior to applying the tourniquet.
    Immediate Medical Intervention Prioritize rapid transport to a medical facility and continuous monitoring of the patient’s condition after tourniquet application.
    Following Protocols Adhere to established protocols and guidelines for tourniquet use, and ensure that the tourniquet was used correctly.

    First Aid Kit Design Considerations

    Tourniquet for first aid kit

    Optimizing a first aid kit for tourniquet use involves careful planning beyond simply including the device. A well-designed kit will ensure the tourniquet is readily accessible, protected from damage, and easily deployed during a critical situation. Proper placement and material selection are key elements for ensuring both the safety of the tourniquet and the efficiency of its deployment.

    Tourniquet Compartment Design, Tourniquet for first aid kit

    A dedicated compartment for the tourniquet is crucial. It should be easily accessible yet secure enough to prevent accidental deployment or damage to the tourniquet itself. The compartment should be designed to prevent the tourniquet from becoming entangled with other items within the kit.

    Tourniquet Placement Within the Kit

    The tourniquet should be positioned in a location that is easily grasped during a fast-paced emergency. Avoid placing it in a spot that might obscure other essential items or require significant searching. A good example is placing the tourniquet in a front, easily accessible pocket or compartment, ideally with a quick-release mechanism. For instance, a Velcro-fastened flap on a compartment would allow for rapid deployment.

    Kit Configuration Examples

    Several configurations can optimize tourniquet placement. A modular kit, with separate compartments for different categories of supplies, can easily accommodate a dedicated tourniquet compartment. A structured, layered kit with a front-facing pocket specifically for the tourniquet is also effective. A kit with a large, open compartment might not provide sufficient protection for the tourniquet, and may allow for entanglement with other items.

    A smaller, zippered compartment could be used to maintain order and prevent items from shifting.

    Material Selection for Tourniquet Compartment

    The ideal material for a tourniquet compartment should be sturdy enough to withstand the rigors of transport and storage, while also allowing for easy access and retrieval. Water resistance is also crucial to protect the tourniquet from moisture damage. A durable, waterproof, and tear-resistant material like a high-quality nylon or a reinforced polyester is recommended. This would prevent the tourniquet from getting damaged during transportation or exposure to the elements.

    The material should be lightweight, minimizing the overall weight of the kit.

    Ideal Tourniquet Packaging

    Proper packaging for the tourniquet is vital for its protection. The tourniquet should be packaged individually, in a waterproof, tear-resistant, and clear or transparent pouch or container, ideally with clear labeling and instructions. This individual packaging will prevent the tourniquet from being damaged or getting contaminated.

    Tourniquet Application Illustrations

    Tourniquet for first aid kit

    Tourniquets are critical life-saving tools in emergency situations, but their effective use requires precise application techniques. Incorrect application can lead to severe complications, such as nerve damage, tissue damage, or even limb loss. Mastering the correct procedures is crucial for anyone handling a tourniquet. Proper application minimizes harm and maximizes the chances of a positive outcome.

    Tourniquet Application for Upper Arm Injuries

    Correct application of a tourniquet on the upper arm is vital for controlling severe bleeding. A poorly placed tourniquet can cause irreparable harm. The illustration below demonstrates the proper technique for upper arm tourniquet application:

    Imagine a diagram depicting the upper arm. The tourniquet is placed snugly around the upper arm, approximately 2 inches above the elbow. The tourniquet should be positioned in a straight line with the arm’s axis, not twisted or angled. The tightening mechanism should be visible and easily accessible. A second person or medical professional should apply firm pressure over the artery, perpendicular to the skin, to further compress the bleeding source.

    Tourniquet Application for Lower Leg Injuries

    For lower leg injuries, the application technique is slightly different from the upper arm. Understanding the anatomy and blood flow in the lower leg is critical. Incorrect application can lead to severe complications.

    Imagine a diagram depicting the lower leg. The tourniquet is placed approximately 2 inches above the knee. The tourniquet should be positioned in a straight line with the leg’s axis. A second person or medical professional should apply firm pressure over the artery, perpendicular to the skin, to further compress the bleeding source. The tourniquet should be tightened until the bleeding stops, but not excessively.

    Tourniquet Application for Thigh Injuries

    Applying a tourniquet to the thigh requires careful consideration of the location and pressure points. The illustration below depicts the proper technique for thigh injuries:

    Imagine a diagram depicting the thigh. The tourniquet is placed approximately 2 inches above the knee. The tourniquet should be positioned in a straight line with the leg’s axis. The tightening mechanism should be visible and easily accessible. A second person or medical professional should apply firm pressure over the artery, perpendicular to the skin, to further compress the bleeding source.

    Step-by-Step Illustrated Guide for Limb Injuries

    Proper tourniquet application involves a series of steps for different limb injuries. This guide helps in applying tourniquets to various injuries:

    1. Assess the situation: Determine the severity of the bleeding and the need for a tourniquet. The presence of severe, uncontrolled bleeding usually indicates a tourniquet is necessary.
    2. Select the appropriate tourniquet: Choose a tourniquet suitable for the size of the limb.
    3. Apply the tourniquet: Position the tourniquet 2 inches above the injury site, ensuring it is aligned with the limb’s axis.
    4. Tighten the tourniquet: Tighten the tourniquet until bleeding stops. Do not overtighten.
    5. Document the time: Record the time the tourniquet was applied.
    6. Continuously monitor the patient: Monitor the patient’s vital signs and for any signs of complications.
    7. Transport to medical facility: Immediately transport the patient to a medical facility for further treatment.

    Final Conclusion: Tourniquet For First Aid Kit

    In conclusion, equipping your first aid kit with a tourniquet is a critical decision. Proper understanding of selection, storage, and application procedures is paramount. This comprehensive guide has highlighted the significance of training and protocols, as well as the legal and ethical considerations. By equipping yourself with this knowledge, you’re not just adding a tool, but potentially saving a life.

    Remember, knowledge is power, and preparedness is key in times of crisis.

  • First Aid Allergies Anaphylaxis A Guide

    First Aid Allergies Anaphylaxis A Guide

    First aid allergies anaphylaxis is a critical topic demanding immediate attention. Understanding the signs, symptoms, and appropriate response is crucial for saving lives. This guide will walk you through recognizing various allergic reactions, progressing to anaphylaxis, and the crucial first aid steps to take in each scenario. From mild reactions to severe anaphylactic episodes, we’ll cover the necessary procedures to ensure the well-being of those affected.

    We’ll explore common allergens, their potential reactions, and how to identify the cause of a reaction. Differentiating between mild and severe reactions, especially anaphylaxis, is paramount. Learning how to act swiftly and correctly can be the difference between life and death.

    First Aid for Allergies and Anaphylaxis: A Practical Guide

    First aid for allergies and anaphylaxis is crucial in managing sudden and potentially life-threatening reactions. Prompt and accurate intervention can significantly improve outcomes, minimizing the severity of the reaction and potentially saving a life. Understanding the signs and symptoms, along with the appropriate actions to take, is vital for anyone who may be exposed to or interact with individuals susceptible to these reactions.

    Signs and Symptoms of an Allergic Reaction

    Allergic reactions can manifest in a wide range of ways, ranging from mild discomfort to severe life-threatening anaphylaxis. Recognizing the progression of symptoms is critical for timely intervention. Early symptoms often include hives, itching, or swelling, particularly around the face, lips, and tongue. Difficulty breathing, wheezing, and a feeling of tightness in the chest are also common indicators.

    As the reaction intensifies, blood pressure can drop, and the individual may experience dizziness or loss of consciousness. In severe cases, anaphylaxis can cause a rapid decline in breathing and circulation, requiring immediate medical attention.

    Symptoms Progressing to Anaphylaxis

    Anaphylaxis represents a severe, systemic allergic reaction that requires immediate medical intervention. A rapid progression of symptoms from a mild allergic reaction can indicate the onset of anaphylaxis. Key indicators include difficulty breathing, swelling of the throat or tongue, causing breathing difficulties, and a sudden drop in blood pressure. The skin may exhibit widespread hives or turn pale and clammy.

    Loss of consciousness is a serious sign, and these symptoms typically develop rapidly, sometimes within minutes of exposure to the allergen.

    Common Allergens and Potential Reactions

    Understanding common allergens and their potential reactions can aid in recognizing and managing allergic reactions. This knowledge is essential for preventing further exposure and ensuring timely intervention.

    Allergen Potential Reactions
    Peanuts Hives, swelling of the lips and throat, difficulty breathing, vomiting, low blood pressure
    Tree Nuts (e.g., walnuts, pecans) Similar to peanut allergies, including hives, swelling, breathing difficulties, and gastrointestinal distress.
    Milk Hives, swelling, vomiting, diarrhea, and in severe cases, anaphylaxis.
    Eggs Hives, itching, swelling, difficulty breathing, and sometimes vomiting or diarrhea. Anaphylaxis is possible.
    Fish Skin reactions, itching, swelling, breathing problems, gastrointestinal distress, and anaphylaxis.
    Shellfish Skin rashes, itching, swelling, difficulty breathing, and anaphylaxis.
    Insect stings (bees, wasps, hornets) Localized swelling, hives, itching, difficulty breathing, low blood pressure, and anaphylaxis.
    Latex Skin rash, itching, hives, swelling, difficulty breathing, and anaphylaxis.
    Certain Medications (e.g., penicillin) Hives, itching, swelling, difficulty breathing, and anaphylaxis.

    Recognizing Allergic Reactions

    Allergic reactions can range from mild discomfort to life-threatening anaphylaxis. Understanding the initial signs and symptoms, along with the methods of identifying the trigger, is crucial for prompt and appropriate action. Early recognition allows for timely intervention, potentially preventing serious complications.Identifying the cause of an allergic reaction is essential for preventing future episodes. A thorough understanding of the potential triggers, combined with careful observation, can lead to a precise diagnosis and tailored management strategies.

    Knowing first aid for allergies, especially anaphylaxis, is crucial. While you might not expect it, certain foods, like nuts high in magnesium, nuts high in magnesium , can trigger severe reactions. Understanding potential triggers and having a plan in place can make all the difference in a critical situation involving first aid for allergies and anaphylaxis.

    Furthermore, recognizing the difference between mild and severe reactions is critical for determining the appropriate course of action. Mild reactions often resolve on their own, but severe reactions, such as anaphylaxis, require immediate medical attention.

    Initial Signs and Symptoms of an Allergic Reaction

    Allergic reactions manifest in various ways, depending on the individual and the specific allergen. Common initial symptoms include skin rashes, hives, itching, swelling, and difficulty breathing. These symptoms can appear within minutes or hours of exposure to the allergen. Sometimes, gastrointestinal symptoms such as nausea, vomiting, or diarrhea may also occur.

    Identifying the Cause of an Allergic Reaction

    Several methods can help pinpoint the cause of an allergic reaction. Detailed questioning about recent exposures, including food, medications, insect stings, or environmental factors, can often reveal a potential trigger. Keeping a detailed food diary, noting specific symptoms and reactions, is also helpful in identifying patterns and potential culprits. Allergy testing, performed by a healthcare professional, can confirm suspected allergens.

    This process involves exposing the individual to potential allergens to observe their response.

    Distinguishing Mild and Severe Allergic Reactions

    Mild allergic reactions typically involve localized symptoms that are not life-threatening. Severe allergic reactions, on the other hand, involve a systemic response and can rapidly progress to a life-threatening condition known as anaphylaxis. It’s essential to understand the differences between these two types of reactions to ensure appropriate action is taken.

    Comparison of Mild and Severe Allergic Reactions

    Characteristic Mild Allergic Reaction Severe Allergic Reaction (Anaphylaxis)
    Symptoms Localized itching, hives, rash, mild swelling, localized discomfort Widespread hives or rash, swelling of the face, lips, tongue, or throat, difficulty breathing, wheezing, nausea, vomiting, dizziness, loss of consciousness
    Speed of onset Symptoms develop gradually over minutes to hours Symptoms develop rapidly, often within minutes of exposure
    Severity Usually resolves without medical intervention Potentially life-threatening and requires immediate medical attention
    Treatment Over-the-counter antihistamines or topical creams may provide relief Requires immediate administration of epinephrine (adrenaline) auto-injector and emergency medical services (EMS)

    First Aid Procedures for Mild Reactions

    Mild allergic reactions, while often less severe than anaphylaxis, can still cause discomfort and require prompt attention. Understanding the steps involved in managing these reactions is crucial for ensuring the well-being of those affected. This section provides practical guidance on recognizing and addressing mild allergic reactions effectively.Recognizing the signs and symptoms of a mild allergic reaction is the first step in providing appropriate first aid.

    These reactions can manifest in various ways, including hives, itching, swelling, and a runny nose. Prompt action is essential to prevent the reaction from escalating.

    Identifying Mild Allergic Reaction Symptoms

    Mild allergic reactions often present with localized symptoms, such as hives or itching, and generally do not involve life-threatening complications. Common signs include skin rashes, itching, swelling, and sometimes, mild respiratory issues like sneezing or a runny nose. Recognizing these symptoms early is key to timely intervention.

    Initial First Aid Actions for Mild Reactions

    The initial response to a mild allergic reaction involves several key steps. These steps focus on minimizing the reaction’s impact and preventing potential escalation. The actions taken should be tailored to the specific symptoms observed.

    • Assess the situation: Ensure the environment is safe and assess the severity of the reaction. Is the person experiencing difficulty breathing? Are there any other concerning symptoms?
    • Remove the trigger: If possible, identify and remove the potential allergen. This could be food, medication, or environmental factors.
    • Administer antihistamines: If appropriate, administer an antihistamine medication as directed by the individual’s doctor or a trusted medical professional. Over-the-counter antihistamines can provide relief from itching and other symptoms.
    • Apply cool compresses: Apply cool compresses to the affected area to reduce swelling and itching. This can be particularly helpful for localized reactions.

    Monitoring Post-Reaction

    Monitoring the individual after the initial reaction is crucial. This period can reveal any potential progression to a more serious reaction.

    • Observe for signs of worsening symptoms: Continuously monitor for any signs of increasing swelling, difficulty breathing, or other concerning symptoms that could indicate a developing anaphylactic reaction.
    • Maintain communication: Keep the individual calm and provide emotional support. Encourage them to report any changes in their condition.
    • Seek professional medical advice: If the symptoms worsen or don’t improve within a reasonable timeframe, seek immediate medical attention. It’s vital to remember that even mild reactions can sometimes lead to more serious consequences if not properly managed.

    Preventing Future Reactions

    Identifying and avoiding potential triggers is vital in preventing future allergic reactions. This involves careful consideration of the individual’s medical history and known allergens.

    • Keep a detailed allergy log: Document all suspected triggers, symptoms, and responses to help identify patterns and potential allergens.
    • Carry necessary medication: Ensure that individuals with known allergies carry their prescribed medication and understand how to use it correctly.
    • Educate others: Inform family members, friends, and caregivers about the individual’s allergies and necessary first aid procedures. This proactive approach can help prevent accidental exposures and ensure appropriate responses in case of a reaction.

    Recognizing Anaphylaxis: First Aid Allergies Anaphylaxis

    Anaphylaxis is a severe, life-threatening allergic reaction that requires immediate medical attention. Rapid recognition of the signs and symptoms is crucial to initiate appropriate first aid and prevent potentially fatal consequences. Prompt action can significantly improve the outcome.Understanding the key indicators of anaphylaxis allows for swift intervention, maximizing the chances of a positive outcome. This knowledge is essential for anyone who might encounter someone experiencing this severe allergic reaction.

    Key Signs and Symptoms of Anaphylaxis

    Recognizing the various signs and symptoms of anaphylaxis is critical for prompt intervention. The symptoms can manifest quickly and sometimes subtly, making awareness paramount. Common signs and symptoms include:

    • Skin reactions: Hives (urticaria), swelling (angioedema) of the face, lips, tongue, or throat, and itching are frequent initial symptoms. These can range from mild to severe, depending on the individual’s sensitivity.
    • Respiratory distress: Difficulty breathing, wheezing, shortness of breath, tightness in the chest, and a persistent cough are common respiratory manifestations. These can rapidly escalate to life-threatening conditions.
    • Circulatory problems: A rapid or weak pulse, dizziness, lightheadedness, and loss of consciousness are indicative of cardiovascular compromise. These symptoms often accompany other manifestations of anaphylaxis.
    • Gastrointestinal issues: Nausea, vomiting, abdominal cramps, and diarrhea can also occur. These symptoms can vary in severity and may or may not be present in all cases.

    Differentiating Anaphylaxis from Other Medical Emergencies

    Accurate identification of anaphylaxis is vital to initiate the correct treatment. Differentiating it from other medical emergencies requires careful observation of the totality of symptoms. Other medical conditions can present similar symptoms, and misdiagnosis can delay appropriate treatment.

    • Asthma attacks: While asthma and anaphylaxis can share some symptoms, the presence of skin reactions, especially hives and swelling, often strongly suggests anaphylaxis. Respiratory distress in asthma is typically accompanied by a history of similar events, whereas anaphylaxis may be the first episode.
    • Anxiety attacks: Symptoms like rapid heartbeat and shortness of breath can overlap with anaphylaxis. However, anxiety attacks typically lack the skin reactions, such as hives or swelling, and the sudden onset and rapid progression often seen in anaphylaxis.
    • Heart attack: Chest pain, shortness of breath, and dizziness are shared symptoms. A detailed medical history, particularly regarding allergies, can assist in differentiating these conditions. Anaphylaxis often has skin manifestations, which a heart attack generally lacks.

    Rapid Progression of Anaphylaxis

    Anaphylaxis is characterized by its rapid progression. Recognizing this rapid onset is crucial for initiating prompt treatment. Symptoms can develop within minutes of exposure to the allergen. Early recognition is essential to limit the severity of the reaction.

    • Time sensitivity: The rapid progression of anaphylaxis demands immediate action. Delays in treatment can lead to severe consequences, including death.
    • Examples: A person experiencing an allergic reaction to a bee sting might develop hives, itching, and difficulty breathing within minutes. This sudden escalation underscores the importance of immediate intervention.

    Immediate Actions When Anaphylaxis is Suspected

    Immediate actions are paramount when anaphylaxis is suspected. Promptness in these actions can significantly improve the chances of a positive outcome. Delaying treatment can worsen the condition.

    • Call emergency services: Immediately call emergency services (e.g., 911) and explain the situation. Providing detailed information about the suspected allergen and symptoms is vital for effective emergency response.
    • Administer epinephrine (if prescribed): If the person has an epinephrine auto-injector (e.g., EpiPen), administer it according to the instructions provided. Precise adherence to instructions is essential for optimal results.
    • Monitor vital signs: Continuously monitor the person’s breathing, pulse, and level of consciousness. Record any changes observed and relay this information to emergency responders.
    • Maintain a safe environment: Ensure the person is in a safe and comfortable position, preferably lying down, to prevent further complications. Ensure the environment is safe and stable to avoid potential harm.

    First Aid Procedures for Anaphylaxis

    Anaphylaxis is a severe, life-threatening allergic reaction that requires immediate medical attention. Knowing the proper first aid procedures can be crucial in saving a life. This section details the critical steps to take when anaphylaxis is suspected, emphasizing the vital role of epinephrine auto-injectors.Suspecting anaphylaxis requires a quick assessment of the patient’s symptoms. Key indicators include hives, swelling, difficulty breathing, and a rapid, weak pulse.

    If you suspect anaphylaxis, act swiftly. Time is of the essence in these situations.

    Immediate Actions in Suspected Anaphylaxis

    Recognizing the signs and symptoms of anaphylaxis is paramount. A person experiencing anaphylaxis may exhibit a range of symptoms, from mild skin reactions to severe breathing difficulties. The progression can be rapid, so swift action is essential.

    • Call emergency services immediately. Dial 911 or your local emergency number. Providing this critical information will help emergency personnel respond efficiently and effectively.
    • Administer epinephrine auto-injector (if available). This is a crucial step in managing anaphylaxis. Epinephrine works to reverse the effects of the allergic reaction by constricting blood vessels and relaxing airways.
    • Maintain open airway and breathing. If the person is having trouble breathing, use techniques to clear any blockages and assist with their breathing.

    Epinephrine Auto-Injectors: A Critical Tool

    Epinephrine auto-injectors, commonly known as EpiPens, are designed for self-administration or administration by trained individuals. These devices contain a pre-measured dose of epinephrine, ready for immediate injection.

    • Familiarize yourself with the device. Knowing how to use the auto-injector is crucial. Familiarize yourself with the device’s design and operating instructions.
    • Proper administration is essential. Follow the instructions provided with the auto-injector carefully. The correct injection site and depth are vital for optimal effectiveness.

    Administering Epinephrine: Step-by-Step

    Accurate administration of epinephrine is critical. Following a precise protocol can significantly improve the outcome.

    1. Check for allergies. Verify the individual’s allergy status. If the person has any known allergies, be aware of potential complications.
    2. Identify the injection site. Locate the recommended injection site on the outer thigh, avoiding bony prominences.
    3. Remove the safety cap. Carefully remove the safety cap from the auto-injector. Always check that the safety mechanism is in place before administering.
    4. Hold the auto-injector. Hold the auto-injector firmly, perpendicular to the thigh, and inject the medication into the muscle.
    5. Maintain pressure. Maintain pressure on the injection site for a few seconds after the injection. This helps to ensure proper absorption.
    6. Continue to monitor. Even after administration, continue to monitor the individual’s symptoms. Additional doses might be needed depending on the severity of the reaction.

    Maintaining Airway and Breathing

    Maintaining a clear airway and ensuring adequate breathing is essential during anaphylaxis. This can involve various techniques depending on the individual’s specific needs.

    • Head-tilt, chin-lift. Use the head-tilt, chin-lift maneuver to open the airway, especially if the person is unconscious.
    • Rescue breaths. If breathing is absent, provide rescue breaths to maintain oxygenation.
    • Positioning. Place the person in a comfortable position, often lying on their back with their legs elevated, to facilitate breathing and blood circulation.

    Post-Anaphylaxis Care

    After administering epinephrine, the crucial focus shifts to ensuring the patient’s safety and recovery. Prompt and appropriate post-anaphylaxis care is vital for minimizing potential complications and maximizing the chance of a positive outcome. This phase necessitates a combination of immediate actions and ongoing monitoring to ensure the patient’s well-being.Careful observation and continued monitoring are paramount. The impact of an anaphylactic reaction can be profound, and lingering symptoms or secondary issues may arise.

    The following sections detail the crucial steps to take in the aftermath of an anaphylactic event.

    Immediate Actions Following Epinephrine Administration

    Post-epinephrine administration, immediate actions are critical for the patient’s well-being. The patient’s breathing and circulation need constant monitoring, and immediate actions should focus on supporting these vital functions. Swift interventions are essential to prevent further deterioration.

    • Assess Breathing and Circulation: Continuously monitor the patient’s breathing rate, depth, and effort. Check for any signs of difficulty breathing, such as wheezing, shortness of breath, or stridor. Assess the patient’s pulse rate, rhythm, and strength to ensure adequate circulation.
    • Maintain Airway Patency: Ensure the patient’s airway remains open. If needed, support the airway using appropriate techniques, such as tilting the head and lifting the chin or using an airway adjunct if trained to do so.
    • Monitor for Reoccurrence: Be vigilant for signs of a biphasic reaction, a recurrence of anaphylaxis after initial improvement. A biphasic reaction can occur several hours after the initial reaction and is a significant concern. Close observation is crucial.

    Importance of Ongoing Monitoring

    Continuous monitoring is crucial for evaluating the effectiveness of the administered epinephrine and detecting any potential complications. It allows for early intervention and ensures the patient’s ongoing safety.

    • Vitals Monitoring: Regularly monitor vital signs, including heart rate, blood pressure, and respiratory rate. These measurements provide critical information about the patient’s overall condition and response to treatment.
    • Neurological Status: Assess the patient’s level of consciousness and mental status. Any changes in neurological function can indicate ongoing complications and require prompt medical attention.
    • Skin Assessment: Regularly assess the patient’s skin for any signs of hives, swelling, or other allergic reactions. This will help in monitoring the extent of the reaction and its progression.

    Necessity of Immediate Transport to a Medical Facility

    Prompt transport to a medical facility is essential for managing and monitoring the patient’s condition, especially after an anaphylactic event. Specialized care, advanced equipment, and medical expertise are necessary to ensure comprehensive treatment and prevent further complications.

    • Specialized Care: Medical facilities have the expertise to administer additional medications, conduct further diagnostics, and provide comprehensive care if needed.
    • Advanced Monitoring: Advanced monitoring tools allow for more precise evaluation of the patient’s condition, including continuous blood pressure and electrocardiogram monitoring.
    • Advanced Treatment: Medical facilities have the resources to provide additional treatment options, such as intravenous fluids or other medications, if necessary.

    Documentation of the Incident, First aid allergies anaphylaxis

    Thorough documentation of the anaphylactic incident is essential for future reference, analysis, and improvement of patient care. It provides valuable data to understand the triggers, severity, and response to treatment.

    Knowing first aid for allergies, especially anaphylaxis, is crucial. While dealing with severe allergic reactions, understanding the prognosis of conditions like metastatic breast cancer can sometimes be overwhelming. Fortunately, resources like this guide on metastatic breast cancer prognosis offer valuable insights. Ultimately, though, mastering first aid for allergies remains paramount, emphasizing swift action in potentially life-threatening situations.

    • Details of the Incident: Record the time of onset, the suspected allergen, the symptoms experienced, the actions taken, and the response to treatment.
    • Patient Information: Include the patient’s age, medical history, and any known allergies.
    • Treatment Details: Document the dose and type of epinephrine administered, as well as any other medications given.

    Prevention and Avoidance of Allergic Reactions

    Knowing your triggers and proactively avoiding them is crucial for managing allergies and preventing severe reactions like anaphylaxis. Effective prevention strategies significantly reduce the risk of experiencing allergic episodes and ensure a healthier, more predictable lifestyle. This proactive approach involves understanding the specific allergens affecting you, planning for potential exposures, and consistently implementing avoidance measures.Effective allergy management hinges on understanding and diligently avoiding allergens.

    By taking steps to minimize exposure, individuals can drastically reduce the frequency and severity of allergic reactions, thus improving their quality of life. This proactive approach is not just about avoiding reactions; it’s about fostering a sense of control and empowerment over one’s health.

    Identifying Potential Allergens

    Identifying potential allergens is the first step in preventing allergic reactions. Accurate identification of triggers allows for targeted avoidance strategies. This involves careful consideration of personal history, environmental factors, and food consumption habits. Keep a detailed record of potential exposures and reactions to pinpoint patterns and triggers.

    Allergy Awareness and Prevention

    Comprehensive allergy awareness is paramount for effective prevention. Understanding the nature of allergies, the mechanisms of allergic reactions, and the specific allergens impacting you is vital for proactive management. Allergy awareness extends beyond personal knowledge; it involves educating others around you, especially family members and close contacts. This proactive approach ensures a safety net for all those who interact with you.

    Planning for Potential Reactions

    Proactive planning for potential reactions is an essential component of allergy management. This involves creating a personalized action plan outlining steps to take in case of exposure or a reaction. This plan should be readily accessible and include details about your specific allergens, the severity of your reactions, and the steps you need to take to mitigate or resolve the reaction.

    It’s also wise to have an emergency action plan, including emergency contact information and location of your epinephrine auto-injector.

    Knowing first aid for allergies, especially anaphylaxis, is crucial. Understanding the potential risks of conditions like high cholesterol, particularly in African American communities, is equally important. For example, high cholesterol can significantly increase the risk of heart disease, a serious concern, as detailed in this insightful article on cholesterol heart disease and african americans. Ultimately, preparedness for allergic reactions, like anaphylaxis, remains vital for anyone.

    Preventing Exposure to Common Allergens

    Proactive measures are essential to minimize exposure to common allergens. Consistent avoidance is key to reducing the risk of reactions. This table presents practical strategies for preventing exposure to some of the most prevalent allergens.

    Allergen Prevention Strategies
    Pollen Use air conditioning, stay indoors during high pollen counts, wash clothes and hair frequently, and consider using antihistamines.
    Dust Mites Use allergen-proof covers for mattresses and pillows, regularly wash bedding in hot water, and keep humidity levels low.
    Pet Dander Keep pets out of bedrooms, regularly bathe pets, and consider hypoallergenic breeds.
    Mold Control moisture in the home, fix leaks promptly, and use dehumidifiers.
    Food (e.g., peanuts, tree nuts, milk, eggs) Read food labels carefully, avoid cross-contamination, and be vigilant about ingredients.
    Insect Stings Wear protective clothing when outdoors, avoid scented products that attract insects, and seek medical attention after an encounter.

    Advanced First Aid and Medical Considerations

    First aid allergies anaphylaxis

    Beyond immediate first aid, understanding the crucial role of professional medical intervention is paramount in managing allergic reactions. Recognizing the limitations of self-treatment and the potential for escalating symptoms is vital. This section explores the importance of seeking prompt medical attention, the role of emergency medical services (EMS), and the expertise of allergists and immunologists in comprehensive allergy management.Understanding the potential progression of an allergic reaction and the importance of immediate professional medical intervention is essential for optimal patient outcomes.

    Severe allergic reactions, particularly anaphylaxis, can rapidly lead to life-threatening complications. Therefore, the prompt involvement of trained medical professionals is critical.

    Seeking Professional Medical Help

    Immediate medical attention is crucial following any allergic reaction, especially if symptoms worsen or persist. A healthcare professional can accurately diagnose the severity of the reaction, initiate appropriate treatment, and monitor the patient’s condition. This is especially true for reactions involving respiratory distress, difficulty swallowing, or a rapid drop in blood pressure. A healthcare professional can assess the need for further interventions, like intravenous fluids or medications, and provide ongoing care.

    Emergency Medical Services (EMS) in Severe Reactions

    In severe allergic reactions, particularly anaphylaxis, emergency medical services (EMS) are indispensable. EMS personnel are trained to recognize and manage life-threatening situations, including anaphylaxis. They possess specialized equipment and medications, like epinephrine auto-injectors, that can be administered promptly. Their rapid response and expertise are vital in stabilizing the patient and transporting them to a medical facility for further care.

    Time is critical in anaphylaxis, and the rapid intervention of EMS personnel is often the difference between life and death.

    The Role of Allergists and Immunologists

    Allergists and immunologists are medical specialists who diagnose and manage allergies and immunologic disorders. They possess specialized knowledge and experience in diagnosing the specific allergens causing reactions and developing individualized treatment plans. Allergy testing and the development of desensitization therapies (allergen immunotherapy) are often undertaken under the supervision of an allergist or immunologist. They are crucial in preventing future reactions and improving quality of life for individuals with allergies.

    Potential Long-Term Effects of Severe Allergic Reactions

    Severe allergic reactions can have long-lasting effects on a person’s health and well-being. The impact varies depending on the severity and frequency of the reactions.

    Potential Long-Term Effect Management Strategies
    Anxiety and Psychological Distress Counseling, support groups, stress management techniques, and education about the condition.
    Respiratory Issues Ongoing monitoring by pulmonologists, potential use of bronchodilators or other respiratory medications, and avoidance of known triggers.
    Cardiovascular Problems Regular cardiovascular check-ups, adherence to prescribed medications, and lifestyle modifications (e.g., diet, exercise).
    Chronic Skin Conditions Management with topical creams, oral medications, and avoidance of triggers, potentially with consultation with dermatologists.
    Gastrointestinal Problems Dietary modifications, avoidance of known triggers, and consultation with gastroenterologists, if needed.
    Impaired Quality of Life Lifestyle adjustments, support networks, and education about the condition. Access to resources for managing the daily challenges associated with severe allergies.

    Illustrations and Visual Aids

    Visual aids are crucial for effectively communicating complex information about allergic reactions and anaphylaxis. Clear, concise visuals can help individuals quickly understand the signs and symptoms, enabling faster recognition and appropriate action. Illustrations empower individuals to confidently respond to emergencies.Visual aids, when properly designed, can significantly improve comprehension and retention of vital information. This approach translates to better preparedness and potentially life-saving interventions.

    Allergic Reaction Visualizations

    Visual representations of various allergic reactions, ranging from mild hives to severe anaphylaxis, are essential for accurate identification. These illustrations should depict the different manifestations of allergic reactions, including skin rashes, swelling, itching, and difficulty breathing. Examples might include a simple diagram illustrating urticaria (hives) with clear descriptions of the characteristic appearance, and a separate image showcasing angioedema (swelling) with a focus on the affected body parts.

    Such clear visual representations allow individuals to easily recognize and differentiate between varying degrees of allergic reactions.

    Anaphylaxis Anatomy and Physiology

    Understanding the anatomy of the airway and the respiratory system is critical in anaphylaxis. Visual aids should depict the structure of the trachea, bronchi, and alveoli. Highlighting the impact of swelling and constriction on these structures is vital. Illustrations should show how anaphylaxis can obstruct airflow, causing difficulty breathing and potentially leading to respiratory arrest. The illustrations should also clearly identify the location of the airway, highlighting areas of potential blockage.

    This will help individuals to recognize the symptoms and understand the mechanisms of anaphylaxis.

    Epinephrine Auto-Injector Use

    Visual guides for using an epinephrine auto-injector (e.g., EpiPen) are essential. These visual aids should present a step-by-step process. A sequence of images showing the correct way to hold the injector, locate the injection site (outer thigh), and administer the injection would be helpful. The images should also depict the correct depth and duration of injection. A diagram should also highlight the crucial importance of correctly administering the medication, emphasizing the necessity of the proper injection technique.

    Emergency Services Call Process

    Visual aids for calling emergency services are crucial in emergency situations. A series of clear steps are necessary. The visual should clearly display the steps involved in dialing emergency services, including the appropriate numbers (e.g., 911, emergency medical services number). A simple diagram illustrating the process of reporting the location, nature of the emergency, and providing basic patient information would be effective.

    Furthermore, a visual representation of how to remain calm while providing necessary information can aid in the efficient and accurate reporting of the emergency.

    End of Discussion

    First aid allergies anaphylaxis

    In conclusion, mastering first aid for allergies and anaphylaxis equips you with the knowledge to respond effectively to a range of situations. Remembering the steps for recognizing reactions, administering first aid, and ensuring post-reaction care is essential. By understanding the progression of allergies to anaphylaxis, and the critical role of epinephrine auto-injectors, you can be prepared to act swiftly and decisively.

    Ultimately, prevention and planning for potential reactions are key components in maintaining safety and well-being. Always seek professional medical attention after any severe reaction.