How to make a homemade heating pad? This guide dives deep into the world of DIY comfort, exploring the rewarding process of crafting your own soothing heating pads. From simple fabric wraps to more complex beanbag styles, we’ll explore the various options available, highlighting the unique benefits of each approach compared to store-bought alternatives. You’ll discover the surprisingly rich history of DIY heating pads, along with essential safety precautions and insightful comparisons of materials and methods.
Imagine the perfect warmth for a sore muscle, a chilly evening, or a comforting bedtime ritual, all crafted with your own two hands. This comprehensive guide provides a detailed roadmap, equipping you with the knowledge to create customized heating pads tailored to your specific needs and preferences.
Introduction to Homemade Heating Pads
Homemade heating pads offer a cost-effective and often more personalized approach to soothing aches and pains compared to store-bought options. They allow for tailoring the size, shape, and materials to specific needs and preferences. Furthermore, creating your own heating pad can be a rewarding experience, allowing you to experiment with different fabrics and designs.The concept of DIY heating pads has roots in the early 20th century, likely arising from the desire for affordable pain relief and the burgeoning do-it-yourself culture.
Over time, the materials and designs evolved, adapting to technological advancements and growing awareness of comfort and well-being. This desire for personalized and affordable comfort is still a key driver in the popularity of homemade heating pads today.
Making a homemade heating pad is surprisingly easy! Just stuff some old t-shirts or flannel scraps into a sock or pillowcase. It’s a great way to soothe sore muscles, but it’s crucial to be mindful of medicine safety when using these DIY remedies. For instance, you should never give aspirin to children as it can cause Reye’s syndrome, a serious condition.
Be sure to check out this resource on why kids shouldnt take aspirin for more details. Once you’ve got that safety aspect covered, your homemade heating pad is ready to go, perfect for a cozy night in!
Types of Homemade Heating Pads
Homemade heating pads come in a variety of styles, each with its own set of advantages and disadvantages. This exploration delves into the common designs, highlighting their distinct characteristics and use cases.
| Type | Pros | Cons | Suitable for |
|---|---|---|---|
| Fabric Wrap | Easy to create, customizable, readily available materials, and often inexpensive. Can be tailored to fit specific body parts. | May not provide as consistent heat as other methods, can be less effective for larger areas of pain, and the heat distribution might not be uniform. | Localized pain, like muscle soreness or minor aches in specific joints. |
| Beanbag Style | Offers good heat retention and distribution. Can be designed to hold a variety of materials for different warmth levels. | Can be bulky and less portable. The filling material must be chosen carefully to ensure safety and proper heat distribution. | Providing sustained heat to larger body areas like the back or abdomen. |
| Pillowcase/Bolster | Simple to make, using readily available materials. Can be customized to different shapes and sizes. | May not provide the same level of heat retention as other options. The filling may need to be carefully chosen to maintain warmth. | Targeted pain relief for smaller, specific areas. |
Considerations for Choosing a DIY Heating Pad Type
Selecting the appropriate heating pad type depends on the intended use and personal preferences. Factors like the desired level of warmth, comfort, and the location of the discomfort should be carefully considered. For instance, a fabric wrap might be suitable for a localized muscle strain, whereas a beanbag style would be more effective for treating back pain.
Materials Needed for Construction
Crafting a homemade heating pad is a rewarding experience, allowing you to tailor the product to your specific needs and preferences. Choosing the right materials is crucial for both comfort and safety. Understanding the various options and their properties will help you make an informed decision.Careful selection of materials ensures the heating pad is functional, safe, and meets your personal comfort standards.
From the fabric covering the warmth to the filler that distributes heat, each component plays a vital role.
Fabric Selection for Heating Pads
The fabric chosen for a heating pad significantly impacts its comfort, durability, and safety. A fabric’s ability to wick away moisture, its breathability, and its resistance to heat are all important factors to consider.
- Cotton: A common and affordable choice, cotton is soft and breathable, making it a comfortable option for many. However, it can absorb moisture, potentially leading to discomfort and slower heat dissipation.
- Flannel: Flannel offers a cozy, warm feel. Its dense weave helps retain heat, making it ideal for those seeking extra warmth. However, its thickness can make the pad bulkier.
- Fleece: Fleece fabrics are exceptionally soft and warm. Their excellent insulation properties make them popular for warmth and comfort. They are also usually quite durable.
- Minky: Minky fabric is known for its plush softness and luxurious feel. It is ideal for creating a highly comfortable heating pad. However, it might not be as durable as other options.
Filler Materials for Heating Pads
The filler material dictates the heating pad’s warmth retention and distribution. Choosing the right filler is vital for safety and comfort.
- Rice: Rice is a popular, natural filler that provides a gentle warmth. Its affordability and natural properties make it a good choice for those seeking a cost-effective solution. However, it might not retain heat as well as other options.
- Dried Beans: Dried beans, like rice, are an affordable and natural filler. Their density helps maintain warmth, making them suitable for those seeking more lasting heat.
- Dried Corn Husks: Corn husks provide good warmth and are often considered a natural, eco-friendly choice. They are also relatively inexpensive.
- Wool: Wool is a natural insulator, offering exceptional warmth retention. It is also highly absorbent, which is a factor to consider.
Other Essential Materials
Beyond fabric and filler, other materials are essential for constructing a functional and safe heating pad.
- Heat-Resistant Fabric: This fabric should be specifically designed to withstand the heat generated by the heating element. This ensures safety and longevity.
- Heating Element: A low-wattage heating element is crucial for generating the desired warmth without overheating the pad. Safety should be paramount when selecting the heating element.
- Insulation: A layer of insulation between the heating element and the outer fabric helps maintain heat and prevents overheating.
- Sewing Supplies: Depending on the construction method, sewing supplies like thread, needles, and pins are necessary.
Material Cost Comparison
The cost of materials can vary significantly depending on the chosen options. Cotton and rice are generally the most affordable choices. Premium fabrics like minky and wool will have a higher cost.
Table of Materials for Different Heating Pad Types
| Type of Heating Pad | Fabric | Filler | Other Materials |
|---|---|---|---|
| Fabric Wrap | Cotton, Flannel, Fleece | Rice, Dried Beans, Corn Husks | Heat-resistant fabric, heating element, insulation, sewing supplies |
Safety Precautions and Considerations
Creating a homemade heating pad can be a rewarding project, but safety is paramount. Careful consideration of materials, construction methods, and potential hazards is crucial to prevent accidents and ensure safe use. This section Artikels essential safety precautions for both the construction and operation of your homemade heating pad.Understanding potential risks and taking appropriate steps to mitigate them is key to enjoying your homemade heating pad without compromising safety.
Improper construction or use can lead to burns, electric shocks, or other hazards. Following the guidelines below will help ensure a safe and enjoyable experience.
Material Selection and Handling
Choosing the right materials is essential for a safe and effective heating pad. Materials like fabric, insulation, and heating elements must be selected carefully to avoid overheating, electrical shorts, or burns. Improper handling of materials, such as sharp edges or chemical exposure, can also pose risks. Always prioritize safety during material selection and handling.
Electrical Safety Considerations
If using electrical heating elements, stringent safety measures are critical. Improper wiring or connections can lead to electrical shocks, fires, or other hazardous situations. Ensure that all electrical components are properly insulated and rated for the intended use. Adherence to electrical safety regulations is mandatory for any electrical component used in the project.
Construction Techniques
Proper construction techniques are vital for the safety and functionality of the heating pad. Carefully follow the instructions for assembling components and avoid shortcuts that could compromise safety. This includes ensuring the heating element is securely and properly housed within the pad to prevent any risk of exposure or damage. Thoroughness in construction minimizes potential hazards.
Testing and Quality Control
Thorough testing is essential to verify the safety and functionality of your heating pad. Always check for proper insulation, heat distribution, and electrical connections before use. This testing process should cover the entire operation, from initial power application to the final heat distribution. Ensure the heating pad operates within the safe parameters to avoid thermal hazards.
Usage Guidelines and Maintenance
Safe usage is critical for the longevity and safety of the heating pad. Always supervise the heating pad when in use and never leave it unattended. Ensure the heating pad is placed on a stable surface to prevent any accidental tipping or movement. Regular maintenance, including inspection for damage or wear, is important to prevent unforeseen hazards.
Safety Tips for Homemade Heating Pad Construction and Usage
- Use only approved and appropriate materials for the construction of the heating pad. Ensure materials are heat-resistant and suitable for the intended use.
- Adhere to all safety guidelines provided in the instructions for the selected heating element.
- Inspect all electrical connections for any damage or loose wires before use. Avoid any frayed wires or exposed metal.
- Never use a heating pad with damaged or faulty components.
- Always test the heating pad on a low setting before increasing the temperature.
- Do not use the heating pad on or near flammable materials or objects.
- Keep the heating pad away from children and pets.
- Never use the heating pad for prolonged periods without supervision.
- Unplug the heating pad when not in use and store it in a safe and dry location.
- Replace any damaged or worn parts immediately.
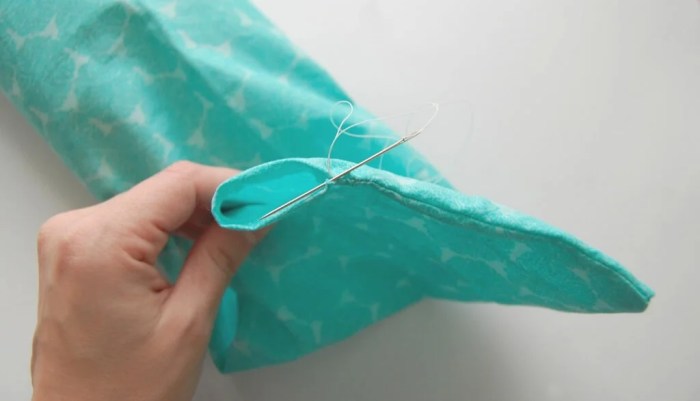
Construction Methods and Procedures

Transforming your materials into a functional heating pad requires careful attention to detail. Each step, from measuring fabric to securing the heating element, plays a crucial role in the final product’s effectiveness and safety. Understanding these procedures ensures a comfortable and reliable experience.Accurate measurements and precise techniques are vital for a safe and effective heating pad. Using a sewing machine and ensuring even seams, for instance, will guarantee that the pad holds its shape and prevents any risk of overheating.
Fabric Wrap Heating Pad
This method is a simple and adaptable way to create a heating pad. The key is selecting the right materials and adhering to the steps to prevent any risks.
- Cut two pieces of fabric, identical in size and shape, to serve as the outer layers. The size should be slightly larger than the area you wish to cover, allowing for overlap.
- Carefully measure and cut a piece of flannel or a similar soft, absorbent fabric. The flannel’s size should be equal to the heating element’s size, allowing for easy placement and minimal contact between the heating element and the outer layers.
- Place the heating element onto the flannel fabric, centering it properly. Ensure that the heating element is not in contact with the outer fabric pieces.
- Fold the flannel over the heating element, securing it with safety pins. This ensures the element remains in place during the sewing process.
- Carefully sew the edges of the flannel fabric together, ensuring a neat and even seam. Use a strong, yet soft stitch, appropriate for the flannel’s texture. This will help to protect the heating element and avoid tears during use.
- Carefully sew the two outer fabric pieces together, matching the edges. Leave a small opening for inserting the heating element and flannel assembly.
- Insert the assembled heating element and flannel assembly into the opening. Double-check that the heating element is centered and protected within the flannel. Ensure that the fabric covers the element completely.
- Close the opening by sewing it securely, ensuring that the stitching is neat and strong. This step is crucial for preventing leaks and maintaining the integrity of the heating pad.
Electric Blanket Heating Pad
Electric blankets are more complex, but provide a wide area of warmth. Understanding the procedures is essential for safety and efficiency.
- Choose an electric blanket that is appropriate for the size of the area you want to heat. Consider the wattage of the blanket to ensure it aligns with the intended usage.
- Carefully measure and cut the fabric that will be used as the cover. The fabric should be large enough to cover the electric blanket, with a slight overlap for a snug fit.
- Lay the electric blanket flat on the chosen fabric. Ensure that the blanket’s wires and connections are not compressed or damaged during the covering process.
- Sew the fabric cover around the electric blanket, ensuring a tight fit. Avoid stretching the fabric during the sewing process, to prevent any damage to the electric blanket.
- Test the electric blanket with the cover to ensure proper function and safety.
Table of Construction Procedures
| Type of Heating Pad | Step 1 | Step 2 | Step 3 |
|---|---|---|---|
| Fabric Wrap | Cut outer fabric pieces and flannel. | Place heating element on flannel, secure with pins. | Sew flannel and outer pieces together, insert element. |
| Electric Blanket | Choose appropriate electric blanket. | Measure and cut fabric cover. | Sew fabric cover around electric blanket. |
Different Filler Options and Their Properties
Choosing the right filler material for your homemade heating pad is crucial for both comfort and effectiveness. Different fillers offer varying levels of heat retention and user experience. This section delves into the various options, highlighting their thermal properties, advantages, and disadvantages.Different materials respond differently to heat and retain it for varying durations. Understanding these differences is key to selecting the ideal filler for your specific needs and preferences.
The following sections provide a comprehensive overview of the most common filler options, guiding you in making an informed decision.
Filler Material Comparison
Various materials can be used as fillers for heating pads, each with unique characteristics. The most common include rice, beans, corn kernels, and water. The choice often depends on factors such as heat retention, comfort, and cost.
Making a homemade heating pad is surprisingly easy – just stuff some fabric scraps into a sock or old t-shirt. But, similar to the precision required in crafting a soothing heating pad, knowing how to select the correct needle size for an injection how to select the correct needle size for an injection is also crucial for safety and efficacy.
Ultimately, both projects emphasize attention to detail for optimal results. Now, back to those cozy heating pads!
Rice
Rice is a popular choice for heating pads due to its affordability and readily available nature. It’s relatively inexpensive and widely accessible. The small grain size helps distribute heat evenly. However, rice can sometimes absorb moisture, potentially leading to a damp or musty odor if not properly stored or maintained.
Beans
Beans offer good heat retention and are often considered a comfortable choice. Their larger size compared to rice allows for a more substantial, supportive feel. The denser nature of beans usually translates to better heat retention compared to rice. However, beans may not distribute heat as evenly as rice.
Making a homemade heating pad is surprisingly easy! Just stuff some old, clean t-shirts or towels into a sock or pillowcase, then pop it in the microwave for a few seconds. Finding the right heating method for your needs can be crucial, especially if you’re looking for a quick, affordable fix for aches and pains. However, if you’re experiencing focus issues, exploring natural alternatives like l tyrosine liquid adderall might be worth considering.
l tyrosine liquid adderall could be a helpful option, though I’m not a medical professional, so always consult a doctor before trying anything new. Once you’ve got your homemade heating pad warmed up, you can relax and enjoy the soothing warmth.
Corn Kernels
Corn kernels, like rice, are a relatively affordable and readily available option. Their small size provides even heat distribution, making them a good alternative to rice. The lightweight nature of corn kernels can make them a comfortable choice for those who prefer a lighter feel. However, corn kernels may not retain heat as long as beans.
Water
Water, while not a solid filler, is an effective and often overlooked choice. A water-filled heating pad can deliver consistent heat over an extended period. This method is particularly useful for maintaining a steady, moderate temperature. However, water-based heating pads require careful sealing to prevent leakage. Also, the weight of the water can make the pad heavier than other types.
Comparison Table
| Filler | Heat Retention | Comfort | Cost |
|---|---|---|---|
| Rice | Moderate | Good | Low |
| Beans | High | Good | Moderate |
| Corn Kernels | Moderate | Good | Low |
| Water | High | Moderate (depends on the setup) | Low |
Adding Heating Elements (Optional)

Adding heating elements to your homemade heating pad elevates its functionality, providing a more powerful and adjustable heat source. This enhancement, however, comes with increased complexity and safety concerns that must be meticulously addressed. Carefully consider the benefits and risks before incorporating heating elements into your design.Incorporating heating elements into your DIY heating pad introduces the possibility of faster heating and greater temperature control.
However, this upgrade requires a more profound understanding of electrical safety and the specific requirements of the chosen heating element. The choice of element significantly influences the overall safety, efficiency, and lifespan of the heating pad.
Safety Precautions and Considerations
Heating elements introduce electrical risks. Extreme caution is paramount. Always use insulated wires, appropriate voltage ratings, and secure connections to prevent short circuits and electrical shocks. Proper insulation and casing are critical to prevent burns. Never operate a heating pad with damaged wiring or connections.
Discontinue use immediately if any unusual smells or sensations are detected. Consult with a qualified electrician if you lack experience with electrical work. Always prioritize safety when handling electrical components.
Types of Heating Elements, How to make a homemade heating pad
Different heating elements offer varying levels of performance and suitability for DIY heating pads. Understanding their characteristics is crucial for selecting the right one. The most common types are discussed below.
Electric Wire
Electric wire, a readily available and relatively inexpensive option, is a popular choice for heating pads. It’s often used in simple designs. The resistance of the wire generates heat when an electrical current flows through it. However, the heat generated depends on the material and gauge of the wire, impacting the overall heating efficiency.
Table: Heating Element Types and Their Characteristics
| Heating Element Type | Pros | Cons | Usage Suggestions |
|---|---|---|---|
| Electric Wire | Relatively inexpensive, readily available, simple to incorporate into existing designs. | Can be less efficient than other options, prone to overheating if not properly regulated, potential for fire hazard if not handled correctly. | Suitable for basic heating pads, potentially needing additional safety measures such as thermal cutoff switches. |
| Ceramic Heating Elements | Efficient heat distribution, high-temperature tolerance, potentially longer lifespan than wire. | More expensive than wire, more complex installation, might require specialized tools. | Excellent for projects needing more consistent and targeted heat output, for instance, in localized heating applications. |
| Carbon Fiber Heating Elements | Very efficient, lightweight, can be thin and flexible. | Can be more expensive than wire, specialized tools may be required. | Suitable for creating thin, flexible heating pads, particularly for body wraps or targeted heating applications. |
Troubleshooting and Maintenance: How To Make A Homemade Heating Pad
Homemade heating pads, while offering a cost-effective and customizable solution for warmth, can sometimes experience issues. Understanding potential problems and their solutions is crucial for ensuring a long and comfortable lifespan for your creations. Proper maintenance practices will not only prolong the life of your heating pad but also ensure its safe operation.Careful consideration of the materials used and the construction process are vital for avoiding common problems.
By understanding the potential pitfalls and implementing preventive measures, you can significantly increase the reliability and longevity of your DIY heating pad.
Common Problems and Solutions
Homemade heating pads, like any other device, can encounter certain issues. Knowing how to identify and resolve these problems will save you time and frustration.
- Leakage or Filler Displacement: A common problem, especially with loose fillers. Over time, the filler material might shift or migrate, potentially leading to uneven heating or creating pockets of air that could affect the evenness of heat distribution. This can also be caused by improper sealing during construction. Ensure that the filler is securely contained within the fabric casing and that the seams are reinforced.
If leakage does occur, carefully remove the affected filler, replace with a similar amount of the same type of filler, and reinforce the affected area.
- Uneven Heating: This can stem from uneven filler distribution, improper placement of the heating element (if applicable), or inadequate insulation. Inspect the filler’s placement to ensure an even distribution throughout the pad. Consider adding extra insulation layers to create better heat retention and prevent the heat from escaping. Ensure the heating element (if used) is properly connected and positioned within the pad for optimal heat dispersion.
- Heating Element Malfunction (if applicable): If you’ve incorporated a heating element, it’s essential to check for signs of overheating, short circuits, or any other malfunctions. This is crucial for safety. Ensure the element’s proper connection and insulation to prevent overheating and fire hazards. If a malfunction is suspected, immediately disconnect the heating pad from the power source and seek professional assistance for repair or replacement.
Maintenance Procedures
Regular maintenance is crucial for prolonging the life and safety of your heating pad.
- Cleaning: Regular cleaning prevents the buildup of dirt and debris, which can affect the heating pad’s performance. For fabric-based pads, gently clean the outer fabric with a mild detergent and water. For filler-based pads, carefully remove the filler and wash the fabric casing as described above.
- Filler Inspection: Periodically check the filler material for signs of wear, damage, or leakage. Replace the filler if any issues are detected, ensuring the replacement material is compatible with the original type and amount. The filler should be checked at least every 3 months, more frequently if used daily.
- Seam Inspection: Inspect seams and stitching regularly, especially after use. Reinforce any weak points or tears to prevent further damage and leakage.
- Electrical Safety (if applicable): For heating pads with heating elements, regularly inspect the electrical connections for damage. Disconnect the pad from the power source before any maintenance work. If you notice any damage to the electrical components, have the heating pad repaired by a qualified electrician.
Handling Filler Issues
Addressing filler problems effectively ensures the longevity and functionality of your heating pad.
- Leaks: If you notice a leak, carefully remove the affected filler. Assess the source of the leak and repair or reinforce any damaged seams or stitching. Use a similar filler material and refill the pad.
- Filler Displacement: To prevent filler displacement, use appropriate filler types for the size and shape of the heating pad. Employ techniques to secure the filler material, such as using a tightly woven fabric or stitching the edges of the filler compartment.
Concluding Remarks
Crafting your own heating pad is a surprisingly satisfying experience, offering both comfort and a deeper connection to your craft. This guide has explored the diverse methods and materials, empowering you to create a personalized heating solution that addresses your unique needs and preferences. From the practical considerations of safety to the joy of personal creation, you now possess the tools to craft a truly comforting homemade heating pad.
Remember to prioritize safety throughout the entire process, and happy crafting!
Leave a Reply